利用者:Sculptorjim/Materials/Properties/Strand
| 2.6 Work in Progress | |
| Please don't edit 2.6 manual "Material" pages until further notice. (sculptorjim, 01/01/2013) |
Strands
The Strand section of the Material editor is specific to the rendering of Hair particles. There are two different strand methods available:
- Polygon strands: This is the default (old) method. The strands are rendered as flat polygons. The number of polygons depend on the Steps settings in the Render panel of the Object context, Particles sub-context.
- Strand Primitive: You activate Strand Primitive with the button Strand render in the Render panel of the particle system. The hair curves are not stored as polygons, but only the key points, which are then converted to polygons on the fly. A second difference is the way transparency works. Rather than rendering them using the existing system, all strand segments in a part are sorted front to back and rendered in that order.
- Strand Primitives
-
- Are more memory efficient and faster, to make rendering of large amounts of fur and grass possible. For good performance, the render steps button should be lowered (e.g. 2 should be good enough fur), since the result will be a smoothed curve anyway. You need 1 to 2 render steps less than steps in the 3D window. Also, using more render parts helps to reduce memory usage.
- Have a distance of vision reduction (in the Render panel under Child Simplification) for children from faces.
- May be faded out towards the tip without an additional texture.
- Are not raytraced. So they are not visible through raytransparent materials or in a raymirror (you can use Environment Mapping for that).
- Have shape problems if they are rendered with a greater width.
- Can not carry an UV-Texture along the strand.
- Polygon strands
-
- Work well with greater width, so you can use them as an alternative to billboards because the strands may have an animated shape.
- Can be textured with an UV-Texture along the strands.
- Are seen by raytracing.
Strands Shading
Strands are rendered with the material of the underlying face/vertex, including shading with an UV-Texture. Since you can assign more than one material to each face, each particle system may have it’s own material and the material of the underlying face can be different from the material of the strands.
Additionally strands can be shaded along the strand (from root to tip) with a mono-dimensional texture, only polygon strands can carry a two-dimensional UV-Texture.
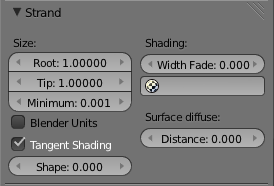
The options for the strand shading are in the Strands section of the Material context.
- Root
- Width of the hair at the root.
- Tip
- Width of the hair at the tip.
- Minimum
- This is the minimum thickness (in pixels) of the strands. Strands below that size are not rendered smaller, but are faded to alpha (well, the fading works only for strand primitives). This gives a much better renderering result for thin hair.
- Blender Units
- Normally strands are quite thin, the thickness is given in screenpixels. If you use Blender units (BU) you may set the root value up to 2 BU, the tip value up to 1 BU. You have to consider the overall object size, because the smallest possible size is 0.001 BU. So if you use 1 BU for 1 meter the smallest possible size would be 1 mm (too thick for thin hair).
- Use Tangent Shading
- Calculates the light as if the strands were very thin and round. This makes the hair appear brighter and shinier. Disabling the “Tangent Shading” option will still render nicely, but resembles more solid strands, as though made of metal or wood.
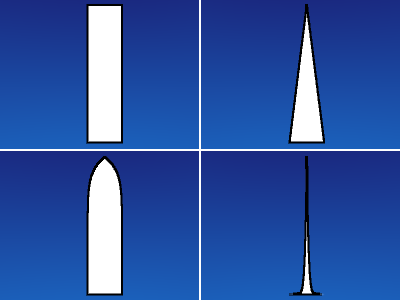
- Shape
- This slider allows you to control the interpolation. Default (0.0) is a linear interpolation between Root and Tip. A negative value will make the strand narrower (spiky), a positive value will make it fatter.
- Width Fade
- To fade out along the width of the strand. This works only for Strand Primitives. 0.0 is no fading at all, 1.0 linear fading out.
- UV Layer
- You can texture the polygon strands with an UV-Texture. Fill in the name of the UV-Set (not the texture) here. You have to load the texture also in the Shading context, Texture and Material sub-contexts (Mapping: UV; you may use every Influence setting you like - especially the alpha value, see Image 3).
- Surface Diffuse
- Computes the strand normal taking the normal at the surface into account. This eases the coloring and lighting of hair a lot, especially for Strand Primitives. Essentially hair reacts similar like ordinary surfaces and don’t show exaggerated strong and large specular highlights.
- Distance
- The distance in Blender units over which to blend in the normal at the surface (if you want to use Surface Diffuse only for Grass/Fur in greater distance).
Texturing along the Strand
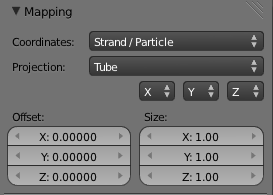
Strands can be textured along the strand, i.e. from root to tip. To do that you have to select Strand/Particle in the Coordinates dropdown in the Maping panel of the Material sub-context.
Pretty much the most important setting is shown in (Image 4), how to fade the tip of a strand to alpha to make nice, fuzzy looking hair. Normally you would use a linear blend texture for this.
You may of course set any attribute you like, especially color. Be careful with specularity, hairs tend to get to shiny.
Strand render Simplification
If you use Strand Primitives (Strand render button) and have activated Interpolated Children, the Child Simplification option appears. The strand render has options to remove child strands as the object’s faces become smaller.
- Reference Size
- This is the approximate size of the object on screen (in pixels), after which simplification starts.
- Rate
- How fast strands are removed.
- Transition
- The transition period for fading out strands as they are removed.
- Viewport
- This removes strands on faces that are outside of the viewport.
- Rate
- Controls how fast these are removed.


