利用者・トーク:JackEden
Introduction
The rendering control panel is accessed by clicking on the Render button in the Properties Panel header.
These buttons are organized into sub panels, which are:
Render
- Render - controls whether an animation or still is rendered and where the rendered image is displayed within blender
Render Layers
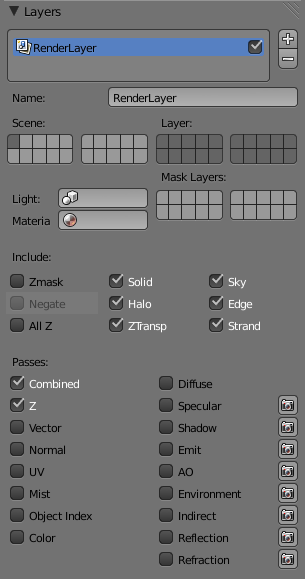
- Render Layers - controls which layers and passes are rendered
Render Dimensions
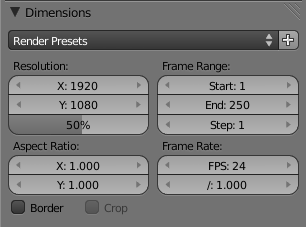
- Render Dimensions - sets the output dimensions as well as frame range when rendering an animation
Anti-Aliasing
- Anti-Aliasing - sets degree of anti-aliasing
Motion Blur
- Motion Blur - sets how many motion blur samples are rendered and the percentage of time of each frame they are spread out across
Shading
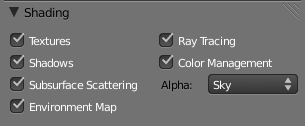
- Shading - sets which shading of objects is rendered
Output
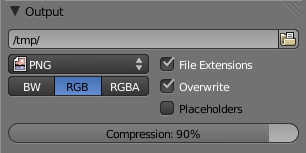
- Output - controls the output file type and place of the render pipeline
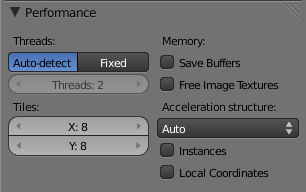
Performance
- Performance - set number of threads (for multi-processor machines) and number of tiles that the render image is broken into during rendering
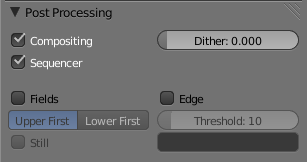
Post Processing
- Post Processing - turn on or off the compositor and sequence editor for rendering
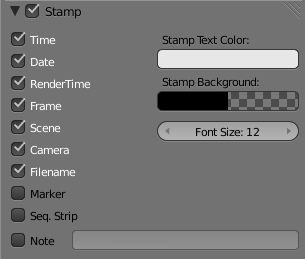
Stamp
- Stamp - Stamp rendered frames with identification, configuration, and rendering data
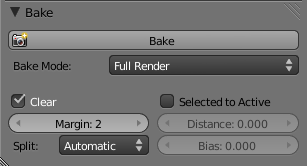
Bake
- Bake - pre-computes certain aspects of a render
Tabs
To save screen space, some of the panels may be tabbed under another; for example, the Layers panel is a tab folder under the Output panel. To reveal it, simply click the tab header.
|
Yafray
If you have installed Yafray, options to control it will appear as two tabs under the Render panel once you have selected it as a rendering engine
|
Overview
The rendering of the current scene is performed by pressing the big RENDER button in the Render panel, or by pressing F12 (you can define how the rendered image is displayed on-screen in the Render Output Options). See also the Render Window.
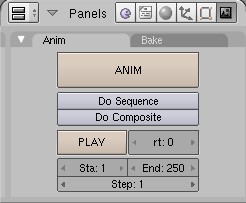
A movie is produced by pressing the big ANIM animation button in the Anim panel. The result of a rendering is kept in a buffer and shown in its own window. It can be saved by pressing F3 or via the File->Save Image menu using the output option in the Output panel. Animations are saved according to the format specified, usually as a series of frames in the output directory. The image is rendered according to the dimensions defined in the Format Panel (Image types and dimensions.).
- Workflow
In general, the process for rendering is:
- Create all the objects in the scene
- Light the scene and position the camera
- Render a test image at 25% or so without oversampling or raytracing etc. so that it is very fast and does not slow you down
- Set and Adjust the materials/textures and lighting
- Iterate the above steps until satisfied at some level of quality
- Render progressively higher-quality full-size images, making small refinements and using more compute time
- Save your images
Render Workbench Integration
Blender has three independent rendering workbenches which flow the image processing in a pipeline from one to the other in order:
- Rendering Engine
- Compositor
- Sequencer
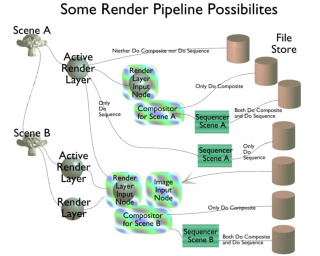
You can use each one of these independently, or in a linked workflow. For example, you can use the Sequencer by itself to do post processing on a video stream. You can use the Compositor by itself to perform some color adjustment on an image. You can render the scene, via the active Render Layer, and save that image directly, with the scene image computed in accordance with the active render layer, without using the Compositor or Sequencer. These possibilities are shown in the top part of the image to the right.
You can also link scenes and renders in Blender as shown, either directly or through intermediate file storage. Each scene can have multiple render layers, and each Render Layer is mixed inside the Compositor. The active render layer is the render layer that is displayed and checked active. If the displayed render layer is not checked active/enabled, then the next checked render layer in the list is used to compute the image. The image is displayed as the final render if Do Composite and Do Sequence are NOT enabled.
If Do Composite is enabled, the render layers are fed into the Compositor. The noodles manipulate the image and send it to the Composite output, where it can be saved, or, if Do Sequence is on, it is sent to the Sequencer.
If Do Sequence is enabled, the result from the compositor (if Do Composite is enabled) or the active Render layer (if Do Composite is not enabled) is fed into the Scene strip in the Sequencer. There is is manipulated according to the VSE settings, and finally delivered as the image for that scene.
Things get a little more complicated when a .blend file has multiple scenes, for example Scene A and Scene B. In Scene B, if Do Composite is enabled, the Render Layer node in Scene B's compositor can pull in a Render Layer from Scene A. Note that this image will not be the post-processed one. If you want to pull in the composited and/or sequenced result from Scene A, you will have to render Scene A out to a file using Scene A's compositor and/or sequencer, and then use the Image input node in Scene B's compositor to pull it in.
The bottom part of the possibilities graphic shows the ultimate blender: post-processed images and a dynamic component render layer from Scene A are mixed with two render layers from Scene B in the compositor, then sequenced and finally saved for your viewing enjoyment.
These examples are only a small part of the possibilities in using Blender. Please read on to learn about all the options, and then exercise your creativity in developing your own unique workflow.
Sequencer from/to Compositor
To go from the Compositor to the Sequencer, enable both "Do Sequence" and "Do Composite". In the Compositor, the image that is threaded to the Composite Output node is the image that will be processed in the Scene strip in the VSE.
The way to go from the Sequencer to the Compositor is through a file store. Have one scene "Do Sequence" and output to an image sequence or mov/avi file. Then, in another scene, "Do Composite" and using an image input node to read in the image sequence or mov/avi file.
Render Window Options
Once you press F12 or click the big Render button, your image is computed and display begins. Depending on the Output Panel Option, the image is shown in a separate Render Window, Full Screen, or in a UV/Image Editor window.
You can render a single frame, or many frames in an animation. You can cancel the rendering by pressing Esc. If rendering a sequence of frames, the lowest number frame is rendered, then the next, and so on in increasing frame number sequence.
The Render Window can be invoked in several ways:
- Render Panel->Render or F12
- renders the current frame, as seen by the active camera, using the selected renderer (Blender Internal or Yafray)
- 3D View Window Header->LMB
 OpenGL Render button (far right)
 - Renders a quick preview of the 3D View window
- Anim Panel->Anim CtrlF12
- Render the Animation from the frame start to and included in the End frame, as set in the Anim panel.
- 3D View Window Header->CtrlLMB
 OpenGL Render button (far right)
 - Renders a quick animation of the 3D View window using the fast OpenGL render
Output Options needs to be set correctly. In the case of Animations, each frame is written out in the Format specified.
Rendering the 3D View Animation using the OpenGL is useful for showing armature animations.
Showing Previous Renders
If the Blender Internal render was used to compute the image, you can look at the previous render:
- Render->Show Render Buffer
- F11 - Pops up the Render Window and shows the last rendered image (even if it was in a previously opened & rendered .blend file).
- Render->Play Back Rendered Animation
- CtrlF11 - Similar as for the single frame, but instead plays back all frames of the rendered animation.
Render Window usage
Once rendering is complete and the render window is active, you can:
- A - Show/hide the alpha layer.
- Z - Zoom in and out. Pan with the mouse. You can also mousewheel to zoom
- J - Jump to other Render buffer. This allows you to keep more than one render in the render window, which is very useful for comparing subtleties in your renders. How to use it:
- Press Render or F12
- Press J to show the empty buffer (the one we want to "fill" with the new image)
- Go back to the Blender modeling window. You can send the render window to the background by pressing Esc. Do not close, or minimize the render window!
- Make your changes.
- Render again.
- Press J to switch between the two renderings.
- LMB
 - Clicking the left mouse button in the Render window displays information on the pixel underneath the mouse pointer. The information is shown in a text area at the bottom left of the Render output window. Moving the mouse while holding the LMB
  will dynamically update the information. This information includes:
- Red, Green, Blue and Alpha values
- Distance in Blender Units from the camera to the pixel under the cursor (Render Window only)
For Alpha values to be computed, RGBA has to be enabled. Z-depth (distance from camera) if computed only if Z is enabled on the Render Layers tab.
Step Render Frame
Blender allows you to do faster animation renders skipping some Frames. You can set the step in the Render Panel as you can see in the picture.
Once you have your video file rendered, you can play it back in the real speed (fps). For that you just need to set the same Step parameter you used to render it.
If you play the stepped video in a normal speed in an external player, the general speed will be *Step* times faster than a video rendered with all the frames (eg. a video with 100 frames rendered with Step 4 @ 25 fps will have only 1 second. The same video rendered with Step 1 (the default value) will have 4 seconds of length).
If you want to use this parameter for rendering through command line you can use -j STEP, where STEP stands for the number of steps you want to use.
If you want to use this parameter for playing video files through the command line, you need to use the parameter -j STEP following the -a (which stands for the playback mode).
./blender -a -s 1 -e 100 -p 0 0 -f 25 1 -j 4 "//videos/0001.jpg"
- Rendered stepped frames with output video format such as FFMpeg (always) or AVI Jpeg (sometimes) produce a corrupted video (missing end frames). in Blender 2.48a. Therefore the rendered video can't be played-back properly.
Therefore I suggest to work with the video output format of JPG, it works fine all the time.
Distributed Render Farm
There are several levels of CPU allocation that you can use to decrease overall render time by applying more brainpower to the task.
First, if you have multi-core CPU, you can increase the number of threads, and Blender will use that number of CPUs to compute the render.
Second, if you have a local area network with available PC's, you can split the work up by frames. For example, if you want to render a 200 frame animation, and have 5 PC's of roughly equal processing power, you can allocate PC#1 to produce frames 1-40, PC#2 to frames 41-80, and so on. If one PC is slower than the others, simply allocate fewer frames to that PC. To do LAN renders, map the folder containing the .blend file (in which you should have packed your external data, like the textures, …) as a shareable drive. Start Blender on each PC and open the .blend file. Change the Start and End frame counts on that PC, but do not save the .blend file. Start Rendering. If you use relative paths for your output pathspec, the rendered frames will be placed on the host PC.
Third, you can do WAN rendering, which is where you email or fileshare or Verse-share the .blend file (with packed datas!) across the Internet, and use anyone's PC to perform some of the rendering. They would in turn email you the finished frames as they are done. If you have reliable friends, this is a way for you to work together.
Fourth, you can use a render farm service. This service, like BURP, is run by an organization. You email them your file, and then they distribute it out across their PC's for rendering. BURP is mentioned because it is free, and is a service that uses fellow BlenderHead PC's with a BOINC-type of background processing. Other services are paid subscription or pay-as-you-go services.
目次
- 1 Introduction

