利用者:Greylica/Doc:2.6/Manual/Modeling/Meshes/Editing/Duplicating/Spin
Spin Tool
Mode: Edit Mode
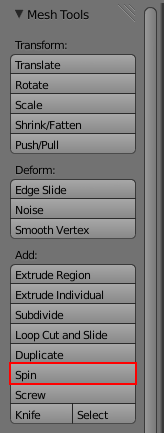
Panel: Edit Mode → Mesh Tools (shortcut T) → Add → Spin
Introduction
The Spin tool makes connected duplicates of the selected mesh elements, open or closed, and at the same time, will distribute them evenly through a circular defined center. This tool is used to make circular profiles like donuts, cups, and also some specific profiles through the angle, steps and axis control.
Description
This tool is used with selected mesh profiles in the Edit mode of the 3D View window.
This tool works using open or closed profiles, as well as profiles closed with faces. You can use profiles like an open edge part that it's a part of a complete piece, as well as a closed circle or a half cutted sphere, wich will also close the profile ending.
When used with closed volumes, this tool will make unconnected duplicates of the same selected volume (volume is a closed mesh, like a cube, an uvsphere, etc), in fact, resulting on a Spin Dup operation.
Usage
This tool works in the Edit mode of the 3DView Window, To use this tool, you will need a starting profile, and also you will need to define a starting center of the Spin process through the cursor positioning and 3D Window view.
This tool will make extrusions (creating faces) of a defined profile using the number of steps defined by the user, and will evenly distribute them through a user defined angle. If you use closed volumes, it will make copies of them and will evenly distribute them through a user defined angle (working a like a Spin Dup .
Options
This tool is an interactive and modal tool, and only works in the Edit Mode.
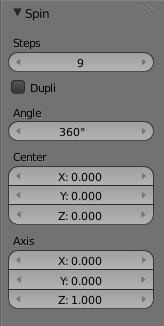
Once you click in the Spin tool in the Mesh Tools Panel, Blender will enter in the Spin interactive mode, and the Operator Panel at the end of the Mesh Tools Panel will be replaced where you can adjust the values explained below. To show the Mesh Tools Panel, use the shortcut T in the Edit Mode of the 3D View Window.
Once you perform any other operation, Blender leaves the interactive mode and accepts all of the values. Because it's modal, you can't return to the interactive mode after completing/leaving the operation or changing from Edit Mode to Object Mode. If you want to restart the operation from it's beginning, you can hit CtrlZ at any time in Edit Mode.
The basic location of the cursor at the point of view (using Global coordinates) will determine around which axis the selection is extruded and spined at first. Blender will copy your cursor location coordinates to the values present in the Center values of the Spin interactive Panel. Depending on the Global View position, Blender will automatically add a value of 1 to the one of the Axis Vectors, giving the profiles a starting direction for the Spin Operation and also giving a direction for the extrusions.
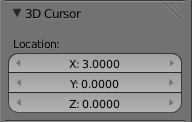
The position of the 3D cursor will be the starting center of the rotation. Subsequent operations (E.G. pressing the Spin button again), will start from the last selected profile or volume. Continuous operations without changing selection will repeat the operation continuously from the last point.
- Steps
- Specifies how many extrusion or copy steps will be evenly distributed along the user defined angle.
- Dupli
- When disabled (default), it will extrude the selected profile conecting its vertex and creating faces automatically.
- When enabled, will make a Spin Dup operation, it will duplicate elements without conecting them.
- Angle
- Specifies the user defined angle in which the profile will be extruded. For closed volumes, it will duplicate and distribute them evenly through the defined user angle even if the dupli check box is not marked. Minimum value 0 (No spin through the axis center), and maximum 360 (a complete turn through the axis center)
- Center
- Those numeric fields specifies the center of the Spin. When the tool is called for the first time, it will copy the X, Y and Z location (Global Coordinates) of the cursor present in the 3D View to start the operation. You can specify the cursor coordinates using the Transform Panel in 3D View, using shortcut T to toggle the Panel, and typing in the 3D Cursor Location coordinates but, unlike in previous Blender Versions (prior to 2.5x), now you can adjust those coordinates interactively and specify another place for the spin center during the interactive session.
- Axis
- Those 3 numeric fields vary from -1.0 to 1.0 and are clamped above those limits. Those values are corresponding to angular vectors from -90 to 90 degrees. Depending on the position you started your cursor location and profile operation at the viewport and it's axis positions in Global View space and coordinates, Blender will give the proper Axis vector a value of 1, giving the angular vector of the profile a starting direction and giving the extrusions a starting direction based on your view. Blender will let you adjust your axis angular vectors and you can tweak your object in a way you can revert the direction of the Spin operation, meaning you can revert the clockwise and counterclockwise direction of the Spin operation, and also adjust the angular vectors of your profile, bending it accordingly.
Examples


