利用者:Intracube/Conversion/Import-Export
目次
Importing/exporting video sequences with Blender
Introduction
Blender can natively read and write a wide range of video formats using Ffmpeg's libraries, but it's possible to get better quality results by pre-processing and converting footage to intermediate formats (like PNG image sequences) prior to import. The same is true of exporting; it's better to export a lossless image sequence and encode using a dedicated program like Ffmpeg or x264, which will let you fine tune the process to get the best out of your renders.
There are a few gotchas with digital video, such as:
- interlacing
- colorspaces
- aspect ratio
- active picture area
which need to be handled properly to ensure good results. This page will cover these and related issues.
| Tip | |
| Make sure to use an up to date version of Ffmpeg! The examples on this page have been tested with version 2.0.1. |
Common import examples
This section assumes you already understand about video formats/issues and cuts straight to some common processing/filtering examples. See the bottom of the page for more detailed descriptions.
Convert video to PNG sequence
Interlaced D1/DV/DVD/HD (PAL and NTSC framerates) to progressive 50p/59.94p - each field becomes a frame:
ffmpeg -i input.mov -vf yadif=1 %04d.png
Interlaced D1/DV/DVD/HD (PAL and NTSC framerates) to progressive 25p/29.97p - field pairs are combined:
ffmpeg -i input.mov -vf yadif=0 %04d.png
Notes
- Progressive source
- It isn't necessary to use the Yadif or similar filter if the source is progressive or there is no time difference between the field pairs.
- Colorspace
- Ffmpeg should choose the correct colorspace automatically depending on the resolution of the source (Rec.601 for SD, Rec.709 for HD).
- Resolution
- Normally the project resolution should match the source material but a custom resolution can be set using the scale filter. Make sure the Yadif filter is always before any other filters otherwise the field interleaving could get damaged and lead to double image artifacts:
ffmpeg -i input.mov -vf yadif=1,scale=1920:1080 %04d.png
- Active picture area
- Unused parts of the frame (for example letterboxing) can be cropped
ffmpeg -i input.mov -vf yadif=1,crop=1920:804,scale=1280:536 %04d.png
By default, the frame will be cropped evenly from all sides. To change the alignment of the cropping:
ffmpeg -i input.mov -vf yadif=1,crop=1920:804:0:80 %04d.png
(the example above will vertically position the top of the cropped frame to be 80px below the top of the original frame.) The basic syntax for the crop filter is:
crop=output_width:output_height:horizontal_alignment:vertical_alignment
where horizontal_alignment is the distance from the left edge of the original frame to the left edge of the cropped frame. vertical_alignment is the distance from the top edge of the original frame to the top edge of the cropped frame. It's possible to have one axis automatically centered while shifting the other axis. To do this, omit one of the shift values but keep both colons.
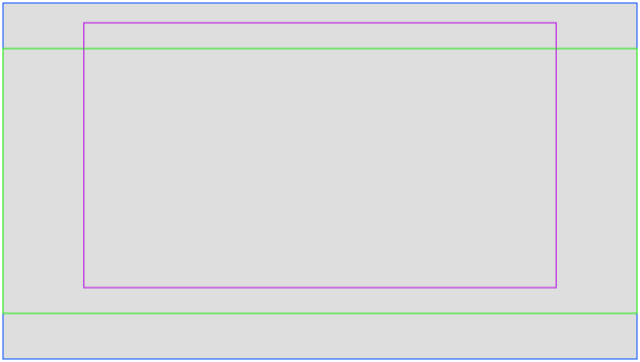
- Blue: original frame (1920x1080)
- Green: crop=1920:804 (centered on both axis)
- Magenta: crop=1432:804::80 (centered horizontally, shifted vertically 80px from the top)
Common export examples
Although Blender can encode to many common video formats directly, not all encoding parameters are available through the user interface. As such, it's better to export an image sequence and encode with Ffmpeg (or equivalent encoder).
Convert PNG image sequence to H.264 video
Note
Make sure that the Render->Output panel is set to PNG, RGB, 8bit
|
50p image sequence to 50p H.264:
ffmpeg -r 50 -i %04d.png -pix_fmt yuv420p -c:v libx264 -crf 16 output.mp4
50p image sequence to interlaced H.264:
ffmpeg -r 50 -i %04d.png -pix_fmt yuv420p -c:v libx264 -crf 16 -flags +ildct+ilme -x264opts tff=1 -vf tinterlace=4 -r 25 output.mp4
59.94p image sequence to 59.94p H.264:
ffmpeg -r 60000/1001 -i %04d.png -pix_fmt yuv420p -c:v libx264 -crf 16 output.mp4
59.94p image sequence to interlaced H.264:
ffmpeg -r 60000/1001 -i %04d.png -pix_fmt yuv420p -c:v libx264 -crf 16 -flags +ildct+ilme -x264opts tff=1 -vf tinterlace=4 -r 30000/1001 output.mp4
Convert PNG image sequence to MPEG2 video
[todo]
Convert PNG image sequence to lossless compressed video
[todo]
More info and links
[todo]
