利用者:Koilz/wiki - doc kia - UI - Keyframe Animation
目次
UI - Keyframe Animation
- Here are some common ways to animate objects by adding keyframes.
- These methods can be used on different objects, like armature bones in pose mode.
Insert Keyframe
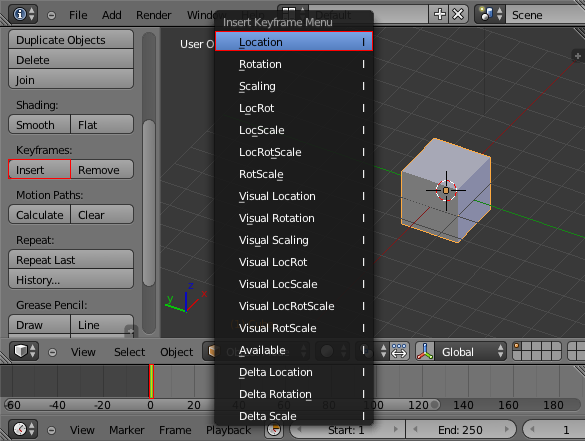
- With a Mesh Object selected in Object Mode, and the frame set in the Timeline. In the 3D View Tools press the 'Insert Keyframe' button, or press I in the 3D View to bring up the 'Insert Keyframe Menu'.
- Select 'Location', this will record the location of the Mesh Object on the frame the Timeline cursor is set.
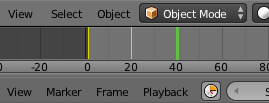
- Set the Timeline cursor to a different frame, move the Mesh Object, then insert another keyframe.
- The keyframes are displayed in yellow on the Timeline. Move the Timeline cursor to test the animation.
Keying Sets
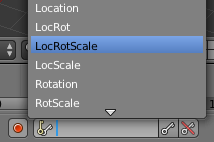
- Keying Sets are a set of keyframes in one. They are made to record multiple properties at the same time. There are some built in keying sets, and also custom keying sets.
- Use the keying set menu in the Timeline editor, to select a keying set. Now when you insert a keyframe, blender will add keyframes for the selected keying set.
- See Reference - Timeline for more info.
- See Reference - Keying Sets for more info.
Auto Keyframe
- Auto Keyframe is the red record button.
- Auto Keyframe adds keyframes automatically to the set frame after setting the location, rotation, scale, etcetra, of the selected object in the 3D View.
- See Reference - Timeline for more info.
Keyframe Properties
- Keyframes can be used to animate lots of properties in blender.
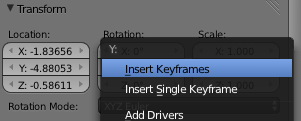
- To add keyframes to a property on the UI, RMB
 the property, then select Insert Single Keyframe, or Insert Keyframes.
 - Insert Keyframes will add a keyframes to the set of properties.
Keyboard
- The keyboard can also be used to add keyframes.
- I: Insert keyframe to the set frame.
- Alt+i: Remove keyframe from the set frame.
- Alt+shift+i: Remove all keyframes from the UI property.
Keyframe Settings
- Most of the low level settings for the keyframes are found in the Graph Editor.


