利用者:Pepribal/Ref/Appendices/MeshTopo
目次
[非表示]Mesh topology notes
Meshes are made up of vertices, edges and faces. One edge connects two vertices. Faces are made up of 3 or more edges. Faces are defined by the number of edges (or vertices) they have. A face with 3 edges (or vertices) is a triangle. One with 4 vertices is a quad. With more edges, it's an N-gon. Faces are renderable, as they represent a surface, while vertices and edges are not. Edges are always straight. All the vertices of any given face should be co-planar, or almost co-planar. With triangles, this is always met. In the case of quads, it's easy to have them almost co-planar. With N-gons, one must be careful, as they are only useful for defining flat portions of the surface; for curved surfaces, triangles and quads are more suitable. However, quads are much preferred, as triangles can pose problems when animating or subdividing. Only when the mesh is not meant to be subdivided or animated, triangles are acceptable.
Edge loops
Edge (and face) loops are used in organic modeling, specially when the mesh shape has to be animated (deformed) in a non linear way.
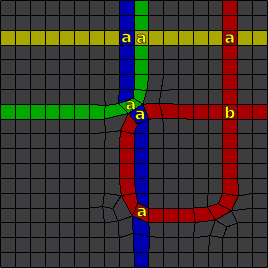
An edge loop is a set of connected edges which follows the middle edge in every 4-way junction. A 4-way junction is a vertex connected to 4 edges. So if you follow an edge until one such vertex, you will find 3 possibilities (edges) to continue the loop: the one in middle must be taken to make a proper edge loop.
Any vertex connected to a number of edges different than 4, is called a pole. There are specific types of pole: a 3-way junction vertex is a N-pole, while a 5-way junction vertex is called an E-pole.
Edge loops can be cyclic or terminate at:
- a pole,
- a hole,
- or a boundary.
You can consider a boundary as an infinite hole.
Blender recognizes as edge loops, in addition, special sets of edges:
- A series of connected edges in boundaries or holes that go through junctions other than 2-way ones. These last act as loop terminators.
- A series of connected edges in boundaries or holes that go through 2-way junctions. A junction other than a 2-way one will act as a terminator for the loop.
When N-gons are involved
Loops are essential in animated surfaces that deform themselves (shrink, crease, stretch,...). That applies to organic modeling and animation, mainly. Loops should be placed following the deformation lines of the surfaces, otherwise this can lead to ugly visible tensions on the surface. In case of animated beings, that means loops should follow the deforming muscles. There is a lot of theory about how to model, use edge loops, manage poles, etc. to build proper animable models. However this is out of the scope of this reference.
To select edge loops, use 3D View » Select » Edge Loop in edit mode, in vertex or edge selection mode, and all the edge loops where the selected edges belong will be selected. You can also use AltRMB ![]() or ⇧ ShiftAltRMB
or ⇧ ShiftAltRMB ![]() to select the edge loop where the edge on which you click belongs. This tool needs the edges to be connected to faces; otherwise what this tool will do is to select all the connected wireframe geometry.
to select the edge loop where the edge on which you click belongs. This tool needs the edges to be connected to faces; otherwise what this tool will do is to select all the connected wireframe geometry.
Edge rings
An edge ring is a set of unconnected edges that follow a "path" defined by the 2 opposite edges of every quad. You can see it as the steps of a ladder. A ring can be built manually following these steps:
- Take any edge in a quad as a starting point and add it to the ring (initial edge).
- The opposite edge in the quad also belongs to the edge ring: add it to the ring.
- For each edge added, if the new edge is shared with another quad, add the opposite edge in that quad to the ring. Repeat this step until the ring is finished.
Edge rings can be cyclic, or terminate at:
- a hole,
- a boundary,
- or an non-quad face (triangle or N-gon).
All the edges in the ring belong to 2 quads, except a terminating edge, that can belong to just one quad, or be shared by a quad and a non-quad.
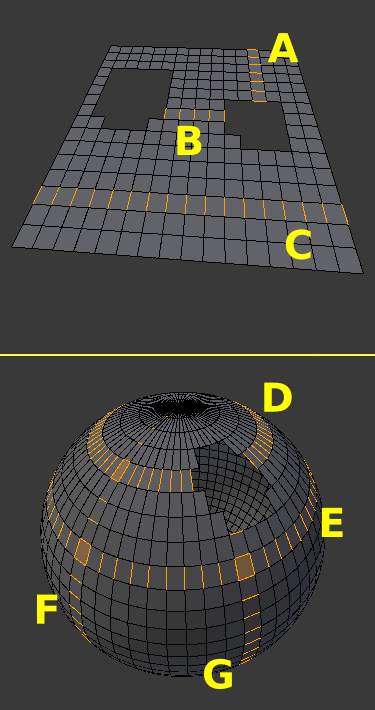
Usually, 2 edge rings run across every quad: one running in the direction of two opposite edges, and the other in the direction of the other 2. It can happen though that the same edge ring runs twice across one quad (self intersecting edge ring). In Edge rings you can see examples of intersecting edge rings: E ring intersects with G and F; F ring intersects also with D ring. Notice that all 4 edges are selected in the intersection quads.
To select edge rings automatically, use 3D View » Select » Edge Ring in edit mode, in vertex or edge selection mode, and all the edge rings where the selected edges belong will be selected. You can also use CtrlAltRMB ![]() or ⇧ ShiftCtrlAltRMB
or ⇧ ShiftCtrlAltRMB ![]() to select the edge ring where the edge on which you click belongs.
to select the edge ring where the edge on which you click belongs.
Face loops
A face loop is made up of all the quads (and only quads) that provide edges in an edge ring. Every edge ring has a direct relation to a face loop and vice versa.
Usually, 2 face loops run across every quad: one running in the direction of two opposite edges, and the other in the direction of the other 2. It can happen though that the same face loop runs twice across one quad (self intersecting face loop).
To select face loops, use CtrlAltRMB ![]() , ⇧ ShiftCtrlAltRMB
, ⇧ ShiftCtrlAltRMB ![]() , CtrlAltRMB
, CtrlAltRMB ![]() or ⇧ ShiftCtrlAltRMB
or ⇧ ShiftCtrlAltRMB ![]() in edit mode, in face selection mode, to select the face loop where the face on which you click belongs. The face loop selected will be the one running on the direction of the edge closest to the point where you click.
in edit mode, in face selection mode, to select the face loop where the face on which you click belongs. The face loop selected will be the one running on the direction of the edge closest to the point where you click.
Manifold and non-manifold geometry
Non-manifold geometry means unreal geometry. Bear in mind that polygon faces have 0 thickness, so a mesh with boundaries is unreal. A manifold mesh is a mesh the edges (and vertices) of which are all manifold. Intuitively, a manifold surface completely defines (wraps) a closed volume, without intersecting itself, and it has no open holes or boundaries. Non-manifold geometry is inconsistent and is considered bad topology: some operations cannot be taken on non-manifold meshes, due to the fact that it cannot be determined which side of the surface is 'in' and which side is 'out'.
To select all non-manifold geometry of a mesh object, use 3D View » Select » Non Manifold (⇧ ShiftCtrlAltM) in edit mode, in vertex or edge selection mode.
There are several types of non-manifold geometry. If we take a look at the Redo Panel, besides defining if we want to extend the selection or not, we can select what type of non-manifold geometry we want to select:
- Wire: all edges that don't belong to any face.
- Boundaries: boundary edges.
- Multiple Faces: edges that belong to 3 or more faces.
- Non Contiguous: edges that belong to 2 faces which have opposite normals.
- Vertices: vertices belonging to wire edges; vertices belonging to multiple faces edges; isolated vertices; vertices that are the only means of connection between faces (0-width geometry).
Topology mirror
When editing meshes, there is the option to edit one side of the mesh, so that the other side follows the actions performed. This can be achieved by ticking X Mirror (Mesh Options panel, in the Tool Shelf). What this tool does is to mirror all the actions of every vertex into its matching vertex on the other side of the mesh.
The matching vertex is the perfectly symmetric vertex of the one being modified. That symmetry is calculated along the local X axis, that is, the local YZ axis acts as a mirror. Those vertices that have no matching vertex at the precise position on the other side of the mirror will not produce a mirrored action on the other side.
However, if mirroring is activated, we have an additional option: ticking Topology Mirror matching vertex pairs will be calculated differently. Instead of using vertex spatial location, the topology position of the vertex will be taken into account.
The topology position of a vertex is calculated using a unique identifier number (UID) based on the amount of neighbour vertices (connected to it via an edge), and on the UID of those neighbours, which at the same time will take into account the UID of their neighbours, and this will continue recursively until all the mesh is taken into account. If vertices are houses and edges are streets, the UID of a vertex would be comparable to unique directions to the specific house.
If a mesh has no topological symmetry, then all its vertices have a unique UID. However, if the mesh is perfectly symmetric topologically, then every vertex will share the same UID with the corresponding vertex on the other side. That is, both vertices will have the same directions (in either side). In that case, when a vertex is moved around and topology mirror is active, the matching vertex will receive the mirrored actions along the local X axis (across the local YZ plane).
However, if the the vertex has more than one match, then nothing will be done. That is the case, for instance, of a cube, a UV sphere or a grid primitive, as they are symmetric across multiple planes. To make them suitable for topology mirror, those symmetries must be broken except for one single symmetry plane.


