利用者:Psy-Fi/Moar texture Paint/UserDoc
Implemented tools in GSOC 2013 include:
目次
Sharpen Tool
Based on unsharp masking, a new tool has been added as a negative to the soften brush. By selecting "Sharpen" in the UI or pressing CtrlLMB ![]() with the soften tool, the sharpen tool is used instead. Also, the soften tool has been imporoved as well, by allowing custom blur kernel sizes, as well as an extra blur kernel, gaussian apart from box. A sharpen threshold value controls the threshold for edge detection for application of the sharpen tool.
with the soften tool, the sharpen tool is used instead. Also, the soften tool has been imporoved as well, by allowing custom blur kernel sizes, as well as an extra blur kernel, gaussian apart from box. A sharpen threshold value controls the threshold for edge detection for application of the sharpen tool.
Sharpen filters need subtlety, make sure that low brush strength is used.
Fill Tool
In texture painting, a new fill tool is available. To use it, while in an image paint mode, select the fill tool from the Brush sub-menu in the toolbar. It can be used to fill the image with a the brush color. For projective texturing it will use the options for projective painting to paint the model. That means that occluded, backfacing, stenciled and normal culled faces will not get filled unless the options are deactivated in the projection paint panel. Also, it is still currently limited to filling the part of the mesh within screen boundaries (will be fixed).
The fill tool allows the use of gradient to fill the image. This gradient may defined by clicking the "Use Gradient" checkbox. There are two modes available, radial and linear, each filling the image in the respective way. To define the gradient colors, a color band widget appears in the brush color section, that helps the user define the gradient color and alpha. To apply the gradient, the user must click and drag on the image to define the gradient line, or radius, if radial gradient is used.
Gradient Strokes
In texture painting, the user can use a gradient as a source for color. This gradient may defined by clicking the "Use Gradient" checkbox. The gradient source drop down menu allows three sources for gradient colors, pressure repeat and clamp. To define the gradient colors, a color band widget appears in the brush color section, that helps the user define the gradient color. Alpha is not yet taken into consideration for blending operations.
The gradient sources operate as follows:
Pressure will choose a gradient color from the color band according to the stylus pressure, while clamp and repeat will alter the color automatically by the distance covered by the brush and as specified by the gradient spacing field, with clamp using the last color of the color band after the specified and repeat resetting the color to the first color in the color band and repeating the pattern.
Palettes
Colour palettes are supported in blender. To add a palette you can find a palette block under the brush colours in the toolbar. Palette colours can be added in two ways. Pressing the + icon in the palette will copy the current brush colour into the palette, and sampling with S and pressing LMB ![]() .
.
The palette colours can be changed by CtrlLMB ![]() and using the colour swatch.
and using the colour swatch.
To delete a palette colour, hover over it and press Del. Colour drag'n drop support has now been added too.
Brushes can use two colours.
One is the primary colour and the second, displayed below the primary is the background or secondary colour.
To paint with the secondary colour use CtrlLMB ![]() To switch between the two colors use X
To switch between the two colors use X
Opacity Control
It is now possible to explicitly disable opacity masking by clicking the accumulate checkbox under the colour wheel in the brush. This will allow a stroke to accumulate on itself, just like an airbrush would do. When accumulate option is active, a lock icon is present next to the strength of the brush that allows attenuating the brush strength according to spacing.
Mask pressure support
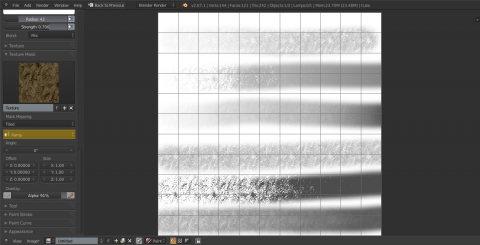
Based on feedback from http://www.davidrevoy.com/article107/textured-brush-in-floss-digital-painting, a mask cut-off function was added to the mask textures. It allows to clip the mask result based on pressure, creating areas of no paint when low pressure is applied to the brush, similar to how a real paint would behave.
There are two modes in the tool, Ramp and Cutoff.
- Cutoff simply selects between 0 and 1 based on stylus pressure
- Ramp distributes the mask effect above the pressure value.
A picture showing the result is above:
From top to bottom:
- Strength pressure influence ON:
- No mask influence
- Cutoff mask influence
- Ramp mask influence
- Strength pressure influence OFF:
- No mask influence
- Cutoff mask influence
- Ramp mask influence
Moarz Blend Modes
16 new blend modes have been added, as part of a patch written by Fredrik Hansson
They are:
- Overlay
- Hard light
- Color burn
- Linear burn
- Color dodge
- Screen
- Soft light
- Pin light
- Vivid light
- Linear light
- Difference
- Exclusion
- Hue
- Saturation
- Luminosity
- Color
Docuentation for those can be found temporarily here: http://docs.gimp.org/en/gimp-concepts-layer-modes.html
Gravity
Sculpting supports a gravity effect while sculpting. This feature has been ported over from GSOC 2011 Onion
New Stroke Modes
Line strokes
Select "Line" under the stroke drop down menu or when pressing A Clicking and dragging lets the user define a line in screen space. The line dabs are separated by the spacing parameter in the stroke panel, similar to space strokes. This stroke mode is available to all paint modes.
Polyline strokes
Select "Polyline" under the stroke drop down menu or when pressing A. A series of clicks can define line segments that will define the lone of the stroke. The polyline dabs are separated by the spacing parameter in the stroke panel, similar to space strokes. This stroke mode is available to all paint modes. To confirm and execute the polyline stroke, press Space or ↵ Enter
Curved strokes
Select "Curve" under the stroke drop down menu or when pressing A.
The first click defines the start point of the curve and the user can define additional curve control points by using CtrlLMB ![]() . The user can define the curve better by dragging the mouse before releasing the mouse button. The curve handles can be dragged around with LMB
. The user can define the curve better by dragging the mouse before releasing the mouse button. The curve handles can be dragged around with LMB ![]() . To ensure the handles of a control point form a smooth result, drag them around using ⇧ ShiftLMB
. To ensure the handles of a control point form a smooth result, drag them around using ⇧ ShiftLMB ![]() .
The curve dabs are separated by the spacing parameter in the stroke panel, similar to space strokes. This stroke mode is available to all paint modes. To confirm and execute the curved stroke, press Space or ↵ Enter
.
The curve dabs are separated by the spacing parameter in the stroke panel, similar to space strokes. This stroke mode is available to all paint modes. To confirm and execute the curved stroke, press Space or ↵ Enter
Drag Dot Stroke mode for texture painting
Drag dot style strokes leave only one dab on the mesh surface which can be placed by dragging on the mesh surface or the image editor.
Anchored stroke mode for texture painting
Anchored strokes are done on a specific spot on the mesh. As the user drags the mouse, the size of the dab changes, but the location stays constant. There is also an edge to edge mode where the dab is positioned between the initial and current mouse position.
Usability improvements
- Better colour sampling in the 3d viewport, samples colour from the texture of the mesh, making it easier to paint similar colours by sampling directly on a mesh.
- You can deactivate mesh display in the uv editor while in one of the image paint modes by unticking "Draw Texture Paint UVs" in the view menu.
- Texture paint mode now will choose textures based on object materials texture slots. When entering texture paint mode, a panel "Layers" will appear, listing all material texture slots of image type, using UV mapping with an image attached. The user can quickly select the active image of a material to paint on using this panel.
Video demonstrations of results:

