利用者:Sculptorjim/Nodes/Node Editor
目次
The Node Editor
This section explains the window in general, and its header menu options. It also tells you how to enable nodes for use within Blender.
Accessing The Node Editor
There are two ways of reaching a node editor up on your screen:
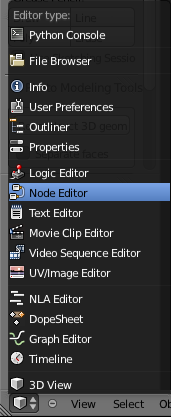
1) select "Node Editor" from the Editor Type selector menu.
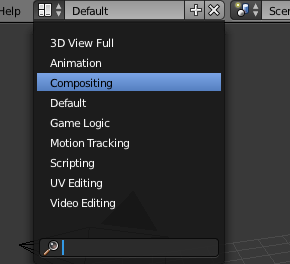
2) click the "Compositing" button (Ctrl←)from the Choose Screen Layout menu. This will bring up a composite four-panel window layout with Node Editor, UV image editor, 3D view, Properties and Timeline panels, each of which can be changed to suit the specialist purpose for which the Node Editor is to be used.
(Image of node map)
A typical Node Editor screen is shown here. The Node Editor panel has a graph-paper style background and a header (it may also have optional toolbar and property sidebars which are toggled by the T and N commands respectively). The header consists of a purpose selector (1) and several other components which vary according to the selected purpose.
By default, the header, when first displayed, is uninitialized as shown:
Activating Nodes
- What nodes to use?
- If you want to work with a material node map, click the ball in the Material/Compositing node set selector. (see Node Editor Header with Material Nodes enabled.)
- If you want to work with a compositing node map, click the face on the Material/Compositing node set selector. (see Node Editor Header with Compositing Nodes enabled.)
- To actually activate nodes, click the Use Nodes button.
- The first time that you select either a Material or a Compsiting node map, the Node Editor window will be instantly filled with starter input and output compositing nodes already connected together.
Node Editor Window Actions
When the cursor is in the window, several standard Blender hotkeys and mouse actions are available, including:
- Popup menu
- Space - Brings up a main popup menu, allowing you to add, view, select, etc.
- Delete
- X or Del - Deletes the selected node(s).
- Box select
- B - Starts the bounding box selection process. Position your cursor and LMB
 click & drag to select a set of nodes.
- Cut connections (box)
- LMB
 click & drag - Starts a box selection, BUT when you let up the mouse button, all threads (connections) within the box are broken.
- Undo
- CtrlZ Very helpful if you forgot to press B before box-selecting, eh?
- Redo
- CtrlY or Ctrl⇧ ShiftZ - You can use this if you used "undo" a bit to often :)
- Grab/Move
- G - Moves your current selection around.
- Execute
- E - pumps inputs through the noodle, refreshing everything.
Node Editor Header
At a glance
On the window header, you will see header options:
- View - to see things more clearly;
- Select - to do things more clearly;
- Add - to walk with...err..to add Nodes, organized by type;
- Node - to do things with selected nodes, akin to vertices;
- a Material or Compositing node set selector;
- a Use Nodes button;
- a Free Unused button.
Menus
View, Select and Add
These popup menus provide the basic functions:
- View
- This menu changes your view of the window, standing in for the standard keyboard shortcuts + NumPad (zoom in), - NumPad (zoom out), ↖ Home (zoom all) or equivalent mouse actions.
- Select
- This menu allows you to select a node or groups of nodes, and does the same as typing the hotkey to select all A or start the border select B process.
- Add
- This menu allows you to add nodes. Please see the next section for a discussion on the types of nodes that you can add, and what they do. Clicking this menu item is the same as pressing Space when the cursor is in the window
Node
- Show Cyclic Dependencies
- C - Ok, so you've been adding and connecting nodes to your heart's content, and you haven't run out of memory yet. Selecting Show Cyclic Dependencies will show you where you have connected your threads in a circle. For example, you can easily connect a mix output as input to another node, and then connect that node's output back to the mix node input, resulting in a little circle where the image just runs round and round. Left alone, it will eventually get tired and dizzy and crash your computer.
- Hide
- H - Hides your selected nodes. Just like vertices in a mesh.
- Grouping
- Most importantly, this menu option allows you to create a user-defined group of nodes. This group can then be edited and added to the map. To create a group, select the nodes you want, and then Node → Make Group, or just use the keyboard shortcut CtrlG. Edit the name using the little input box in the group. Groups are easily identified by their green header and cool names you have picked for them.
- Delete
- X - Deletes selected nodes.
- Duplicate
- ⇧ ShiftD - Makes an Unlinked copy, with the same settings as the original.
- Grab
- G - Moves the little nodes around according to your mouse, just like with meshes.
Duplicate - Faked you out
The new copy is placed exactly over the old one. But it isn't the connected one, so playing with the controls will do nothing to your images, even though it looks like it's connected with the little threads coming out of the node that is underneath. You have to move the duplicated node to reveal the connected node beneath it.
|
Grab - Reminder Only
Just like my mother-in-law, the menu item does not actually do anything; it's just there to remind you that you can press the G key when your cursor is in the window and actually accomplish something with your life (like rearranging nodes in the window).
|
Buttons
Material/Composite Selector
Nodes are grouped into two categories, based on what they operate on:
- to work with Material Nodes, click on the ball,
- to work with Compositing nodes, click on the face.
Use Nodes Button
This button tells the render engine to use the node map in computing the material color or rendering the final image, or not. If not, the map is ignored and the basic render of the material tabs or scene is accomplished.
Free Unused Button
This button frees up memory space when you have a very complex node map. Recommended.
Backdrop
Use the active viewer node output as a backdrop. When enabled, additional settings appear in the Header and the Properties Panel:
- Backdrop Channels
- Set the image to be displayed with Color, Color and Alpha, or just Alpha.
- Zoom
- Sets how big the backdrop image is.
- Offset
- Change the screen space position of the backdrop, or click the Move button, or shortcut AltMMB
 to manually move it.
Auto Render
Re-render and composite changed layer when edits to the 3d scene are made.

