利用者:Xat/KeyerNode
This page is a little outdated (blender 2.4x code) and as apparently this kind of node will not make it to trunk (too specific) we have to wait for the node system to be plug-able.
目次
Sequencer color correction
Here is what I didt to the sequencer color correction system:
General
The formula for ASC CDL color correction is:
out = ( in*slope + offset)^power
The formula for Lift/Gamma/Gain correction is:
out = ( gain*(in + lift*(1-in)) )^(1/gamma)
Before
I took the value of the color pikers and apply :
- lift value as offset (after inverting it so whit was no change)
- gain value as slope
- gamma value as power
in the ASC CDL color correction function.
As gain and gamma does the same as slope and power, this wasen't notisable but lift was applied as osffset and that was really strange.
Now
Value of the color pikers correspond directly to lift gamma and gain (so now black is the non change value for lift which is quite strange also but will be corrected later)
These value are converted to ASC CDL slope, offset and power value using the folowing conversion:
 power = 1/gamma
 offset = lift * gain
 slope = (1-lift) * gain
And the value from old file must be converted using the opposite convertion:
 gamma = 1/power                    (old gamma)
 gain = offset + slope            (old lift + old gain)
 lift = offset/(offset + slope)   (old lift)/(old lift + old gain)
Note: Must also take care with the change of the lift non change value
Future
Some better UI must fit the way to fill those parameters.
A basic UI with:
- 3 slider for setting lift, gamma, gain common to all 3 channels
- 3 Hue discs to setting with channel to affect more or less
- 3 color pikers to automaticaly set black, white and midtones levels
This can brings a basic color correction control like the lift/gamma/gain control in Magic bullet Colorista
I never coded in openGL before but after a little googling and reading interface_draw.c a hue disk UI can be created quite easily. For now blender have a HSVCUBE control that can be used but neutral is not at center (Hue on one axis and saturation on the other)
Keyer Node
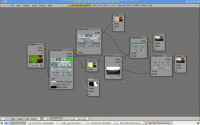
The keyer node has been split into several nodes (greenscreen, edge blur, improving the existing color spill). The doc below is outdated but still usefull to understand the new nodes.
Screenshot of the nodes:
Disclaimer
There is nothing "automagical" in this keyer, it just allows the user to take advantage of all the basic greenscreen related techniques in one node.
The matte pulling part is the most important one, and you must keep in mind that it provides "G-R", "G-max(R,B)", or similar mattes. The results are totaly predictable. Image treatment to improve the resulting matte must be done outside the node (through the pre-processed plate input).
However, these basic techniques are sufficient for most cases.
Use
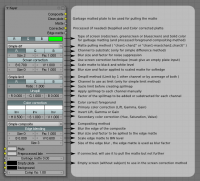
Parameters of the keyer:
Pulling the matte
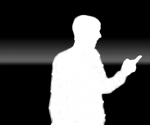
This is the most important step, the goal is to produce a matte with a completely white foreground and a completely black background. The first step is to select the type of "screen" you are using with the button "R" "G" or "B".
If you want to mask some garbage, create a matte of the garbage and select a solid color to use for replacement.
Next, choose the matte pulling algorithm. The matte is created by subtracting the channel of the background's dominant color (let's say green) by one other channel or the maximun of the 2 other channels (red and blue). Try different algorithms and choose the one that give you the best results (the closest to the desired matte).
Next step is to scale the matte to Black and White level. If you have too much noise, you can apply a first blur to eliminate it. Then choose the black and white level to scale to. Check the resulting matte, if the edges are too hard, you can apply a second blur to soften them.
| The BW levels | |
| Typically, you will have to choose a hight black level (around 0.6) and just touch a little the withe level (around 0.97) but to keep soft edges there must be a difference of 0.3 (at least) between the two values. |
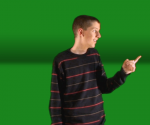
A powerful feature is the "screen correction technique." Use it when you want to eliminate distractions in the background. Here is a exemple:
| The preprocessed platte | |
| I your footage is from a video camera with YUV subsampling (like almost all videocamera) a great technique is to sligtly blur the UV channels and use the result for pulling the matte only (Use the preprocessed platte input for that). You also may want to use it if you have green highlights in your foreground subject, and want to pull the matte from a platte with a clamped green channel. |
Despilling
For despilling, we typically create a spillmap of the excess of spill color (let's say green)). This is done by choosing a limit (a certain percentage of one other channel or of the averrage of the 2 other channels) and measuring how much the the spill color exceeds this limit.
Choose the limit by selecting the algorithm and the channel to use (for simple limit algorithm only). Then scale this limit by a desired factor with the "Ratio" button.
Then normally we substract the value of the spillmap from the spill channel. But you can choose to apply the spillmap to each chanel manually. In this case a percentage of the spillmap is substrated form the spill channel (green) and other percentages of the spillmap are added to the other channels (red and blue). This way you can drive the spilled region to virtually any color you want.
Color correction
Color correction is typically done in two steps, primary color correction followed by secondary color correction. If you don't know how to use it, search a good book/tutorial on color correction.
Compositing
There are two compositing methods. The first is the traditional one: COMP = (1-MATTE)*BG + MATTE*FG
The second uses a processed foreground and then composites it on background, but does so without multiplying it by the matte first. This gives softer edges but the BG area of the palatte to be composited must be black, otherwise it will change the BG color in the final composite. To obtain a FG platte with black everywhere outside the subject, we substract the solid color (same color used for garbage matting) from the original palatte but only outside the matte. When this technique is used, the processed foreground can be view in the "corrected" output of the node.
| The processed foreground | |
| If you do not have pure black in the BG area, raise up the RGB values of your solid color to be just above the one of the BG area in your platte. |
Internals
Flow chart:
Code duplication
For developpers who ask themselves about code duplication:
-The color correction HSV is kind of duplicated, but it is only 4 lines of code.
-The edge detection method is an internal filter different from those used in the filter node. It give much softer results.
-The despill is somehow different, but my despill can do the same as the despill node (and more), the despill node can be improved with part of the keyer code but this will be code duplication! Is there any solution? [Perhaps move your code to despill node and call the code there from this node, or put the cod in a library used by both nodes? - rben13]
Clamped values
During the succesives opperations the images values can raise above 1.0 (more white then white) or below 0.0 (darker than black). This is not acceptable for mattes, but is a great "feature" for images to prevent clipping/clamping.
My code clamps the matte to 0.0 - 1.0 values before using it (same for edge matte), but it also clamps the sub-black value of the foreground (to 0) if you choose the "processed foreground" compositing method.
This is needed because the "processed foregound" method must use a foreground platte where the backgroung area is exactly 0.0, and if I did'nt clamp it, the values are slightly negatives.
Screen correction
The screen correction technique consists of creating a classic matte, doing the same for the empty plate (with same parameters), and dividing the inverted matte by the inverted empty matte. For now the first blur (noise blur) is part of the common parameters, the scale and second blur are the apply to the corrected matte.
This (under certain circumstances) can result in totaly black pixels in the foreground area (not observed for now). The normal method must be to make the first blur and the scale operation part of the common parameters and add a second scale operation to the corrected matte (but this will introduce 2 more parameters in the UI: black and white level for the second scale operation)
Will need test to see where to go...
