Dev:JA/Ref/Release Notes/2.62/UV Tools
目次
Blender 2.62: UV ツール
Subsurfを考慮した展開
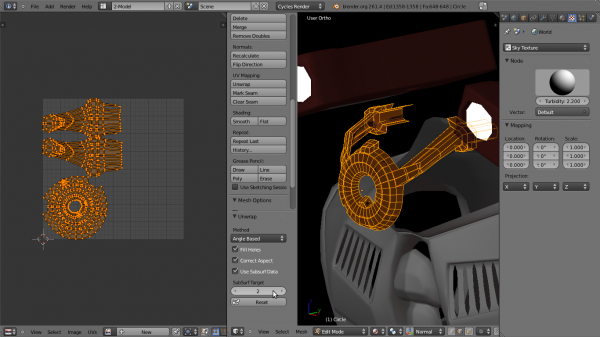
展開がサブディビジョンサーフェス(SubSurf)の後の面積と頂点の位置を考慮するようになり、SubSurf を使用した Mesh の、広い範囲のデフォームの結果がより正確になります。使用するには、Unwrap(3Dビュー上で[U]キーもしくは UV/Image エディタ上で[E]キー)を UV Unwrapping メニューから選択し、ツールシェルフ内の新しいオペレータオプションを使用し、展開の挙動を変更します。 'Use subsurf data' を ON にし、その下の 'Subsurf Target' フィールドで、計算する分割レベルを選択してください。
Stitch ツールの改良
Stitch(スティッチ)が3D空間内の同じ頂点に対応する UV の統合をチェックするようになりました。
改良版 Stitch ツールを使用するには、UV/ImageエディタでV を使用します。その後操作モードに入ります。
Stitch モードに入ると、オプションとキーがヘッダに表示されます。アクティブなオプションは、その左側に "On" の文字が表示されます。
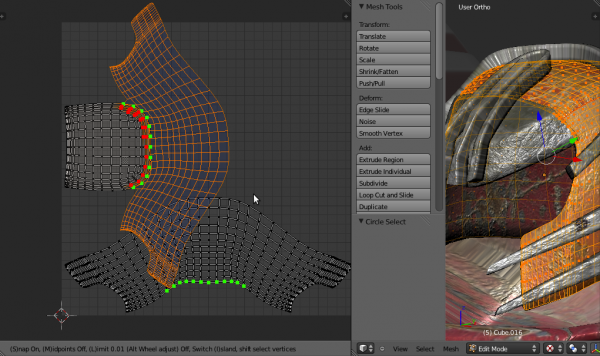
- オペレータは現在の選択について動作します。Vを押した後で、Stitch する UV の選択・非選択を追加する場合、⇧ ShiftRMB
 を押します(選択に左マウスボタンを使用しているユーザの場合はそちらを代わりに使用)。一緒に Stitch できる UV は緑のマークが付き、変更した最終結果のプレビューを見ることができます。選択された UV であっても、(Stitch の制限もしくは固定した島上の UV とは Stitch できないという理由で)Stitch できない場合は、赤いマークが付きます。
- Stitch 操作の要は固定の島([V]キーを押した時に明るい青でハイライト表示されます)の概念です。Stitch できない固定の UV の島へ Stitch を行おうとすると失敗します。
- さらに Stitch には "Midpoint" と "Snap" モードがあります。"Midpoint" が ON の場合、複数の UV の中間に Stitch されます。一方、OFF の場合は、固定の島の内の対応する UV に Stitch されます。
will stitch them on the corresponding UV of the static island.
その固定の島に各頂点に対応する UV が二つ以上ある場合、一緒に Stitch される可能性のある UV を明確にするための解決策が、"Limit" オプションの使用です。 If more than one UV corresponding to each vertex is present on the static island, the solution is to use the "Limit" option to disambiguate between possible uvs that can be stitched together.
- 固定の島に属する二つの UV の Stitch を試すと、モードが "Midpoint" が On かつ "Snap" が Off の場合でない限り失敗します。"Midpoints" モードはMを押すとOn/Offを切り替えることができ、島の固定はIで変更できます。Iを押すと、Stitch 可能な UV のある島の中から、新たな固定の島が選ばれます。
Attempting to stitch two UVs belonging to the static island will fail, unless the mode is "Midpoints" On and "Snap" Off. You may toggle "Midpoint" mode by pressing M and you may change the static island by pressing I. By pressing I, the static island alternates between islands that contain possible uvs for stitching.
- Stitich 可能な UV は、L(Limit)を押すことで、距離によっての制限できます。制限する距離は{Shortcut|alt|pad+}}とAlt- NumPad、またはAltWheelUp
 とAltWheelDown
  で増減可能です。このオプション有効時は、UV のお互いの距離が制限距離より離れていると Stitch されません。
- Stitch可能な UV のある島にスナップするオプション(S)。
- 選択解除/選択時、同じ頂点に属する、対応する Stitch 可能・不可能な辺/UV はすべて選択解除/選択されることに注意してください。
この方法では、正反対のStitch 可能な UV を選択解除でき、初期選択も同様に選択解除できます。ただし、各 UV が Stitch にふさわしい場合、別々にチェックされます。そのため、Limit のようなオプションは各 UV に別々に適用されます。
Note that when deselecting/selecting, all corresponding stitchable/unstitchable edges/UVs that belong to the same vertex are deselected/selected. This way you can deselect the opposite stitchable UV and the initial selection gets deselected too. However, each UV is checked separately if its eligible for stitching. So options like Limit will apply to each UV separately.
- GUIカラーは Themes→UV Editor の、'stitch preview' の名前を持つ物で設定できます。
All GUI colors are configurable under themes->Uv Editor, having 'stitch preview' names
Calculate Seams from Islands(島によるシーム)
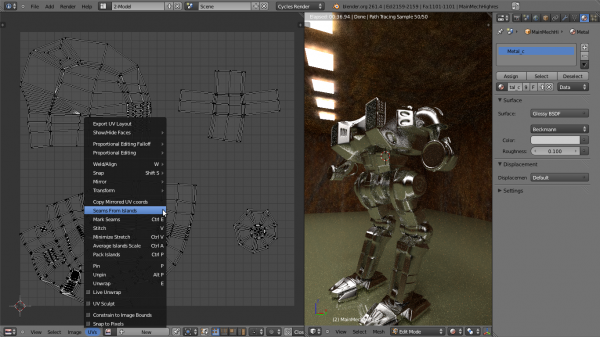
このオペレーターは UV メニューからアクセス可能で、現在の UV エディターの UV レイアウトからメッシュのシームを計算します。オペレーターオプションを元に、辺にシームまたはシャープ(ベイキング時、正しくノーマルを計算する必要がある場所のバンプマッピングに便利)のタグ付けするのに使用できます This operator, accessible from the UV menu recalculates the mesh seams from the current layout of uv's in the uv editor. You can use it to tag edges as seams or sharp (useful for bump mapping where you need normals calculated correctly when baking), based on operator options.
Tag Seams in UV editor
このオペレーターは辺をシームとしてUV/画像エディターからタグ付けし、もし Live Unwrap が ON の場合に、再展開します。CtrlEを押すと、選択中の辺にタグ付けします。
UV スカルプティング
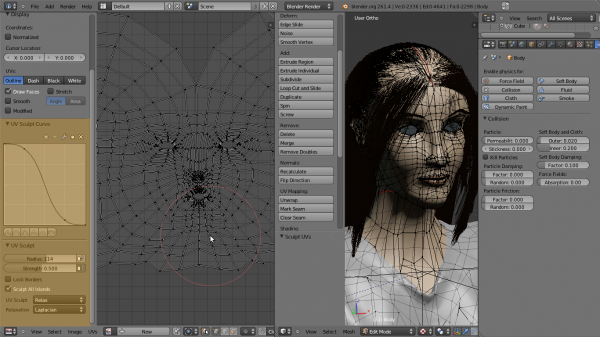
UV メニュー内の "UV Sculpt" を選択、またはQを押すと、利用可能になります。UVのスカルプトモード同様、移動、ひねり、スムージングが可能になります。
UV スカルプティング有効時、プロパティパネルにはブラシツールの選択アイテムとオプションが表示されます。
Activated by ticking "UV Sculpt" in the UV menu or pressing Q, they allow you to grab, pinch and smooth UVs, just like sculpt mode. When UV sculpting is activated, the properties panel shows brush tool selection items and options.
There are three brushes that operate on uvs: grab brush activated by pressing G, relax brush, activated by pressing S, also by ⇧ ShiftLMB ![]() and pinch brush, activated by pressing P.
To use the brushes simply use LMB
and pinch brush, activated by pressing P.
To use the brushes simply use LMB ![]() . The pinch brush can be inverted by pressing CtrlLMB
. The pinch brush can be inverted by pressing CtrlLMB ![]() Using standard convention, you can scale the brush with F and change its strength with ⇧ ShiftF
Using standard convention, you can scale the brush with F and change its strength with ⇧ ShiftF
- The Grab brush moves uvs around.
- The Pinch brush draws uvs toward its center, making the texture take up less space on the model locally. Pressing CtrlLMB
 produces the inverse result, making the texture take up more space.
 - The Relax brush makes uvs more evenly distributed. The algorithm relies on space, not stretch minimization, so most probably a minimize stretch will have to be run for optimal results. However it is great to use after stitching islands, or when unwrap produces cluttered results to smooth the distribution of uvs. There are two relax algorithms: HC relaxation and laplacian relaxation. You can choose between the two using the listbox that appears under the tool listbox when Relax is selected as brush (See picture below)
UV スカルプティングのオプション:
- Lock Borders: これを ON にした場合、UV の島の境界の UV がブラシの影響を受けなくなります。
when this is checked, the boundary uvs of uv islands will not be affected by the brush. This is very useful to preserve the shape of a uv island and it's almost always used with relax brushes or islands tend to shrink.
- Sculpt All UV islands: when this is checked, the brush will operate on all UVs, else it will only operate on the island nearest to the brush center when the sculpt stroke begins. This can save some performance because only the uvs of that island are registered for processing.


