Dev:Py/Scripts/Cookbook/Code snippets/Introduction
Introduction
With the arrival of the Blender 2.5x versions of Blender, Python scripting is taken to a new level. Whereas the Python API up to Blender 2.49 was quite incomplete and ad hoc, the API in Blender 2.5x promises to allow for Python access to all Blender features, in a complete and systematic way.
However, the learning curve for this amazing tool can be quite steep. The purpose of these notes is to simplify the learning process, by providing example scripts that illustrate various aspects of Python scripting in Blender.
Blender is still under heavy development, and the Python API is not yet quite stable. During the few months that passed between the two first editions of these notes, the Python API underwent a complete overhaul, breaking all old scripts. The differences between the second edition (for Blender 2.54.0) and the present third edition (for Blender 2.57.0) are much less dramatic. However, also minor changes in the API can make the scripts stop working. The scripts in these notes have been tested with Blender 2.57.0 rev 35147 (this information is available on the splash screen).
Since Blender 2.57 is advertised as the first stable release, there is some hope that the API can remain stable in the future. Hence there is a fair chance that the scripts in these notes will continue to work for a long time, but there are no guarantees. The covered subjects fall into the following categories:
Most of the programs are not very useful, but they serve to illustrate the concepts.
- Data creation and manipulation.
- Custom properties.
- User interfaces: panels,buttons and menus.
- Turning scripts into Blender add-ons, which can be loaded automatically when Blender starts.
- Scripts distributed over several files.
- Simulations of particles, hair, cloth, softbodies, smoke, fluids, etc.
- Nodes
Running the scripts
Each script example, with the exception of the multi-file packages, is a complete program. It can be copied and pasted into the Text Editor in Blender, which is found on the Scripting screen. Execute the script by pressing the Run Script button, or press AltP on your keyboard.
The scripts are also available as separate Python files, located in the scripts folder which should have come bundled with this file. Just load the Python file into the Text Editor AltO, and run it. There is also a batch script which runs many of the other scripts at once. It is described in detail in the last section.
It is assumed that the scripts are located in the ~/snippets/scripts folder, where ~ is your home directory (e.g. /home/thomas on Linux, C:/Documents and Settings/users/thomas on Windows XP, or C:/Users/thomas on Windows Vista. The scripts can be placed anywhere, but path names in some Python files (batc.py, texture.py, and uvs.py) must be modified accordingly. Python will inform you if it fails to find the relevant files.
It is possible to make a batch run of all scripts in the object and simulation folders by loading and executing the file batch.py. We can easily confirm that all scripts work correctly (or at least that they don't generate any errors) by running the batch script. If there are problems, look in the console window for further information.
Getting more information
The example scripts only scratch on the surface of what can be done with Python scripting in Blender 2.5x. When you write your own scripts, you will certainly want to access operators and variables not mentioned here. There are several ways to obtain this information.
API reference
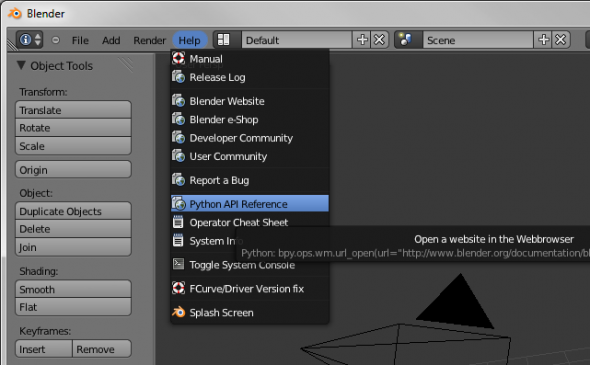
The main source of information is the Blender Python documentation. It can be conveniently accessed from the Help » Python API Reference.
Tutorials
There is also an official scripting tutorial here
Tooltips
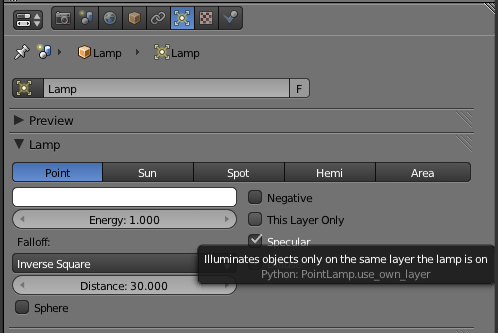
Use tooltips. E.g., hovering over the This Layer Only option in the Lamp context reveals the following text:Illuminates objects only on the same layer the lamp is on
Python: PointLamp.use_own_layer
From this we conclude that this option is accessed as lamp.use_own_layer where lamp is the data of the active object, i.e. lamp = bpy.context.object.data
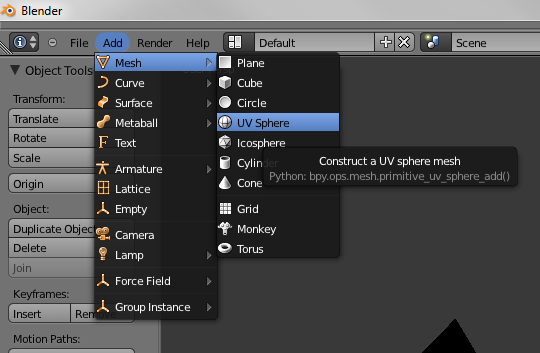
There are tooltips also when addingConstruct an UV sphere mesh
Python: bpy.ops.primitive_uv_sphere_add()
This tells us what operator call is needed to add a primitive UV sphere mesh.
Operator reports
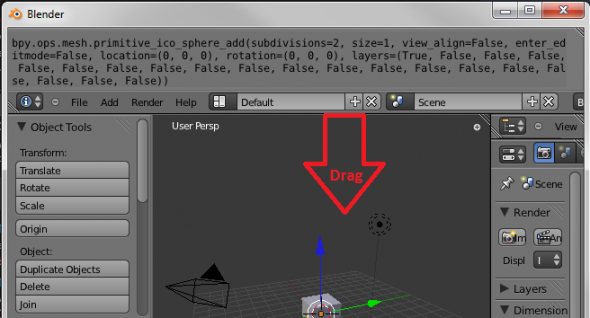
Once an operator has been executed, it leaves a trail in the report window in Scripting screen bpy.ops.mesh.primitive_uv_sphere_add(segments=32, rings=16,
size=1, view_align=False, enter_editmode=False,
location=(0, 0, 0), rotation=(0, 0, 0), layer=(True, False, False,
False, False, False, False, False, False, False, False, False, False,
False, False, False, False, False, False, False))
When we add an UV sphere from the menu, it always has 32 segments, 16 rings, etc. But it is straightforward to figure out wich call we need to make a sphere with other data, e.g. 12 segments, 6 rings, radius 3, and centered at (1, 1, 1): bpy.ops.mesh.primitive_uv_sphere_add(
segments=12,
rings=6,
size=3,enter_editmode=True,
location=(1, 1, 1))
Only operator execution is recorded in the report window, and not e.g. setting a value.
In recent Blender versions the scripting trail is instead printed in the Info window, wich can be revealed by pulling down the top menubar.
Community
- Learn from other people's code. The scripts that come bundled with Blender are a great source of inspiration.
- There is a thriving on-line community at the Python and scripting subform at BlenderArtist


