Dev:Ref/Release Notes/2.62/UV Tools
目次
Blender 2.62: UV Tools
Subsurf-aware Unwrapping
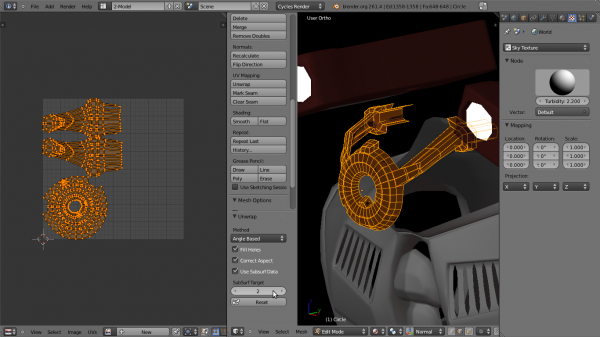
Unwrapping now accounts for area and position of vertices after subsurfing, which will give more correct results on subsurfed meshes with high area deformation. To use select unwrap (U key in 3D editor, E key in UV editor) and now you can use new operator options in the toolbar to change the behavior of the unwrapper. Check 'Use subsurf data' and select the level of subdivision to calculate below, in the 'Subsurf Target' field.
Improved Stitch Tool
Stitching refers to joining the UVs corresponding to the same vertex in 3D space.
To use the improved stitch tool, use V, while in the UV editor. You will enter a modal mode of operation.
Options and keys are listed in the area header when you enter stitch mode. Active options are marked by an "On" word on their left.
- The operator acts on current selection. To select/deselect additional uvs to stitch after pressing V, press ⇧ ShiftRMB
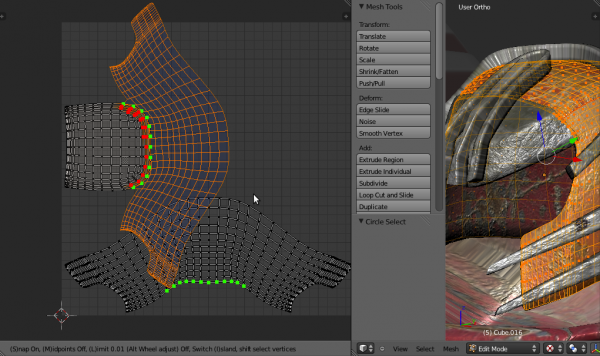
 (for users using right mouse to select, use that instead). UVs that can be stitched together are marked green, and you can see a preview of the modified final result. UV's that, even though selected can't be stitched(due to stitch limit or not stitchable with a UV on the static island) will be marked red.
- Key to the operation of stitching is the notion of the static island(highlighted in light blue when pressing V). Attempting to stitch UV's that cannot be stitched with a UV of the static island will fail. There are also extra modes of stitching. "Midpoint" stitching and "Snap". The tool, when "Midpoint" is on, will stitch UVs halfway through their distance, while when it is off, will stitch them on the corresponding UV of the static island. If more than one UV corresponding to each vertex is present on the static island, the solution is to use the "Limit" option to disambiguate between possible uvs that can be stitched together. Attempting to stitch two UVs belonging to the static island will fail, unless the mode is "Midpoints" On and "Snap" Off. You may toggle "Midpoint" mode by pressing M and you may change the static island by pressing I. By pressing I, the static island alternates between islands that contain possible uvs for stitching.
- You can limit stitchable UVs by their distance by pressing L. The limit distance is changed by pressing Alt+ NumPad and Alt- NumPad or AltWheelUp
 and AltWheelDown
  . UVs farther from each other that the limiting distance will not be stitched together if the option is active.
- There is an option to snap islands that have stitchable uvs together. By pressing S, you activate this option.
- Note that when deselecting/selecting, all corresponding stitchable/unstitchable edges/UVs that belong to the same vertex are deselected/selected. This way you can deselect the opposite stitchable UV and the initial selection gets deselected too. However, each UV is checked separately if its eligible for stitching. So options like Limit will apply to each UV separately.
- All GUI colors are configurable under themes->Uv Editor, having 'stitch preview' names
Calculate Seams from Islands
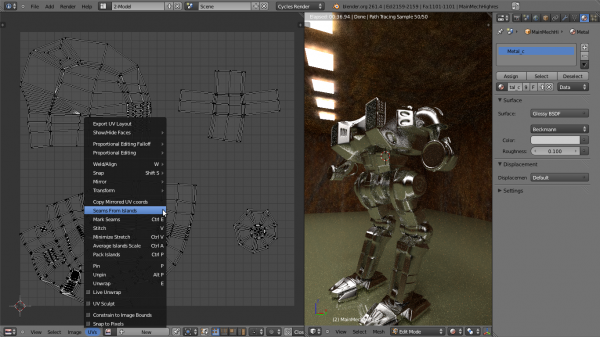
This operator, accessible from the UV menu recalculates the mesh seams from the current layout of uv's in the uv editor. You can use it to tag edges as seams or sharp (useful for bump mapping where you need normals calculated correctly when baking), based on operator options.
Tag Seams in UV editor
This operator tags edges as seams from the uv editor and re-unwraps if live unwrap is on. To use press CtrlE to tag selected edges.
UV Sculpting
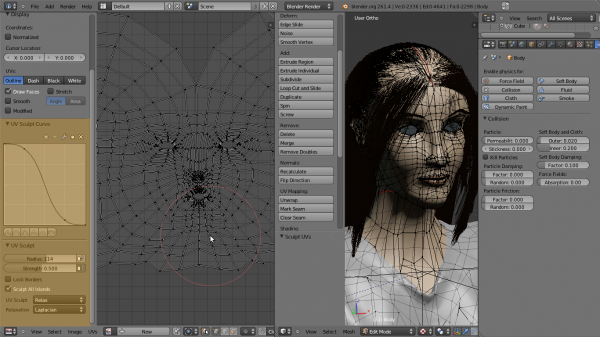
Activated by ticking "UV Sculpt" in the UV menu or pressing Q, they allow you to grab, pinch and smooth UVs, just like sculpt mode. When UV sculpting is activated, the properties panel shows brush tool selection items and options.
There are three brushes that operate on uvs: grab brush activated by pressing G, relax brush, activated by pressing S, also by ⇧ ShiftLMB ![]() and pinch brush, activated by pressing P.
To use the brushes simply use LMB
and pinch brush, activated by pressing P.
To use the brushes simply use LMB ![]() . The pinch brush can be inverted by pressing CtrlLMB
. The pinch brush can be inverted by pressing CtrlLMB ![]() Using standard convention, you can scale the brush with F and change its strength with ⇧ ShiftF
Using standard convention, you can scale the brush with F and change its strength with ⇧ ShiftF
- The Grab brush moves uvs around.
- The Pinch brush draws uvs toward its center, making the texture take up less space on the model locally. Pressing CtrlLMB
 produces the inverse result, making the texture take up more space.
 - The Relax brush makes uvs more evenly distributed. The algorithm relies on space, not stretch minimization, so most probably a minimize stretch will have to be run for optimal results. However it is great to use after stitching islands, or when unwrap produces cluttered results to smooth the distribution of uvs. There are two relax algorithms: HC relaxation and laplacian relaxation. You can choose between the two using the listbox that appears under the tool listbox when Relax is selected as brush (See picture below)
Options for uv sculpting:
- Lock Borders: when this is checked, the boundary uvs of uv islands will not be affected by the brush. This is very useful to preserve the shape of a uv island and it's almost always used with relax brushes or islands tend to shrink.
- Sculpt All UV islands: when this is checked, the brush will operate on all UVs, else it will only operate on the island nearest to the brush center when the sculpt stroke begins. This can save some performance because only the uvs of that island are registered for processing.


