Dev:Ref/Release Notes/2.72/Painting
Texture Painting
Texture Slot Support
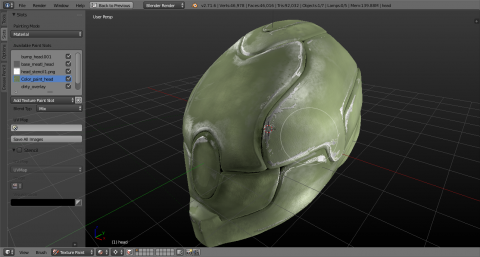
Texture painting has a new system to determine images and UV maps that will be used during painting. The old workflow of switching to the UV editor and assigning an image is replaced by a workflow more tied to the mesh's materials or by explicitly specifying the texture image to use. To access the functionality, click the "Slots" tab in the toolbar and you can find the functionality in the "Slots" panel. In this panel, you can see a list of images, associated with a UV layer (the combination is called "slots"). To paint using a certain slot just click on it and the system will use the associated image and UV layer. Clicking on a slot will also display the slot image on image editors, if any are open.
The slot system includes two painting modes are named "Material" and "Image" (selectable at the top of the panel).
In "Image" mode, the user can just select an existing image and painting will use the active UV layer for painting (also selectable via a drop-down in the panel). Note that the generated UV map just maps the whole UV space to each face and is not optimal for all but the most simple use cases (painting on a plane wall/floor, for instance).
"Material" mode tries to detect the slots from the materials of the mesh, depending on the renderer (cycles and blender internal supported only for now)
For Blender Internal, texture paint slots are material texture slots that use images and UV mapping. The UV map that is used during painting is either the assigned on the UV slot of the material texture UV slot, or the active UV layer of the mesh (this is the highlighted UV map under the mesh tab in the properties screen) if no UV map has been assigned.
For Blender Internal, there are a few extra controls: A drop down that allows the addition of additional slots. Slots added here are directly added on the material. There are options to also activate or deactivate the paint slots, and also select the active UV layer for each material slot independently. A blank value in the UV layer will always use the active UV layer.
For Cycles, all texture images on the material's node tree are added on the layer tab and the texture paint slot UV map is always the active UV map of the mesh. Custom UV maps in the node tree are not used yet, but may be in the future.
When no UV layers or texture slots can be detected, the system will display a warning and a few controls to add the relevant data in the Toolbar. User will not be able to paint until all missing data have been added.
Sharpen Tool
This tool is based on unsharp masking. By selecting "Sharpen" in the UI or pressing CtrlLMB ![]() with the soften tool active, the sharpen tool is used instead.
The sharpen tool enhances the contrast of the image as you paint over it. There are a few values that control the effect: Threshold will only apply sharpening to only those pixels that differ more than the threshold value from their surrounding pixels. The kernel size controls how big an area the tool searches over while calculating that difference.
with the soften tool active, the sharpen tool is used instead.
The sharpen tool enhances the contrast of the image as you paint over it. There are a few values that control the effect: Threshold will only apply sharpening to only those pixels that differ more than the threshold value from their surrounding pixels. The kernel size controls how big an area the tool searches over while calculating that difference.
The soften tool now also allows custom blur kernel sizes.
An extra blur kernel type, gaussian, has been added. The two kernel types, box and gaussian control how neighbouring pixels are weighted when calculating the blur effect. Box samples all surrounding pixels equally, while gaussian will sample the pixels near the center of the brush most.
Sharpen - and blur - filters need subtlety, make sure that a low brush strength is used.
Fill Tool
In texture painting, a new fill tool is available. To use it, while in an image paint mode, select the fill tool from the Brush sub-menu in the header/footer. It can be used to fill the image with the brush color. For projective texturing it will bypass some options for projective painting to paint the model. This means that occluded, backfacing and normal culled faces will always get filled, regardless of whether the options are activated in the projection paint panel. Also, it is still currently limited to filling the part of the mesh within screen boundaries.
The fill tool allows the use of a gradient to fill the image. This gradient may be defined by clicking the "Use Gradient" checkbox. There are two modes available, radial and linear, each filling the image in the respective way. To define the gradient colors, a color band widget appears in the brush color section, that helps the user define the gradient color and alpha. To apply the gradient, the user must click and drag on the image to define the gradient line, or radius, if radial gradient is used.
Mask Tool
The mask tool is used in projective texturing, and allows for easy use of the previous stencil feature. The mask feature actually maps an image to the mesh and uses the image intensity to mask out certain parts of the mesh out during painting. It is also possible to invert and deactivate the mask in the Mask panel under the Slots tab. Visual feedback and custom color is now provided when using masks.
Gradient Strokes
In texture painting, a gradient can be used as color source. This gradient may be defined by clicking the "Use Gradient" checkbox. The gradient source drop down menu allows three sources for gradient colors, pressure repeat and clamp. To define the gradient colors, a color band widget that helps the user define the gradient color appears in the brush color section. Alpha is not yet taken into consideration for blending operations.
The gradient sources operate as follows:
Pressure will choose a gradient color from the color band according to the stylus pressure, while clamp and repeat will alter the color automatically by the distance covered by the brush and as specified by the gradient spacing field, with clamp using the last color of the color band after the specified and repeat resetting the color to the first color in the color band and repeating the pattern.
Brush Opacity Control
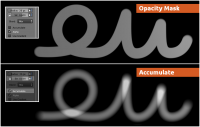
It is now possible to explicitly disable opacity masking by clicking the accumulate checkbox under the colour wheel in the brush. This will allow a stroke to accumulate on itself, just like an airbrush would do. When the accumulate option is active, a lock icon is present next to the strength of the brush that allows attenuating the brush strength according to spacing.
Mask Pressure support
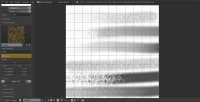
Based on feedback from http://www.davidrevoy.com/article107/textured-brush-in-floss-digital-painting, a mask cut-off function was added to the mask textures. It allows to clip the mask result based on pressure, creating areas of no paint when low pressure is applied to the brush, similar to how a real brush would behave.
There are two modes in the tool, Ramp and Cutoff.
- Cutoff simply selects between 0 and 1 based on stylus pressure
- Ramp distributes the mask effect above the pressure value.
A picture showing the result is above:
From top to bottom:
- Strength pressure influence ON:
- No mask influence
- Cutoff mask influence
- Ramp mask influence
- Strength pressure influence OFF:
- No mask influence
- Cutoff mask influence
- Ramp mask influence
Drag Dot Stroke Mode Support
The Drag dot style strokes leaves only one dab on the mesh surface which can be placed by dragging on the mesh surface or the image editor.
Anchored Stroke Mode Support
Anchored strokes are done on a specific spot on the mesh. As the user drags the mouse, the size of the dab changes, but the location stays constant. There is also an edge to edge mode where the dab is placed between the initial and current mouse position.
New Blend Modes
16 new blend modes have been added, as part of a patch written by Fredrik Hansson.
They are:
- Overlay
- Hard light
- Color burn
- Linear burn
- Color dodge
- Screen
- Soft light
- Pin light
- Vivid light
- Linear light
- Difference
- Exclusion
- Hue
- Saturation
- Luminosity
- Color
Documentation for those can be found here: http://docs.gimp.org/en/gimp-concepts-layer-modes.html
All Modes
New Stroke Modes
Line strokes
Select "Line" under the stroke drop down menu or by pressing E. Clicking and dragging lets the user define a line in screen space. The line dabs are separated by the spacing parameter in the stroke panel, similar to space strokes. This stroke mode is available in all paint modes.
Curved strokes
Select "Curve" under the stroke drop down menu or by pressing E. The user can define additional curve control points by using CtrlLMB ![]() . The user can define the curve better by dragging the mouse before releasing the mouse button. The curve handles can be dragged around with LMB
. The user can define the curve better by dragging the mouse before releasing the mouse button. The curve handles can be dragged around with LMB ![]() . To ensure the handles of a control point form a smooth result, drag them around using ⇧ ShiftLMB
. To ensure the handles of a control point form a smooth result, drag them around using ⇧ ShiftLMB ![]() . To delete a curve point, use X
The curve dabs are separated by the spacing parameter in the stroke panel, similar to space strokes. This stroke mode is available to all paint modes. To confirm and execute the curved stroke, press ↵ Enter or use the Draw Curve button at the stroke panel.
Stroke Curves are reusable and can be stored and selected by using the dropdown menu in the stroke panel. They also support a few transform operators such as grabbing, scaling and rotating. The handles can be selected individually by using RMB
. To delete a curve point, use X
The curve dabs are separated by the spacing parameter in the stroke panel, similar to space strokes. This stroke mode is available to all paint modes. To confirm and execute the curved stroke, press ↵ Enter or use the Draw Curve button at the stroke panel.
Stroke Curves are reusable and can be stored and selected by using the dropdown menu in the stroke panel. They also support a few transform operators such as grabbing, scaling and rotating. The handles can be selected individually by using RMB ![]() , extend the selection by ⇧ ShiftRMB
, extend the selection by ⇧ ShiftRMB ![]() and deselect/select all by using A.
and deselect/select all by using A.
Unified Color
Similar to unified strength and unified size, unified color, accessible from the options panel, allows color brushes to share colors.
Palettes
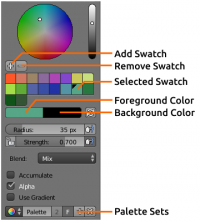
Colour palettes are supported in texture and vertex paint mode. To add a palette you can find a palette block under the brush colours in the toolbar. Palette colours can be added in two ways. Pressing the + icon in the palette will copy the current brush colour into the palette, and sampling with S and pressing LMB ![]() .
.
The palette colours can be changed with CtrlLMB ![]() and using the colour swatch.
and using the colour swatch.
To delete a palette colour, hover over it and press Del. Colour drag and drop support has now been added.
Brushes can use two colours. One is the primary colour and the second, displayed below the primary is the background or secondary colour. To paint with the secondary colour, use CtrlLMB ![]() . To switch between the two colours, use X
. To switch between the two colours, use X
Usability improvements
- Better colour sampling in the 3d viewport, samples colour from the texture of the mesh, making it easier to paint similar colours by sampling directly on a mesh.
- You can deactivate mesh display in the uv editor while in one of the image paint modes by unticking "Draw Texture Paint UVs" in the view menu.
- Radial operators (F, ⇧ ShiftF, CtrlF, CtrlD) now have a precision mode by holding shift.
