Dev:Ref/Release Notes/2.78/GPencil
目次
- 1 Grease Pencil
- 1.1 Introduction
- 1.2 Why change
- 1.3 Details of the change
- 1.4 Layer panel
- 1.5 Palette panel
- 1.6 Drawing brushes panel
- 1.7 Curves panel
- 1.8 Arrange strokes
- 1.9 Palette workflow
- 1.10 Stroke Quality Improvements
- 1.11 Improved Fills - Support for Concave Shapes
- 1.12 Parenting
- 1.13 Compositing
- 1.14 Sculpt Tools
- 1.15 Editing Tools
- 1.16 Pie Menus
- 1.17 Animation Tools
- 1.18 More info
- 1.19 Quick Tutorials
Grease Pencil
Introduction
The current Grease Pencil functionality was created with the aim to make it a tool for on-screen annotations, but after improving stroke editing and the new sculpt tools, it became a real alternative to 2D animators. The changes done in this release adapt Blender to work in a way similar to other 2D drawing softwares, and to get a production ready 2D animation tool that can mix 2D drawings with 3D objects and composition.
Why change
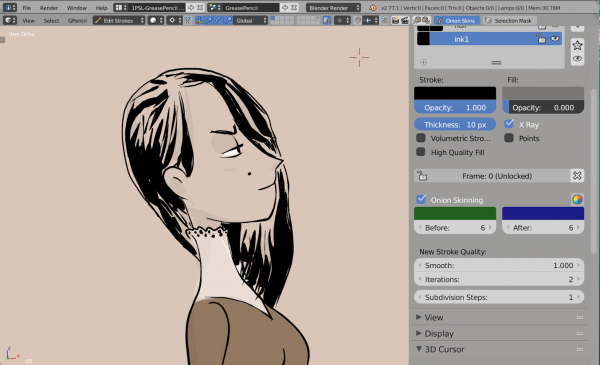
From 2.77 and earlier versions, the grease pencil works using layers as main attribute container. The layer stores the width of the line, the color and the filling options.
In order to draw a stroke the following logic is used:
Layer color->Layer width * pressure = Draw line
If we change the thickness in the layer, all lines change, but if we want different color, we need create a new layer.
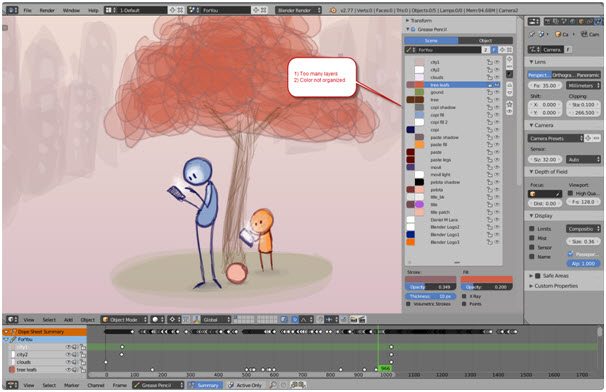
The problem with this approach is that you need a lot of layers for any character or drawing. For example, if you draw a background with 5 different colors, you need 5 layers, and this is not intuitive.
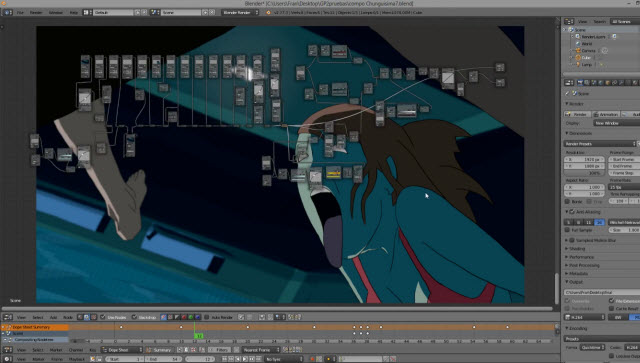
In the image above, a simple scene with two characters and a background. The artist needs a lot of layers and it is impossible determine what colors correspond to what character.
Another limitation of the current Blender implementation is the impossibility to create strokes with different saturation of color. If the artist needs different saturation for the same color, needs to create a set of layers for each color saturation.
Details of the change
The previous implementation (from 2.77 and earlier), links the layer with the stroke, so any variation in the stroke must be controlled by the layer, and this reduces the possible options.
Now, the thickness was moved to stroke, and color to a new palette color instead of saving this information in layer. Now, the layer is only a container, and strokes can use different color, strength and thickness in the same layer.
Layer----> Strokes(thickness and color) ----> Point (Position, pressure and strength)
Some benefits for the artist:
- Easy layer management (background, character 1, foreground, etc).
- Ability to have multiple colors per layer.
- Ability to have multiple thickness values per layer.
- Ability to have different color saturation in the same stroke.
With the new design, the brush is independent and it allows create brushes that simulate different types of pencils.
The new workflow is the following:
- Create a layer.
- Create a palette.
- Add colors to palette.
- Set brush preferences.
- Select color->Draw stroke.
- Select color->Draw stroke.
Some of the steps are automatic. For example, if the user press D in an empty scene and draw, an automatic brush, palette and color are created.
For each stroke, the artist can change brush settings and/or color. All strokes remain in the same current layer.
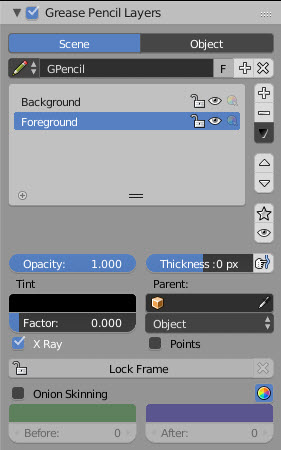
Layer panel
As result of the redesign, the layer panel changed.
Now, the layer doesn't have color information and only works as a container of strokes.
The new available parameters are:
- Opacity: Level of opacity of all strokes of the layer.
- Thickness: Works as a modifier. All strokes of the layer are changed with a thickness of +/- value. If the apply button is pressed, the thickness change is applied and the value is set to 0.
- Tint: Apply a color tint to all strokes of the layer. The level is defined by the factor value.
- Parent: Allows to parent the layer to any object or bone. The logic used is the same that Blender uses with other objects.
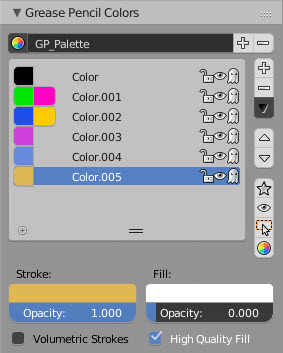
Palette panel
The color are grouped in palettes. A palette is a set of color that can define a mood for the scene, for example the same color can be defined in "Day palette" and "Night palette" and a simple palette switch, will change all strokes color in all layers.
The available parameters are:
- Stroke color: Color used in the stroke. Can be used in any layer.
- Opacity: Default opacity of the color. This value can be adjust with the brush strength, so depending of the pressure, the saturation of the color will be from 0 to the opacity set.
- Fill: Filling color.
- Fill Opacity: Opacity for filling color. This opacity is not affected by brush strength.
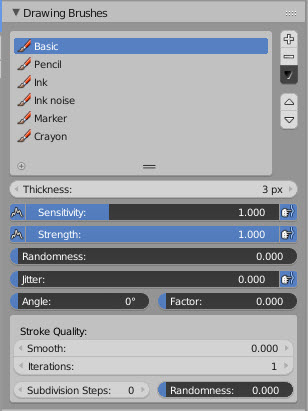
Drawing brushes panel
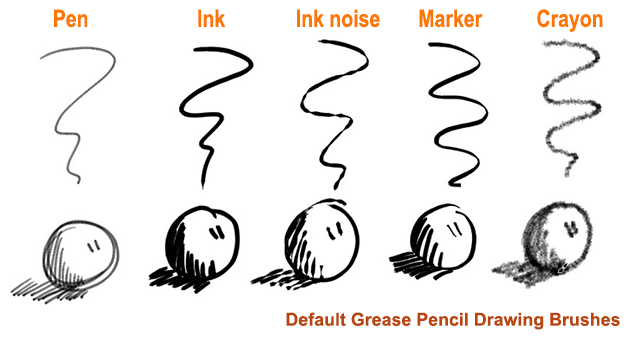
This panel defines the parameters used when drawing new strokes. A set of predefined brushes is created automatically.
In order to get these brushes work properly, a drawing tablet device with pressure sensitivity is mandatory.
The new available parameters are:
- Thickness: Number of pixels for full pressure strokes. The thickness can be lower depending of the pressure.
- Sensibility: Adjust the sensibility of the thickness to the pressure of the pencil on the tablet. This pressure can be disabled using the right small button.
Additionally, a randomness factor can be enabled using the right button.
- Strength: Similar to sensibility, but affect the saturation of the color. This parameter allows to get effects as color fading or watercolor.
The strength can be changed using the new "strength" sculpt brush.
- Randomness: Defines the level of randomness (if enabled) for sensibility and strength.
- Jitter: Define a jitter randomness in the stroke.
- Angle: Defines the angle when the thickness of the stroke will be 100%. Any change in the direction will change the thickness.
- Angle factor: Defines the effect for drawing angle changes in the thickness.
The Angle and Angle Factor parameters allow to create drawing brushes as markers that change the thickness depending of the angle of drawing. This gets a more artistic drawing and less "computer" lines.
Smooth, iterations and subdivision parameters define the quality of the new strokes. See section below for details.
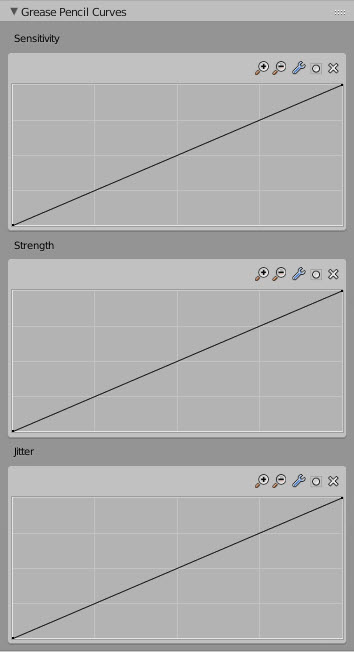
Curves panel
This panel allows to adjust the parameters used with tablets to get personal preferences.
When the user draws a stroke, the system get the brush information and combined with color information and pressure, generates the stroke.
Arrange strokes
The new design creates a new request for arrange strokes in the layer. With the old system, each layer contained only one color, so using the layer up/down operator, the strokes could be arranged.
With the new design the same layer can use several colors, so it requires a new set of operators to arrange the strokes. These operators apply only to the same layer. To arrange the layers, the old up/down operator can be used as usual.
New arrange operators are:
- Bring to Front: Set the selected strokes in front of all strokes..
- Bring Forward: Set the selected strokes one step forward.
- Send Backward: Set the selected strokes one step backward.
- Send to Back: Set the selected strokes behind all strokes.
Note: If any of the strokes selected is in the top/bottom and try to move in the same direction the strokes will not be moved in order to preserve drawing integrity.
Palette workflow
In this section we describe the workflow corresponding to palettes and colors.
A palette must contain at least 1 color. The interface will not allow to delete the last color of the palette. The interface will avoid that the user delete all the palettes. Any GP Data must have at least one palette with one color.
Delete palette
The user will press a button to delete a palette, but if there is only a palette, the operation will be disabled.
If there are more than one palette, all colors of the old palette will be transferred to the new selected palette.
There are two options:
- If the color exist in the new palette (same name), the stroke is linked to new color.
- If the color does not exist in the new palette, a new color is added to the palette in order to keep the stroke.
Delete palette color
Delete a color will remove the color from the palette.
A palette must contain at least one color, so the last one cannot be deleted. If a color with strokes is removed, all strokes of this color are removed.
Change palette color
Any change to line color or fill color, will change any stroke of any layer using this color.
Set stroke color
The user will be able to select several strokes, and pressing a button set the current selected color as new color to all selected strokes.
Stroke Quality Improvements
Several new features have been added to improved the quality of strokes drawn using Grease Pencil:
- Smoothing Factor and Smoothing Iterations for new strokes
- Subdivision Steps for new strokes
| Stroke Quality Improvements |
These settings are per-brush settings that are applied after each stroke is drawn, when converting from 2D/screenspace coordinates to 3D/dataspace coordinates. These are per-brush settings so that you can apply different levels of smoothing to different types of strokes (i.e. higher smoothing and/or subdivision for final "beauty", and less smoothing/subdivision for initial "blocking" strokes).
Smoothing Factor defines how much smoothing is applied (using the same method as the "Smooth" Brush). The range varies from 0.0 to 2.0. It is used to get rid of jagged edges and jitter/hand shake.
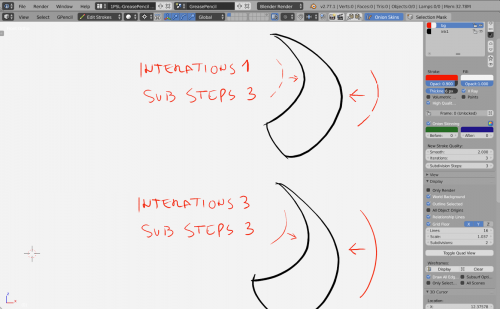
Subdivision Steps defines how many times the stroke will be subdivided. Each time the stroke is subdivided, extra stroke points are added between each pair of existing stroke points. The main use of this setting is to make strokes look less "faceted" (especially large strokes drawn quickly). Strokes are subdivided before smoothing is applied.
Smoothing Iterations defines how many times smoothing is applied. On each additional round of smoothing performed, the strength of the smoothing applied is halved - i.e. on the first round, it will be 100% of smoothing factor, then 50%, then 25%, etc. This setting is most useful for improving the quality of heavily subdivided strokes (as seen below), where the multiple rounds of smoothing can help reduce "faceting" artifacts.
Recommended Settings (for best general-purpose results):
- Smooth = 0.7
- Subdivision = 1
- Smooth Iterations = 1 (2 on larger curves when drawn quickly, and/or with multiple rounds of subdivision)
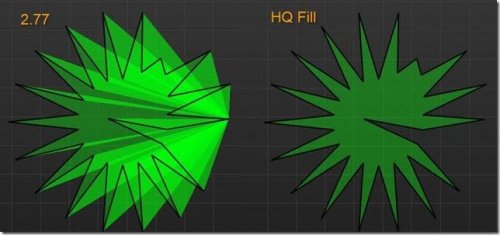
Improved Fills - Support for Concave Shapes
Parenting
- Now is possible to parent a layer to any object, armature or bone. The strokes of the layer will follow parent transformations.
| GP Parenting example by Daniel M. Lara (pepeland) |
Compositing
- Now the grease pencil layers create a pass inside opengl render result. This result can be exported to EXR multilayer and used in composition.
| GP Using composition quick tutorial |
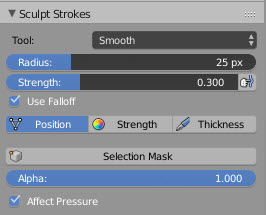
Sculpt Tools
- New strength color brush for creating fading effects.
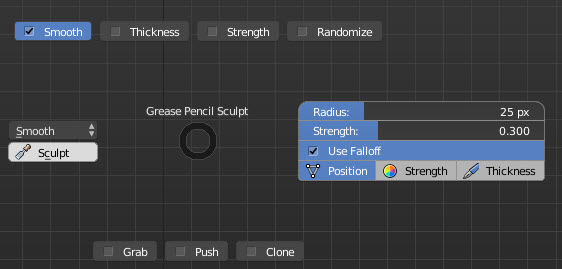
- New buttons to enable sculpt for position, strength and thickness in smooth and random brush.
Editing Tools
- Added Select First and Select Last operators. These select the first and last stroke points respectively.
- If the "Extend" option is enabled, the first/last point will be selected alongside any points already selected
- If the "Only Selected Strokes" option is enabled, only the first/last points of strokes that already have selected points will get selected
- Lasso select now works in the Nodes Editor. Note that it is activated using AltCtrlLMB
 -drag (same as for the standard Node Editor lasso, instead of the keymapping used elsewhere, due to keymap conflicts)
- Fixed bug where it was impossible to paste strokes when there were no editable strokes visible.
- The "Delete Active Frame" operator can now be accessed using DX (anywhere), as well as ⇧ ShiftX (Edit Strokes Mode only) or the Delete menu (92a3ac4). This makes it easier to quickly get rid of throwaway scribbles made while recording a video tutorial or during a dailies/review session.
- The Sculpt cursor is now more visible on a light coloured background (e.g. white or light gray). It is now drawn with a double ring - an inner light-coloured ring, and a darker outer ring to make it stand out on white backgrounds.
- The Eraser now respects the "Selection Mask" option in Edit Mode (2af4c80)
- "View Selected" support for grease-pencil dc82c2cd4817c6c
- New functions to arrange strokes drawing order in layer and draw on back option.
- Continuous drawing can be disabled using E key in order to get fast access to sculpt mode.
- Switch between drawing brushes using keyboard top numbers from 1 to 0. The selected drawing brush is the brush in the list located at that position (ie: if press 3 the third brush will be selected)
- When copy & paste strokes, the paste try to copy strokes in the original layer of each stroke if available and unlocked. This keeps the integrity of the drawing and don't paste all strokes in active layer only as previous versions.
- New operators Join CtrlJ to merge several strokes. This allows filling areas created with not closed perimeter.
- New operator for toggle cyclic strokes to create a line from last to first point.
- New Alpha value to hide selection dots while editing strokes for getting a cleaner viewport. The visibility can be hide/unhide using CtrlH.
- Added "By Color" option to the Select Grouped ⇧ ShiftG operator to select strokes with the same color as selected strokes
Reproject Strokes
The "Reproject Strokes" tool for fixing the problems caused when the 3D cursor ended up accidentally jumping around in space, and messing up your drawings.
| Grease Pencil - Reproject Strokes Tool |
This operator helps fix up this mess by taking the selected strokes, projecting them to screenspace (i.e. "flattening" the strokes back on to the screen), and then putting them back out into 3D space again. As a result, it should be as if you had directly drawn the whole thing again, from the current viewpoint, but without losing the pressure/strength info.
Unfortunately, if there was originally some depth information present (i.e. you already started reshaping the sketch in 3D), then that will get lost during this process. But so far, my tests indicate that this seems to work well enough.
Pie Menus
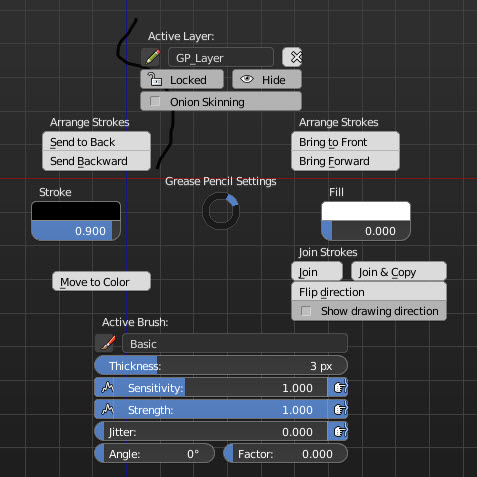
- Improved pie menus for editing.
- Improved pie menus for sculpt.
Animation Tools
- It is possible to independently disable the display of onion skins before or after the current frame by setting the relevant Before/After setting to -1. For example, this could be used to disable the "next" frame, if leaving it visible proves too distracting.
More info
More details about design can be found here
Quick Tutorials
A collection of small video tutorials can be found here
