Dev:Source/GameEngine/2.49/Fisheye Dome Camera
目次
Dome Mode in Blender Game Engine
This feature allows artists to visualize their interactive projects within an immersive dome environment. In order to make it an extensible tool, we are supporting Fulldome, Truncated domes (front and rear), Planetariums and domes with spherical mirrors.
The support has been added to Blender 2.49. It uses a multipass texture algorithm as developed by Paul Bourke and was implemented by Dalai Felinto with sponsorship from SAT - Society for Arts and Technology within the SAT Metalab immersion research program.[1]Briefly, that involves rendering the scene 4 times and placing the subsequent images onto a mesh designed especially such that the result, when viewed with an orthographic camera, is a fisheye projection.
Remember to use Blender in fullscreen mode to get the maximum out of your projector.
To accomplish that launch Blender with the command-line argument -W. Also to get away of the top menu on Blender try to join all windows (buttons, 3dview, text, ...) in a single one. Otherwise if you only maximize it (Ctrl+Up) you can't get the whole screen free to run your game (the top bar menu takes about 20 pixels).
Accessing Game Framing Settings
These controls are located on Scene page(F10) of the Buttons Window type. On the Format tab there is a button "Game framing settings" that brings up the GUI options.
GUI options:
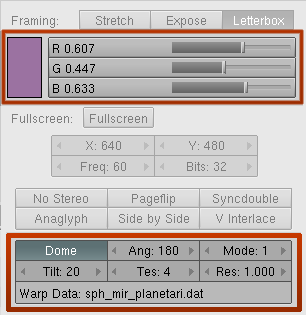

- Background color (RGB) - the color used as background. Strong colors make calibration/tuning easy.
- Angle (from 90 to 250) - it works only in the fisheye mode (1)
- Mode (to be extended to implement other modes. So far: 1 (fisheye), 2 (enviroment map) and 3(spherical panoramic)
- Tilt (for tilted domes - it rotates the camera in the horizontal axis)
- Tesselation (4 is the default. This is the tesselation level of the mesh)
- Resolution (1.0 is full resolution. This is the relative size of the render buffer. Decrease it to get speed)
- Warp Data (warp mesh data file)
Dome Modes
1. Full Dome Mode

- An Orthogonal Fisheye view from 90º to 250º degrees.
- From 90º to 180º we are using 4 renders.
- From 181º to 250º we are using 5 renders.
2. Front-truncated Dome Mode

- Designed for truncated domes, this mode aligns the fisheye image with the top of the window while touching the sides.
- The Field of view goes from 90º to 250º degrees.
- From 90º to 180º we are using 4 renders.
- From 181º to 250º we are using 5 renders.
3. Rear-truncated Dome Mode

- Designed for truncated domes, this mode aligns the fisheye image with the bottom of the window while touching the sides.
- The Field of view goes from 90º to 250º degrees.
- From 90º to 180º we are using 4 renders.
- From 181º to 250º we are using 5 renders.
4.Environment Map Mode

- An enviroment Map mode. It can be used for pre-generate animated images for CubeMaps.
- We are using 6 renders for that.
- The order of the images follows Blender internal EnvMap file format:
- first line: right, back, left
- second line: bottom, top, front
5. 360º Spherical Panoramic

- A full spherical panoramic mode.
- We are using 6 cameras here.
- The bottom and top start to get precision with Definition set to 5 or more.
Warp Data Mesh
Many projection environments require images that are not simple perspective projections that are the norm for flat screen displays. Examples include geometry correction for cylindrical displays and some new methods of projecting into planetarium domes or upright domes intended for VR.
For more information on the mesh format see Paul Bourke's article.

In order to produce that images, we are using a specific file format.
File template::
mode
width height
n0_x n0_y n0_u n0_v n0_i
n1_x n1_y n1_u n1_v n1_i
n2_x n1_y n2_u n2_v n2_i
n3_x n3_y n3_u n3_v n3_i
(...)
First line is the image type the mesh is support to be applied to: 2 = rectangular, 1 = radial
Next line has the mesh dimensions in pixels
Rest of the lines are the nodes of the mesh.
Each line is compund of x y u v i
(x,y) are the normalised screen coordinates
(u,v) texture coordinates
i a multiplicative intensity factor
x varies from -screen aspect to screen aspect
y varies from -1 to 1
u and v vary from 0 to 1
i ranges from 0 to 1, if negative don't draw that mesh node
- You need to create the file and add it to the Text Editor in order to select it as your Warp Mesh data file.
- Open the Text Editor (Window Types/Text Editor).
- Open your mesh data file(ie. myDome.data) in the text editor (Text/Open or Alt O on keyboard).
- Go to Game Framing Settings (Window Types/Buttons Window/Scene Page or F10 on keyboard)
- Enable Dome Mode.
- Type filename in Warp Data field(ie. myDome.data).
To create your own Warp Meshes an interactive tool called meshmapper is available as part of Paul Bourke's Warpplayer software package(requires full version).
Example files: Spherical Mirror Dome 4x3, Truncated Dome 4x3, Sample Fullscreen File 4x3, Sample Fullbuffer File 4x3.
Important: the viewport is calculated using the ratio of canvas width by canvas height. Therefore different screen sizes will require different warp mesh files. Also in order to get the correct ratio of your projector you need to use Blender in Fullscreen mode.