Dev:Source/Render/Pipeline
目次
[非表示]Render Pipeline recode
Early 2006 the Blender rendering pipeline was redeveloped from scratch. Main targets were:
- create a decent API for the render module
- remove exported globals from render module
- allow multiple instances of a 'render' to exist in parrallel, so a Render can be used for previews
- achieve a higher level of threading
- prepare for tile-based (bucket based) rendering
- allow any Scene to render multiple 'layers' (using same render data)
- allow any render-layer to store multiple passes (diffuse, specular, Z, alpha, speed vectors, AO, etc)
- integrate render pipeline with compositing
- add new API for 3d 'shaded' preview drawing, and for 'baking' lighting/rendering
Functionality notes for end-users can be found here:
http://archive.blender.org/development/release-logs/blender-242/render-pipeline/index.html
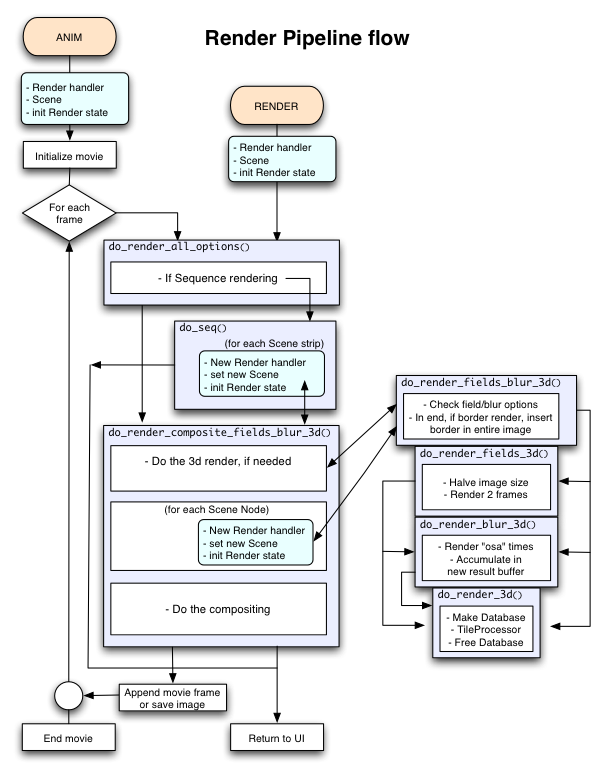
Let's first take a look at the flow, the way a render currently happens for the important options:
This diagram shows what happens when you start an animation render (ANIM button) or an image render (RENDER button). In both cases a Render handler is required, which then gets initialized with a Scene (stores render data settings). In Blender, an animation render will enter a loop, saving out images or a movie files. A single image render will only return and display the result.
- First a check is done for Sequence render, if so then it can bypass the entire 3D render pipeline, or - when Scene strips exist - it calls the 3D render pipeline per Scene, including a Composite. That's how you can activate compositing in Sequencer now.
- Then the main pipeline function do_render_composite_fields_blur_3d() is entered. The name already indicates what options are inside.
- Scene Nodes in compositor can do a full render too, but note this differs from Sequence scenes.
Per Scene, the result of rendering is stored, which is a linked list of 'render layers' which in turn has a list of 'passes' which store the actual buffers.
Render Result
Here's a diagram of the internal structure of all the image buffers that can get created on a render.
http://archive.blender.org/typo3temp/pics/97aaf4168b.jpg
Scene
As usual, a Blender file (i.e. the project you work on) can consist of many Blender Scenes, each with individual render settings and shared or unique Objects. The Render pipeline is fully 'localized' per Scene, ensuring renders can happen per Scene independently or even in parallel.
RenderResult
One of the first steps of rendering a Scene is to create the RenderResult, this is a container for all RenderLayers and Passes, and it stores the result of Compositing or Sequence edit. Each Scene will get its own unique RenderResult, but multiple RenderResults per Scene can exist as well (as illustrated by the new 3D window preview).
RenderLayer and Passes
Once all 3D rendering geometry has been created and initialized, the pipeline goes over each RenderLayer in succession to fill its "passes" with data. A Pass is the actual image and can store anything, like the RGBA 'combined' result of a render, or the normal value of a render.
If you use compositing, you can find the RenderLayers in a "RenderResult Node" as a menu option, and its passes available as output sockets.
Apart from the obvious memory constraints, there's no limit in Blender for the amount of layers or passes in a single render command.
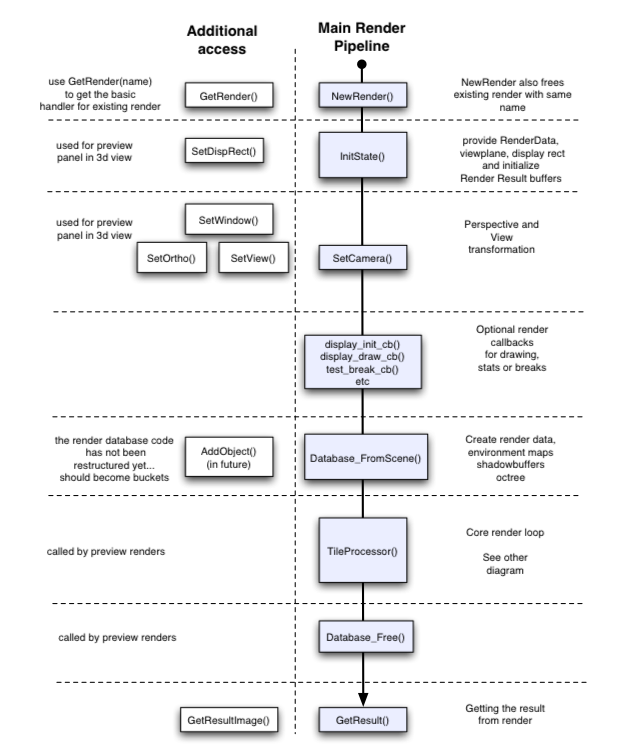
Render Pipeline API
The functions in the diagram below all start with a "RE_" prefex, which has been omitted for clarity. You can find the code in the render module, files RE_pipeline.h and pipeline.c.
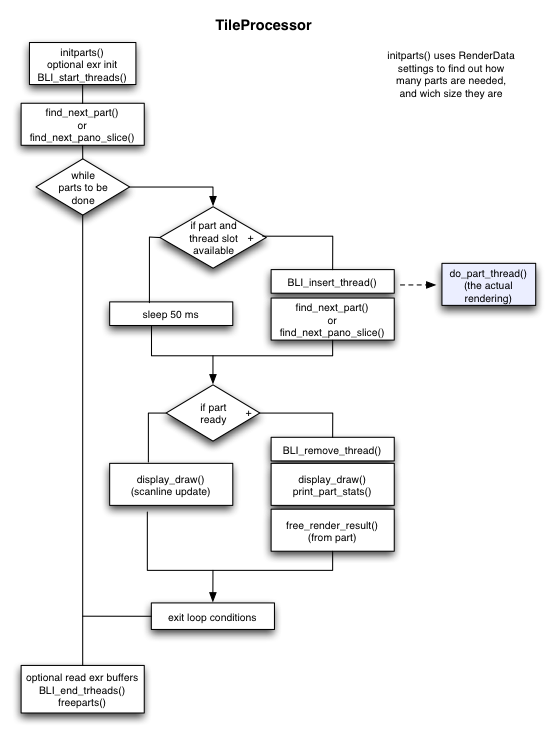
Tile Processor
Looking more closely at the core of the pipeline, you can find the "tile processor", this is where the threads are started, one for each part to be rendered.
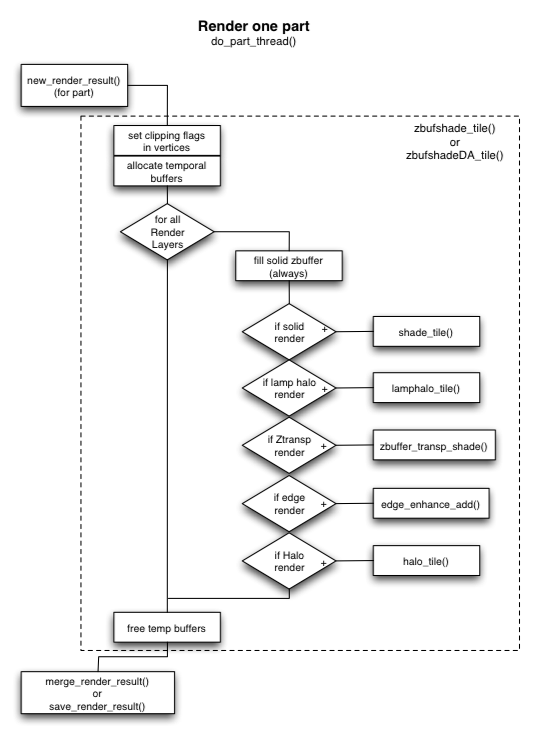
Part Render
A this stage all code has to be thread-safe. Per tile (part) a full rendering happens. Note that internally already multiple 'layers' get rendered, which can use the zbuffer information from the 'solid zbuffer' to detect visibility. These layers can each be set on/off individually with in the Blender RenderLayer Panel.
For each RenderLayer, its passes then get filled with color (or values), which in the end then gets merged in the final RenderResult or saved in an exr file.
Pixel Render
The part renders go over pixels per scanline, and gather visibility information. Per pixel that way a series of sub-pixel samples are created. These simple sub-pixel samples now have to converted to more complex data to prepare for actual rendering.
To keep (Material Node) shaders fast, the shadow calculus is done before actual shading happens.
The shade_samples() function returns all samples with mask info (for subpixel location). In the Part Render loop (above) such samples then get filled in using optional filters.
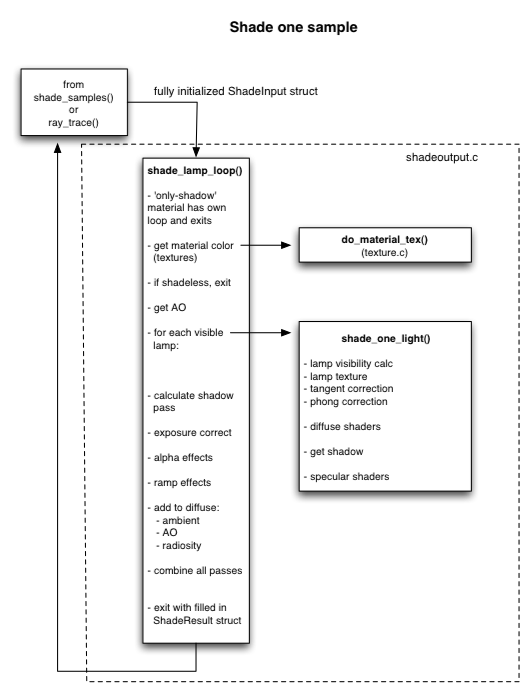
Sample Shading
Each sample now is a completely filled in ShadeInput struct, with all data initialized to perform actual shading. Result is written in a ShadeResult struct, which stores all pass info.
