Doc:2.6/Manual/Physics/Soft Body/Reference
< Doc:2.6 | Manual | Physics | Soft Body(Doc:2.5/Manual/Physics/Soft Body/Referenceから転送)
Soft Body options and settings
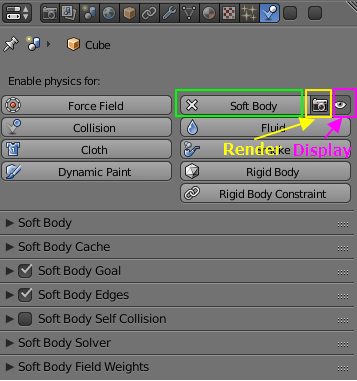
- Soft Body
- This creates the soft body modifier on the selected object
- Render
- Enable soft body during render
- Display
- Display soft body in real time.
Soft Body
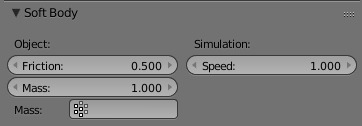
- Object:
- Friction
- The friction of the surrounding medium. Generally friction dampens a movement.
- Mass
- Mass value for vertices. Larger mass slows down acceleration, except for gravity where the motion is constant regardless of mass. Larger mass means larger inertia, so also braking a Soft Body is more difficult.
- Vertex Group for control Mass
- Use a specified vertex group for mass values
- Simulation:
- Speed
- You can control the internal timing of the Softbody system with this value.
Soft Body Cache
Start- and Endframe
The Start and End settings in the Collision panel are not only valid for the baking, but for all Soft Body simulations. So if your animation lasts longer than 250 frames, you have to increase the End value.
|
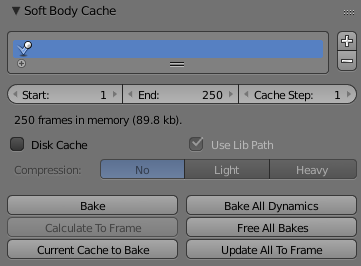
- Caches list
- Allows to use multiply caches and manage the ones — add, remove and rename caches.
- + and - buttons
- Add and remove respectively caches.
- Start/End
- First and last frame of the simulation. Always valid, not only for baking.
- Cache Step
- Number of frames between cache steps.
- Disk Cache
- Save cache files to disk. Blend file must be saved first.
- Use Lib Path
- Use this files path when library linked into another file.
- Compression
- Compression method to be used
- No
- No compression.
- Light
- Fast but not so effective compression.
- Heavy
- Effective but slow compression.
- Bake
- Calculates the simulation and protects the cache. You need to be in Object mode to bake.
- Free Bake
- Clears the cache.
- Calculate to Frame
- Bake physics to current frame
- Current Cache to Bake
- Bake from Cache.
- Bake All Dynamics
- Bake all physics
- Free All Bakes
- Free all baked caches of all objects in the current scene
- Update All To Frame
- Update cache to current frame
If you haven’t saved the blend file the cache is created in memory, so save your file first or the cache may be lost.
Soft Body Goal
- Anable/Disable Soft Body Goal
- Soft Body Goal acts like a pin on a chosen set of vertices; controlling how much of an effect soft body has on them. Enabling this tells Blender to use the position / animated position of a vertex in the simulation. Animating the vertices can be done in all the usual ways before the Soft Body simulation is applied. The goal is the desired end-position for vertices. How a softbody tries to achieve this goal can be defined using stiffness forces and damping.
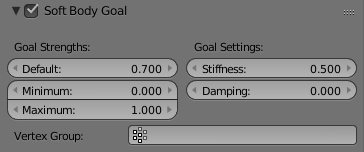
- Goal Strengths:
- Default
- If no vertex group is used, this numeric field is the default goal weight for all vertices. If a vertex group is present and assigned, this button instead shows an popup selector button that allows you to choose the name of the goal vertex group. A Goal value of 1.0 means no Soft Body simulation, the vertex stays at its original (animated) position. When setting Goal to 0.0, the object is only influenced by physical laws. By setting goal values between 0.0 and 1.0, you can blend between having the object affected only by the animation system, and having the object affected only by the soft body effect.
- Minimum/Maximum
- When you paint the values in vertex-groups (using Weight Paint mode), you can use the Minimum and Maximum to fine-tune (clamp) the weight values. The lowest vertex-weight (blue) will become Minimum, the highest value (red) becomes Maximum (please note that the blue-red color scale may be altered by User Preferences).
- Goal Settings:
- Stiffness
- The spring stiffness for Goal. A low value creates very weak springs (more flexible “attachment” to the goal), a high value creates a strong spring (a stiffer “attachment” to the goal).
- Damping
- The friction for Goal. Higher values dampen the effect of the goal on the soft body.
- Vertex Group
- Use a vertex group to specify goal weights.
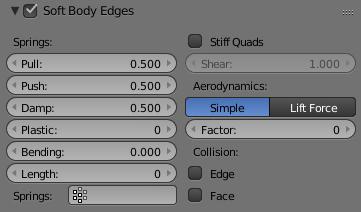
Soft Body Edges
- Anable/Disable Soft Body Edges
- The edges in a Mesh Object can act as springs as well, like threads in fabric.
- Springs:
- Pull
- The spring stiffness for edges (how much the edges are stretched). A low value means very weak springs (a very elastic material), a high value is a strong spring (a stiffer material) that resists being pulled apart. 0.5 is latex, 0.9 is like a sweater, 0.999 is a highly-starched napkin or leather.
- Push
- How much the Softbody resist being scrunched together, like a compression spring. Low values for fabric, high values for inflated objects and stiff material.
- Damp
- The friction for edge springs. High values (max of 50) dampen the edge stiffness effect and calm down the cloth.
- Plastic
- Plasticity, permanent deformation of the object.
- Bending
- This option creates virtual connections between a vertex and the one after the next. This includes diagonal edges. Damping applies also to these connections.
- Length
- The edges can shrink or been blown up. This value is given in percent, 0 disables this function. 100% means no change, the body keeps 100% of his size.
- Vertex Group for control Springs
- Use a specified vertex group for spring strength values.
- Stiff Quads
- For quad faces, the diagonal edges are used as springs. This stops quad faces to collapse completely on collisions (what they would do otherwise).
- Shear
- Stiffness of the virtual springs for quad faces.
- Aerodynamics:
- Simple
- If you turn on Aerodynamics the force is not confined to the vertices, but has an effect also on the edges. The angle and the relative speed between medium and edge is used to calculate the force on the edge. This force results that vertices with little connecting edges (front of a plane) fall faster than vertices with more connecting edges (middle of a plane). If all vertices have the same amount of edges in a direction they fall with equal speed. An edge moving in its own direction feels no force, and an edge moving perpendicular to its own direction feels maximum force (think of a straw moving through air). Try it with an Factor of 30 at first.
- Lift Force
- Use an aerodynamic model that is closer to physical laws and looks more interesting. Disable for a more muted simulation.
- Factor
- How much aerodynamic effect to use
- Collision:
- Edge
- Checks for edges of the softbody mesh colliding.
- Face
- Checks for any portion of the face of the softbody mesh colliding (compute intensive!). While Face enabled is great, and solves lots of collision errors, there doesn’t seem to be any dampening settings for it, so parts of the softbody object near a collision mesh tend to “jitter” as they bounce off and fall back, even when there’s no motion of any meshes. Edge collision has dampening, so that can be controlled, but Deflection dampening value on a collision object doesn’t seem to affect the face collision.
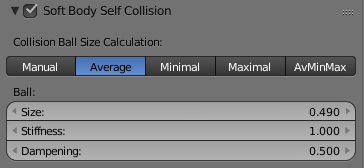
Soft Body Self Collision
Soft Body Self Collision is working only if you have activated Soft Body Edges.
- Anable/Disable Soft Body Self Collision
- When enabled, allows you to control how Blender will prevent the Soft Body from intersecting with itself. Every vertex is surrounded with an elastic virtual ball. Vertices may not penetrate the balls of other vertices. If you want a good result you may have to adjust the size of these balls. Normally it works pretty well with the default options.
- Collision Ball Size Calculations:
- Manual
- The Size directly sets the ball size (in BU).
- Averavge (“average”)
- The average length of all edges attached to the vertex is calculated and then multiplied with the Size setting. Works well with evenly distributed vertices.
- Minimal/Maximal
- The ball size is as large as the smallest/largest spring length of the vertex multiplied with the Size.
- AvMiMax
- Size = ((Min + Max)/2) × Ball Size.
- Ball:
- Size
- Default 0.49 BU or fraction of the length of attached edges. The edge length is computed based on the algorithm you choose. You know how when someone stands too close to you, and feel uncomfortable? We call that our “personal space”, and this setting is the factor that is multiplied by the spring length. It is a spherical distance (radius) within which, if another vertex of the same mesh enters, the vertex starts to deflect in order to avoid a self-collision.
- Set this value to the fractional distance between vertices that you want them to have their own “space”. Too high of a value will include too many vertices all the time and slow down the calculation. Too low of a level will let other vertices get too close and thus possibly intersect because there won’t be enough time to slow them down.
- Stiffness
- Default 1.0. How elastic that ball of personal space is.
- Dampening
- Default 0.5. How the vertex reacts. A low value just slows down the vertex as it gets too close. A high value repulses it.
Collisions with other objects are set in the (other) Collision panel. To collide with another object they have to share at least one common layer.
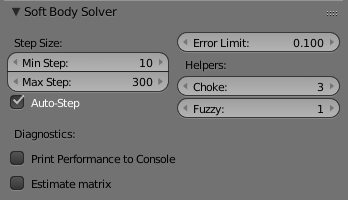
Soft Body Solver
These settings determine the accurateness of the simulation.
- Step Size:
- Min Step
- Minimum simulation steps per frame. Increase this value, if the Soft Body misses fast moving collision objects.
- Max Step
- Maximum simulation steps per frame. Normally the number of simulation steps is set dynamically (with the Error Limit) but you have probably a good reason to change it.
- Auto-Step
- Helps the Solver figure out how much work it needs to do based on how fast things are moving.
- Error Limit
- Rules the overall quality of the solution delivered. Default 0.1. The most critical setting that says how precise the solver should check for collisions. Start with a value that is 1/2 the average edge length. If there are visible errors, jitter, or over-exaggerated responses, decrease the value. The solver keeps track of how “bad” it is doing and the Error Limit causes the solver to do some “adaptive step sizing”.
- Helpers:
- Fuzzy
- Fuzziness while on collision, high values make collision handling faster but less stable.
- Choke
- Calms down (reduces the exit velocity of) a vertex or edge once it penetrates a collision mesh.
- Diagnostics:
- Print Performance to Console
- Prints on the console how the solver is doing.
- Estimate Matrix
- Estimate matrix... split to COM, ROT, SCALE
