Doc:2.6/Manual/Rigging/Posing/Visualization
Page status (reviewing guidelines)
Images
examples
|
目次
Visualization
We talk in this page about the armature visualization options available in all modes (the visualization types, the bones’ shapes, etc.).
In Pose mode, you have extra features, colors and groups to help you visually categorize your bones, ghosts and motion paths to help you visualize armatures’ animations.
Colors
In Pose mode, the bones can have different colors, following two different processes, controlled by the Color button (Armature panel, Editing context, F9):
- When it is disabled, bones are colored based on their “state” (i.e. if they use constraints, if they are posed, etc.).
- When it is enabled, bones are colored depending on which bone group they belong to (or as above if they belong to no group).
You can also mix both coloring methods, see below.
Coloring from Bone State
This is the default and oldest way – there are six different color codes, ordered here by precedence (i.e. the bone will be of the color of the topmost valid state):
- Purple: The Stride Root bone.
- Orange: A bone with a targetless Solver constraint.
- Yellow: A bone with an |IK Solver constraint.
- Green: A bone with any other kind of constraint.
- Blue: A bone that is posed (i.e. has keyframes).
- Gray: Default state.
Coloring from Bone Group
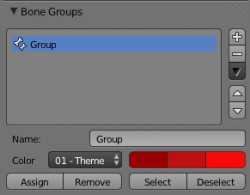
The bone groups panel is available in the Object data editor for an armature. Bone groups facilitate the colouring (theming) of multiple bones. Bone groups are managed mostly in the Buttons window, Editing context (F9).
To create a new bone group, click on the Add Group button in the Bone Groups: buttons set (Link and Materials panel). Once created, you can use the top row of controls to select another group in the drop-down list (“arrows” button), rename the current group (text field), or delete it (“X” button).
To assign a selected bone to a given bone group you can do one of the following:
- In the Bone Groups, select an existing group, and click Assign
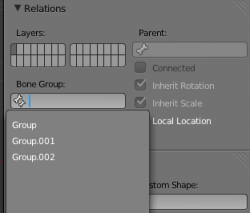
- In the Relations section of the Bones panel), use the Bone Group drop-down list to select the chosen one.
In the 3D views, using the Pose » Bone Groups menu entries, and/or the Bone Groups pop-up menu (CtrlG), you can:
- Assign to New Group
- Assigns selected bones to a new bone group
- Assign to Group
- Assigns selected bones to the selected Bone Groups
- Remove Selected from Bone Groups
- Removes selected bones from all bone groups
- Remove Bone Group
- Removes the active bone group
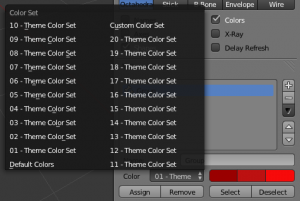
You can also assign a “color theme” to a group (each bone will have these colors). Remember you have to enable the Colors button (Armature panel) to see these colors. Use the Bone Color Set drop-down list to select:
- The default (gray) colors (Default Colors).
- One of the twenty Blender presets (nn – Theme Color Set), common to all groups.
- A custom set of colors (Custom Set), which is specific to each group.
Below this list, you have three color swatches and a button.
- The first swatch is the color of unselected bones.
- The second swatch is the outline color of selected bones.
- The third swatch is the outline color of the active bone.
As soon as you click on a swatch (to change the color, through the standard color editing dialog), you are automatically switched to the Custom Set option.
Ghosts
Mode: Pose mode
Panel: Visualisations
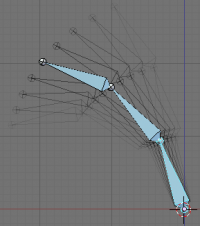
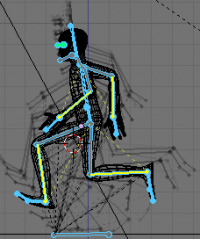
If you are a bit familiar with traditional cartoon creation, you might know that drawing artists use tracing paper heavily, to see several frames preceding the one they are working on. This allows them to visualize the overall movement of their character, without having to play it back… Well, Blender features something very similar for armatures in Pose mode: the “ghosts”.
The ghosts are simply black drawings (more or less opaque) of the bones’ outlines as they are at certain frames.
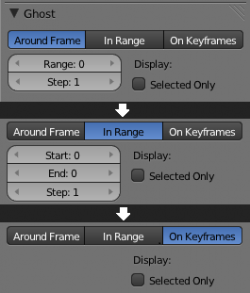
The ghosts settings are found in the Visualisations panel (Editing context, F9), only available in Pose mode. You have three different types of ghosts, sharing more or less the same options:
- Around Current Frame
- This will display a given number of ghosts before and after the current frame. The ghosts are shaded from opaque at the current frame, to transparent at the most distant frames. It has three options:
- Range
- This numeric field specifies how many ghosts you’ll have on both “sides” (i.e. a value of 5 will give you ten ghosts, five before the current frame, and five after).
- Step
- This numeric field specifies whether you have a ghost for every frame (the default 1 value), or one each two frames, each three frames, etc.
- Selected Only
- When enabled, you will only see the ghosts of selected bones (otherwise, every bone in the armatures has ghosts…)
- In Range
- This will display the ghosts of the armature’s bones inside a given range of frames. The ghosts are shaded from transparent for the first frame, to opaque at the last frame. It has four options:
- Start
- This numeric field specifies the starting frame of the range (exclusive). Note that unfortunately, it cannot take a null or negative value – which means you can only see ghosts starting from frame 2 included…
- End
- This numeric field specifies the ending frame of the range, and cannot take a value below GSta one.
- Step
- Same as above.
- On Keyframes
- This is very similar to the In Range option, but there are ghosts only for keyframes in the armature animation (i.e. frames at which you keyed one or more of the bones). So it has the same options as above, except for the GStep one (as only keyframes generate ghosts).
- Oddly, the shading of ghosts is reversed compared to In Range – from opaque for the first keyframe, to transparent for the last keyframe.
Finally, these ghosts are also active when playing the animation (AltA) – this is only useful with the Around Current Frame option, of course…
Note also that there is no “global switch” to disable this display feature – to do so, you have to either set Ghost to 0 (for Around Current Frame option), or the same frame number in both GSta and GEnd (for the two other ghosts types).
Motion Paths
Mode: Pose mode
Panel: Visualisations
Hotkey: WNum3, WNum4
Menu: Pose » Motion Paths » …
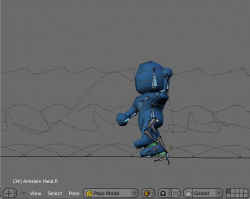
This feature allows you to visualize as curves the paths of bones’ ends (either their tips, by default, or their roots).
Before we look at its options (all regrouped in the same Visualisations panel, in the Editing context, F9), let’s first see how to display/hide these paths. Unlike ghosts, you have to do it manually – and you have to first select the bones you want to show/hide the motion paths. Then,
- To show the paths (or update them, if needed), click on the Calculate Path button of the Visualisations panel, or, in the 3D views, select the Pose » Motion Paths » Calculate Paths menu entry (or use the Specials pop-up menu, WNum3).
- To hide the paths, click on the Clear Paths button, or, in the 3D views, do Pose » Motion Paths » Clear All Paths, or WNum4.
Remember: only selected bones and their paths are affected by these actions!
The paths are drawn in a light shade of gray for unselected bones, and a slightly blueish gray for selected ones. Each frame is materialized by a small white dot on the paths.
As with ghosts, the paths are automatically updated when you edit your poses/keyframes, and they are also active during animation playback (AltA, only useful when the Around Current Frame option is enabled).
And now, the paths options:
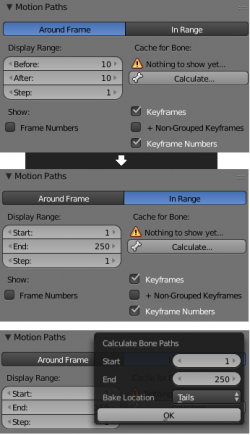
- Around Frame
- Around Frame, Display Paths of poses within a fixed number of frames around the current frame. When you enable this button, you get paths for a given number of frames before and after the current one (again, as with ghosts).;In Range
- In Range, Display Paths of poses within specified range.
- Display Range
- Before/After
- Number of frames to show before and after the current frame (only for ‘Around Current Frame’ Onion-skinning method)
- Start/End
- Starting and Ending frame of range of paths to display/calculate (not for ‘Around Current Frame’ Onion-skinning method)
- Step
- This is the same as the GStep for ghosts – it allows you to only display on the path one frame for each n ones. Mostly useful when you enable the frame number display (see below), to avoid cluttering the 3D views.
- Frame Numbers
- When enabled, a small number appears next to each frame dot on the path, which is of course the number of the corresponding frame…
- Keyframes
- When enabled, big yellow square dots are drawn on motion paths, materializing the keyframes of their bones (i.e. only the paths of keyed bones at a given frame get a yellow dot at this frame).
- Keyframe Nums
- When enabled, you’ll see the numbers of the displayed keyframes – so this option is obviously only valid when Show Keys is enabled.
- + Non-Grouped Keyframes
- For bone motion paths, search whole Action for keyframes instead of in group with matching name only (is slower)
- Calculate
- Start/End
- These are the start/end frames of the range in which motion paths are drawn. You have to Calculate Paths again when you modify this setting, to update the paths in the 3D views.
- Note that unlike with ghosts, the start frame is inclusive (i.e. if you set PSta to 1, you’ll really see the frame 1 as starting point of the paths…).
- Bake Location
- By default, you get the tips’ paths. By changing this setting to Tails, you’ll get the paths of the bone’s roots (remember that in Blender UI, bones’ roots are called “heads”…). You have to Calculate Paths again when you modify this setting, to update the paths in the 3D views.
