Doc:2.6/Manual/Interface/Screens
Screens
Blender's flexibility with windows lets you create customized working environments for different tasks such as modeling, animating, and scripting. It is often useful to quickly switch between different environments within the same file.
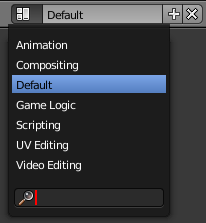
To do each of these major creative steps, Blender has a set of pre-defined screens, that show you the types of windows you need to get the job done quickly and efficiently. Screens are essentially pre-defined window layouts. If you are having trouble finding a particular screen, you can use the search function at the bottom of the list (pictured right).
Default Screens available
- Animation
- Making actors and other objects move about, change shape or color, etc.
- Compositing
- Combining different parts of a scene (e.g. background, actors, special effects) and filter them (e.g. color correction).
- Default
- The default layout used by Blender for new files. Useful for modeling new objects.
- Game Logic
- Planning and programming of games within Blender.
- Scripting
- Documenting your work and/or writing custom scripts to automate Blender.
- UV Editing
- Flattening a projection of an object mesh in 2D to control how a texture maps to the surface.
- Video Editing
- Cutting and editing of animation sequences.
Blender sorts these screen layouts for you automatically in alphabetical and/or numerical order. The list is available in the Info Window header that is at the top of the layout for preset screens. This is often confused for a menu bar by those new to Blender; however it is simply a window showing only its header.
To change to the next alphabetically listed screen press Ctrl→; to change to the previous screen, press Ctrl←.
By default, each screen layout 'remembers' the last scene it was used on. Selecting a different layout will switch to the layout and jump to that scene.
All changes to windows, as described in Window system and Window types, are saved within one screen. If you change your windows in one screen, other screens won't be affected.
Configuring your Screens
Adding a new Screen Type
Click on the "Add" button(![]() ) and a new frame layout will be created based on your current layout.
) and a new frame layout will be created based on your current layout.
You might want to give the new screen not only a name but also a number in front of it so that you can predictably scroll to it using the arrow keys. You can rename the layout by LMB ![]() in the field and typing a new name, or clicking again to position the cursor in the field to edit. For example you could use the name "6-MyScreen". See Screen and Scene selectors above.
in the field and typing a new name, or clicking again to position the cursor in the field to edit. For example you could use the name "6-MyScreen". See Screen and Scene selectors above.
Deleting a Screen
You can delete a screen by using the Delete datablock button (![]() ). See Screen and Scene selectors above.
). See Screen and Scene selectors above.
Rearranging a Screen
Use the window controls to move frame borders, split and consolidate windows. When you have a layout that you like, press CtrlU to update your User defaults. Be aware that all of the current scenes become part of those defaults, so consider customizing your layouts with only a single, simple scene.
The properties window has a special option: pressing RMB ![]() on its background will allow you to arrange its panels horizontally or vertically. Of the two, vertically-arranged panels have greater support.
on its background will allow you to arrange its panels horizontally or vertically. Of the two, vertically-arranged panels have greater support.
Overriding Defaults
When you save a .blend file, the screen layouts are also saved in it. When you open a file, enabling the Load UI checkbox in the file browser indicates that Blender should use the file's screen layouts (overriding your defaults in the process). Leaving the Load UI checkbox disabled tells Blender to use the current layout.
Additional Layouts
As you become more experienced with Blender, consider adding some other screen layouts to suit your workflow as this will help increase your productivity. Some examples could include:
- 1-Model
-
- Four 3D windows (top, front, side and perspective), Properties window for Editing
- 2-Lighting
-
- 3D windows for moving lights, UV/Image Window for displaying Render Result, Properties window for rendering and lamp properties and controls
- 3-Material
-
- Properties window for Material settings, 3D window for selecting objects, Outliner, Library script (if used), Node Editor (if using Node based materials)
- 4-UV Layout
-
- UV/Image Editor Window, 3D Window for seaming and unwrapping mesh
- 5-Painting
-
- UV/Image Editor for texture painting image, 3D window for painting directly on object in UV Face Select mode, three mini-3D windows down the side that have background reference pictures set to full strength, Properties window
- 6-Animation
-
- Graph Editor, 3D Window for posing armature, NLA Window
- 7-Node
-
- Big Node Editor window for noodles, UV/Image window linked to Render Result
- 8-Sequence
-
- Graph Editor, video sequence editor in Image Preview mode, video sequence editor in timeline mode, a Timeline window, and the good old Properties window.
- 9-Notes/Scripting
-
- Outliner, Text Editor (Scripts) window
Reuse your Layouts
If you create a new window layout and would like to use it for future .blend files, simply save it as the User default by pressing CtrlU (don't forget: all screens and scenes themselves will be saved as default too).
|

