Doc:2.6/Manual/Materials/Properties/Mirror
Mirror Reflections
Mirror reflections are computed in the Blender Render and Cycles render engines using ray tracing. (NB: Reflections are not available in the Game Engine.) Ray tracing can be used to make a material reflect its surroundings, like a mirror. The principle of ray-traced reflections is very simple: a ray is fired from the camera and travels through the scene until it encounters an object. If the first object hit by the ray is not reflective, then the ray takes the color of the object. If the object is reflective, then the ray bounces from its current location and travels up to another object, and so on, until a non-reflective object is finally met and gives the whole chain of rays its color.
Eventually, the first reflective object inherits the colors of its environment, proportional to its Reflectivity value. Obviously, if there are only reflective objects in the scene, then the render could last forever. This is why a mechanism for limiting the travel of a single ray is set through the Depth value: this parameter sets the maximum number of bounces allowed for a single ray.
Note
You need to enable ray tracing in your scene settings if you want to use ray-traced reflections. This is done in the Scene/Render context → Render Panel. Ray tracing is enabled by default in Blender 2.37 and higher. |
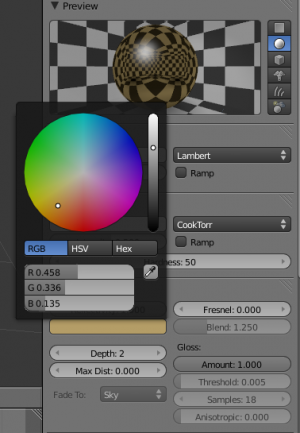
The Color Swatch in the mirror panel is the color of the light reflected back. Usually, for normal mirrors, use white. However, some mirrors color the reflection (e.g. metals), so you can change the color by clicking on the swatch.
The amount of mirrored reflection is determined by the Reflectivity value. If set to something greater than 0, mirrored reflectivity will be activated and the reflection will be tinted the color set in the swatch.
Options
- Enable ray-traced reflections
- Enable or disable ray-traced reflections
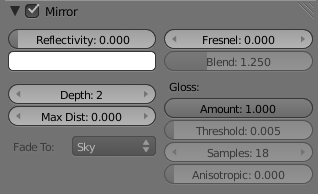
- Reflectivity
- Sets the amount of reflectiveness of the object. Use a value of 1.0 if you need a perfect mirror, or set it to 0.0 if you don't want any reflection.
- Color swatch
- Color of mirrored reflection
- By default, an almost perfectly reflective material like chrome, or a mirror object, will reflect the exact colors of its surrounding. But some other equally reflective materials tint the reflections with their own color. This is the case for well-polished copper and gold, for example. In order to replicate this within Blender, you have to set the Mirror Color accordingly. To set a mirror color, simply click the color swatch in the mirror panel and select a color.
- Fresnel
- Sets the power of the Fresnel effect. The Fresnel effect controls how reflective the material is, depending on the angle between the surface normal and the viewing direction. Typically, the larger the angle, the more reflective a material becomes (this generally occurs on the outline of objects).
- Blend
- A controlling factor to adjust how the blending happens between the reflective and non-reflective areas.
- Depth
- Maximum allowed number of light inter-reflections. If your scene contains many reflective objects and/or if the camera zooms in on such a reflective object, you will need to increase this value if you want to see surrounding reflections in the reflection of the reflected object (!). In this case, a Depth of 4 or 5 is typically a good value.
- Max Dist
- Maximum distance of reflected rays away from camera (Z-Depth) in Blender units. Reflections further than this range fade out to reduce compute time.
- Fade to
- The color that rays with no intersection within the Max Distance take. Material color can be best for indoor scenes, Sky color (World settings) for outdoor scenes.
- Gloss
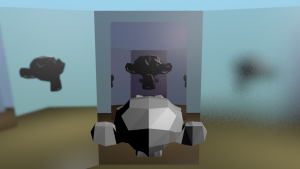
- In paint, a high-gloss finish is very smooth and shiny. A flat, or low gloss, finish disperses the light and gives a very blurry reflection. Also, uneven or waxed-but-grainy surfaces (such as car paint) are not perfect and therefore slightly need a Gloss < 1.0. In the example to the right, the left mirror has a Gloss of 0.98, the middle is Gloss = 1.0, and the right one has Gloss of 0.90. Use this setting to make a realistic reflection, all the way up to a completely foggy mirror. You can also use this value to mimic depth of field in mirrors.
- Amount
- The shininess of the reflection. Values < 1.0 give diffuse, blurry reflections and activate the settings below.
- Threshold
- Threshold for adaptive sampling. If a sampling contributes less than this amount (as percentage), sampling is stopped. Raising the threshold will make the adaptive sampler skip more often, however the reflections could become noisier.
- Samples
- Number of cone samples averaged for blurry reflection. More samples will give a smoother result, but will also increase render time.
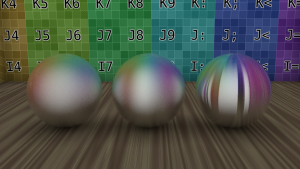
- Anisotropic
- The shape of the reflection, from 0.0 (circular) to 1.0 (fully stretched along the tangent). If the Tangent Shading is on, Blender automatically renders blurry reflections as anisotropic reflections.
- When Tangent is switched on, the Anisotropic slider controls the strength of this anisotropic reflection, with a range of 1.0 (default) being fully anisotropic and 0.0 being fully circular, as is when tangent shading on the material is switched off. Anisotropic ray-traced reflection uses the same tangent vectors as for tangent shading, so you can modify the angle and layout the same way, with the auto-generated tangents, or based on the mesh's UV co-ordinates.
Examples
Fresnel
Let's undertake a small experiment in order to understand what Fresnel is really about. After a rainy day, go out and stand over a puddle of water. You can see the ground through the puddle. If you kneel just in front of the puddle, your face close to the ground, and look again at a distant point on the puddle of water, the liquid surface part which is closer to you lets you see the ground, but if you move your gaze towards the other end of the puddle, then the ground is gradually masked until all you see is the reflection of the sky. This is the Fresnel effect: having a surface sharing reflective and non-reflective properties according to the viewing angle and the surface normal.
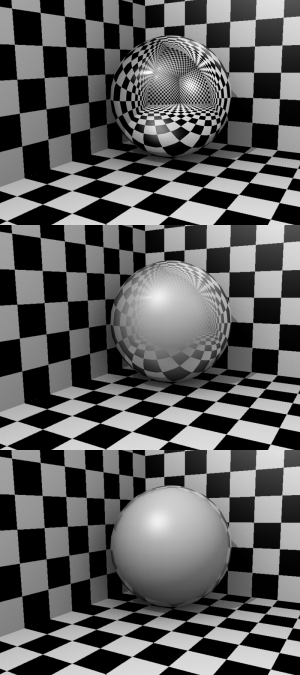
In Demonstration of Fresnel effect with values equal to (from top to bottom) 0.0, 2.5 and 5.0, this behavior is demonstrated for a perfectly reflective Material (Mirror Reflectivity 1.0).
Fresnel 0.0 stands for a perfect mirror Material, while Fresnel 5.0 could stand for a glossy Material. It's barely noticeable but in the lower picture, the Material is perfectly reflective around the edges.
The smoothness of the Fresnel limit can be further controlled using the Blend slider.
