Doc:2.6/Manual/Modeling/Metas
Meta Objects
Mode: Object or Edit modes
Hotkey: ⇧ ShiftA
Menu: Add » Meta
Meta objects are implicit surfaces, meaning that they are not explicitly defined by vertices (as meshes are) or control points (as surfaces are): they exist procedurally. Meta objects are literally mathematical formulas that are calculated on-the-fly by Blender.
A very distinct visual characteristic of metas is that they are fluid mercurial, or clay-like forms that have a “rounded” shape. Furthermore, when two meta objects get close to one another, they begin to interact with one another. They “blend” or “merge”, as water droplets do, especially in zero-g (which, by the way, makes them very handy for modeling streams of water when you don’t want to do a fluid simulation). If they subsequently move away from one another, they restore their original shape.
Each of these is defined by its own underlying mathematical structure, and you can at any time switch between them using the Active Element panel.
Typically Meta objects are used for special effects or as a basis for modeling. For example, you could use a collection of metas to form the initial shape of your model and then convert it to another object type (well, only meshes are available…) for further modeling. Meta objects are also very efficient for ray-tracing.
Note that Meta objects have a slightly different behavior in Object mode, as detailed below.
Primitives
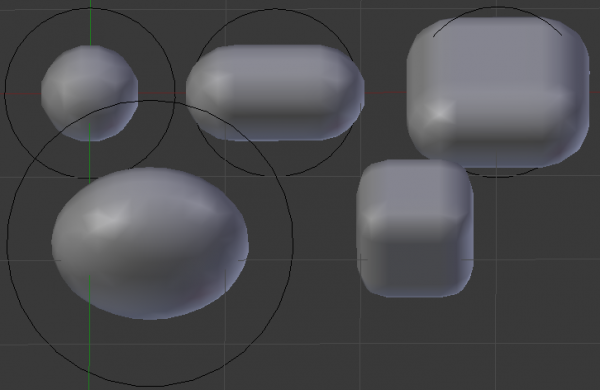
There are five predefined meta “primitives” (or configurations) available in the Add » Meta sub-menu:
- Meta Ball adds a meta with a point underlying structure.
- Meta Tube adds a meta with a line segment underlying structure.
- Meta Plane adds a meta with a planar underlying structure.
- Meta Ellipsoid adds a meta with an ellipsoidal underlying structure.
- Meta Cube adds a meta with a volumetric cubic underlying structure.
Visualization
In Object mode, the calculated mesh is shown, along with a black “selection ring” (becoming pink when selected). To learn more about metas in Object mode, see below.
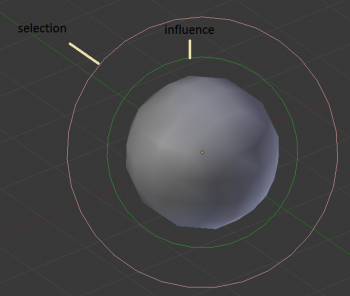
In Edit mode (Meta Ball example), a meta is drawn as a mesh (either shaded or as black wireframe, but without any vertex of course), with two colored circles: a red one for selection (pink when selected), and a green one for a direct control of the meta’s stiffness (see below – light green when active). Note that except for the Scale (S) transformation, having the green circle highlighted is equivalent to having the red one.
Meta Ball Options
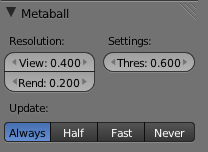
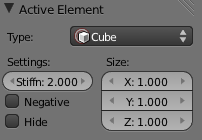
All Meta objects in a scene interact with each other. The settings in the MetaBall section apply to all meta objects. In Edit mode, the Active Element panel appears for editing individual meta elements.
Resolution
The Resolution controls the resolution of the resultant mesh as generated by the Meta object.
- View
- The 3D View resolution of the generated mesh. The range is from 0.05 (finest) to 1.0 (coarsest).
- Render
- The rendered resolution of the generated mesh. The range is from 0.05 (finest) to 1.0 (coarsest).
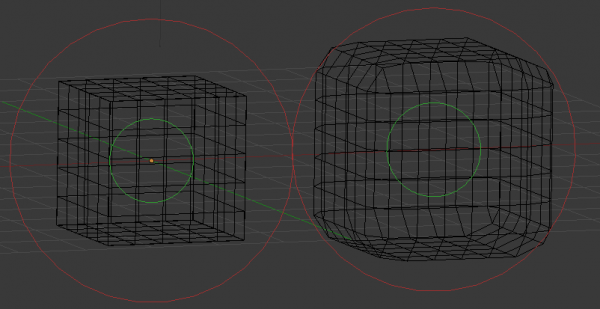
One way to see the underlying mathematical structure is to lower the Resolution, increase the Threshold and set the Stiffness (see below) a fraction above the Threshold. (Underlying structure) is a (Meta cube) with the above mentioned configuration applied as follows: Resolution of 0.410, Threshold of 5.0 and Stiffness a fraction above at 5.01.
You can clearly see the underlying cubic structure that gives the meta cube its shape.
Threshold (Influence)
Mode: Object or Edit modes
Panel: MetaBall (Editing context, F9)
Threshold defines how much a meta’s surface “influences” other metas. It controls the field level at which the surface is computed. The setting is global to a group of Meta objects. As the threshold increases, the influence that each meta has on each other increases.
There are two types of influence: positive or negative. The type can be toggled on the Active Element panel while in Edit mode, using the Negative button. You could think of positive as attraction and negative as repulsion of meshes. A negative meta will push away or repel the meshes of positive Meta objects.
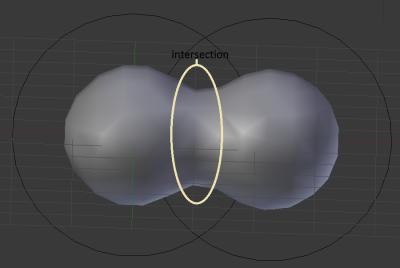
A positive influence is defined as an attraction, meaning the meshes will stretch towards each other as the rings of influence intersect. (Positive) shows two meta balls’ rings of influence intersecting with a positive influence.
Notice how the meshes have pulled towards one another. The area circled in white shows the green influence rings intersecting.
Update
While transforming metas (grab/move, scale, etc.), you have four “modes” of visualization, located in the Update buttons group of the MetaBall panel:
- Always – fully draw the meta during transformations.
- Half Res – During transformations, draw the meta at half its Wiresize resolution.
- Fast – Do not show meta mesh during transformations.
- Never – Never show meta mesh (not a very recommended option, as the meta is only visible at render time!).
This should help you if you experience difficulties (metas are quite compute-intensive…), but with modern computers, this shouldn’t happen, unless you use many metas, or very high resolutions…
Meta Structure
Technical Details
A more formal definition of a meta object can be given as a directing structure which can be seen as the source of a static field. The field can be either positive or negative and hence the field generated by neighboring directing structures can attract or repel.
The implicit surface is defined as the surface where the 3D field generated by all the directing structures assume a given value. For example a meta ball, whose directing structure is a point, generates an isotropic (i.e. identical in all directions) field around it and the surfaces at constant field value are spheres centered at the directing point.
Meta objects are nothing more than mathematical formulae that perform logical operations on one another (AND, OR), and that can be added and subtracted from each other. This method is also called Constructive Solid Geometry (CSG). Because of its mathematical nature, CSG uses little memory, but requires lots of processing power to compute.
Underlying Structure
Mode: Edit mode
Panel: MetaBall tools (Editing context, F9), Transform Properties
Blender has five types of metas, each determined by its underlying (or directing) structure. In Edit mode, you can change this structure, either using the relevant buttons in the MetaBall tools panel, or the drop-down list in the Transform Properties panel (N). Depending on the structure, you might have additional parameters, located in both Transform Properties and MetaBall tools panels.
- Ball (point, zero-dimensional structure)
- This is the simplest meta, without any additional setting. As it is just a point, it generates an isotropic field, yielding a spherical surface (this is why it is called Meta Ball or Ball in Blender).
- Tube (straight line, uni-dimensional structure)
- This is a meta which surface is generated by the field produced by a straight line of a given length. This gives a cylindrical surface, with rounded closed ends. It has one additional parameter:
- dx: The length of the line (and hence of the tube – defaults to 1.0).
- Plane (rectangular plane, bi-dimensional structure)
- This is a meta which surface is generated by the field produced by a rectangular plane. This gives a parallelepipedal surface, with a fixed thickness, and rounded borders. It has two additional parameters:
- dx: The length of the rectangle (defaults to 1.0).
- dy: The width of the rectangle (defaults to 1.0).
- Note that by default, the plane is a square.
- Elipsoid (ellipsoidal volume, tri-dimensional structure)
- This is a meta which surface is generated by the field produced by an ellipsoidal volume. This gives an ellipsoidal surface. It has three additional parameters:
- dx: The length of the ellipsoid (defaults to 1.0).
- dy: The width of the ellipsoid (defaults to 1.0).
- dz: The height of the ellipsoid (defaults to 1.0).
- Note that by default, the volume is a sphere, producing a spherical meta, as the Ball option…
- Cube (parallelepipedal volume, tri-dimensional structure)
- This is a meta which surface is generated by the field produced by a parallelepipedal volume. This gives a parallelepipedal surface, with rounded edges. As you might have guessed, it has three additional parameters:
- dx: The length of the parallelepiped (defaults to 1.0).
- dy: The width of the parallelepiped (defaults to 1.0).
- dz: The height of the parallelepiped (defaults to 1.0).
- Note that by default, the volume is a cube.
