Doc:2.6/Manual/Modifiers/Modify/UV Warp
UV Warp Modifier
Mode: Any mode
Panel: Modifiers (Generate)
ファイル:Uvwarp.jpg
Projecting the Blender logo onto Suzanne.
UV Warp uses 2 objects to define a transformation which is applied to the UV coordinates.
Options
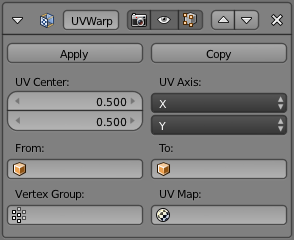
- UV Center
- The center point of the UV map to use when applying scale or rotation. With (0, 0) bottom left and (1, 1) top right. Defaults to (0.5, 0.5).
- UV Axis
- The axis to use when mapping the 3D coordinates into 2D.
- From/To
- The two objects used to define the transformation, when these objects overlap eachother - there will be no warp value, only the difference in transformation is used, note that bones can be used for armature objects.
- Vertex Group
- The vertex group can be used to scale the influence of the transformation per-vertex.
- UV Map
- Which UV map to modify. Defaults to the active rendering layer.
Usage
The UV Warp modifiers main usage is to give you direct control over UV's as you do with objects and bones, so you can directly rotate, scale and translate existing UV coordinates using objects and bones.
