Doc:2.6/Manual/Modifiers/The Stack
Modifier
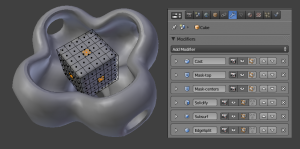
A modifier is defined as the application of a “process” or “algorithm” upon objects. They can be applied interactively and non-destructively in just about any order the users chooses. This kind of functionality is often referred to as a “modifier stack” and is found in several other 3D applications.
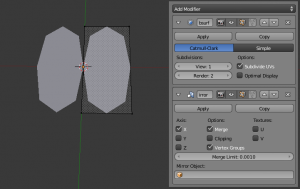
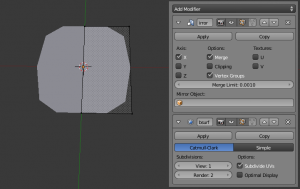
Modifiers are added from the Modifiers menu. Some tools and scripts, for example Decimate and Solidify, have been migrated from its previous location and changed into a modifier. In a modifier stack the order in which modifiers are applied has an effect on the result. Fortunately modifiers can be rearranged easily by clicking the convenient up and down arrow icons. For example, (Stack ordering) shows SubSurf and Mirror modifiers that have switched places.

|

|
| Stack ordering | |
In the first example, the Mirror modifier is the last item in the stack. The result looks like two surfaces. In the other example the mirror modifier is the first item in the stack and the result is a single merged surface.
You can see that the results look different from the previous. This means that the stack order is very important in defining the end results.
Interface
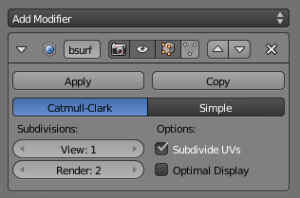
Each modifier has been brought in from a different part of Blender, so each has its own unique settings and special considerations. However, each modifier’s interface has the same basic components, see (Panel Layout (Subsurf as an example)).
At the top is the panel header. The icons each represent different settings for the modifier (left to right):
- Arrow — Collapse modifier to show only the header.
- Modifier icon and a box for the name of this modifier — default being the name of the modifier itself. It is unique amongst other modifiers of the same type.
- Camera — Display modifier effect during render time.
- Eye — Display modifier effect in the 3D view.
- Box — Shows modifier effect in Edit mode. This button may not be available depending on the type of modifier.
- Triangle — Applies modifier to editing cage in Edit mode. This icon materializes the Cage mode.
- Up arrow — Moves modifier up in the stack.
- Down arrow — Moves modifier down in the stack.
- Cross — Removes the modifier from the stack.
Below the header are two buttons:
- Apply – Makes the modifier real.
- Copy – Creates a copy of the modifier at the base of the stack.
And below these buttons is a sub panel with settings for individual modifiers.
Stack

To add a modifier you add it to the stack. Once added (always at the bottom of the stack), they can be rearranged to your liking.
Some modifiers can only be applied to certain object types. This is indicated by the panel filtering the Add Modifier button on the Modifiers panel. Only modifiers that can be applied are shown in this listbox button. Mesh objects can have all available modifiers added, while, for example, Lattice objects type objects can only have a few.
