Doc:2.6/Manual/Motion Tracking Mask
目次
Mask
Introduction
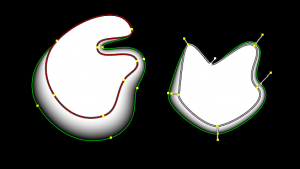
Mask is a grayscale raster image which is created from vector image. Artists interacts with vector image to create mask with needed shape and then it automatically gets rasterized when using in Node Editor or wherever else.
User interacts with masks in the following editors:
- Movie Clip Editor
- Image Editor
- Node Editor
- Sequencer
- Dope Sheet
Movie Clip Editor and Image editor are used to edit masks, Compositor and Sequencer are just using already created mask, Dope Sheet for animating masks.
Previously there was no simple workflow for masks in Blender, compositing a rendered scene with real footage was possible, but when it came to masking out objects, defining areas of influence and other scenarios, the workflow was cumbersome. Masks are now natively supported, which allow you to draw masks using splines, and then have them rasterized for use in the compositor or sequencer.
This features consists of a few different parts:
- Mask datablock containing multiple mask layers and splines.
- Mask editing in the image and movie clip editor space using various tools.
- Animation of masks with keyframes, drivers and tracking data.
- Compositing node and sequencer strip to use mask.
Mask Datablock: Points, Splines and Layers
A Point is the most low-level entity used to define mask. It's a simple point with it a coordinate, handles and set of feather points. Points can be parented to markers from motion tracking.
Sets of points define a Spline. Currently only Bezier splines are supported. They create a smooth curve from the first to the last point in the spline. Splines by default will create a filled area, but can also create non-closed curves with a thickness to mask out objects such as wires or hair.
One or several splines can belong to the same Layer. Splines belonging to the same layer can be animated together, for example by an item from motion tracker footage. By creating overlapping splines holes can be created, and it's the layer membership that defines which splines interact to create holes.
Mask datablocks are the most high-level entity used for masking purposes. They can be reused in different places, and hold global parameters for all the entities they consist of.
Understanding Layers
The purpose of mask layers can be explained with an example. Suppose there are two unwanted people in the footage, and one of them goes from left to right, and the other in the opposite direction. Two mask layers can then be used to mask them separately using a single mask datablock. At the point of intersection of these shapes they will be added together rather than creating a hole, as would happen if they were on the same layer. If the motion is simple enough, a single motion tracked point can be used to drive the location of the entire mask layer. Each mask layer can consist of multiple splines to fit more complex shapes.
Editing Masks
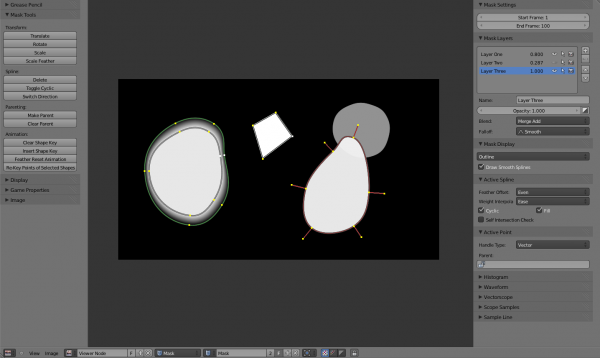
Masks can be created in the image and movie clip editors, by changing the mode from View to Mask in the header. This will add various tools and properties to the editor panels, while hiding others that are not needed for interacting with masks. The tools and panels available to edit masks are the same in both editors, with the exception that linking masks to motion tracking data is only possible in the movie clip editor.
Once set to Mask mode, a Mask datablock can be added. Any image, movie clip, render or compositing result can be used as a backdrop to draw masks over. To get interactive feedback on the resulting mask, a Mask node can be connected directly to a Viewer node in the compositor, which will then keep updating the compositing result while editing.
Control Points
Editing of mask splines happens in a way similar to editing bezier curves or paths in GIMP or other curve editors: control points are added to define the spline itself, and handles of different types are used to create smooth bends. This makes it possible to define a mask with few points to easily follow an object in footage.
- Ctrl + LMB
 is used to place new control points and define handle orientations (click to place control point, click followed with slide to place new control point and set smoothness for it).
 - Alt + C: to close the mask by joining the last control point to the first.
- Existing control points can be translated, scaled and rotated with the usual G, S, R shortcuts.
- X or Delete removes control points.
Selection
The usual selection and hide/reveal tools are available:
- A: toggle select all
- B, C: border and circle Select
- Ctrl + L select linked from selection, L: select linked with mouse
- Ctrl + Alt + LMB
 : lasso select
 - H hide selected, ⇧ Shift + H hide unselected, Alt + H reveal
Curve Handles
- Alt + C: cycle toggle spline, to create a close curve or open it again
- V: set handle type for selected spline points
- Ctrl + N: make normals (handle directions) consistent
- Switch Direction handle directions in/out.
Feather
It's possible to control feather of mask, including a way to define non-linear feather. Linear feather is controlled by a slider, non-linear feather is controlled in the same curve-based way to define feather falloff.
- ⇧ Shift + LMB
 is used to define a feathering outline curve. To create an initial feather, sliding from a spline control point outside or inside will create and position feather points. After this ⇧ Shift + LMB
  will insert new feather point and mouse sliding can be used to move them around.
 - Alt + S will scale the feather size.
Using Masks
Masks have many purposes. They can be used in a motion tracking workflow to mask out, or influence a particular object in the footage. They can be used for manual rotoscoping to pull a particular object out of the footage, or as a rough matte for green screen keying. Masks are independent from a particular image of movie clip, and so they can just as well be used for creating motion graphics or other effects in the compositor.
Compositing Node
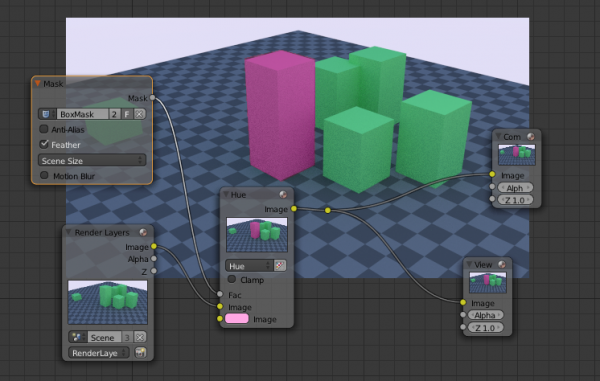
In the compositing nodes the Mask input node can be used to select a mask datablock, with as output the raster mask image. This image can be used with other nodes, for example to Invert, Multiply or Mix, or use as a factor input. The node options are:
- Anti-Alias
- Create smooth mask edges rather than hard ones.
- Feather
- Use or ignore feather points defined for splines.
- Size
- Scene Size will give an image the size of the render resolution for the scene, scaling along when rendering with different resolutions. Fixed gives a fixed size in pixels. Fixed/Scene gives a size in pixels that still scales along when changing the render resolution percentage in the scene.
- Motion Blur
- For animated masks, creating a motion blurred mask from the surrounding frames, with a given number of samples (higher gives better quality), and a camera shutter time in seconds.
Sequencer Strip
In the sequencer a Mask strip can be added, which generates a mask image. This works similar to the compositing node but without the options available for finer control. The mask image is always generated at the render resolution, scaling along with different proxy levels.
S-Curves
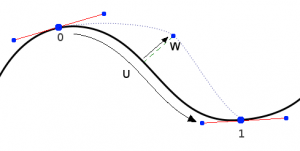
The curve type used for creating mask splines is almost a Bezier curve, but with some differences. The curve needed to support feathering in a way that stuck to the curve as you edited it, for ease of editing an animation. We call these S-Curves.
Besides the handles, every control point also has points that define the feather between the current point and the next point on the spline. Each feather point is stored in UV space, where U means position across spline segment, and V means distance between main spline and feather points.
This allows for deforming the main spline in almost any way, and the feather will be updated automatically to reflect that change. For example if there's just rotation of the spline, feather would stay completely unchanged. If one point's feather is moved, the other feathers will be automatically stretched uniformly along that segment and the overall shape will be almost the same as artists would want it to be.
Masking Tips
1. Analyze the sequence. Try to figure out which parts of the object are overlapping, moves in different directions (arms, legs, body of walking man; protruding elements and body of a car (eg: mirrors, antenas, lights on the roof); ears and nose when head turns). For each of those overlapped objects you should create separate mask. Obvious masks also should be overlapped, not end-to-end (only just touching).
Its a good idea is to create separate masks for parts with different kinds of motion. For example, if a man stays still and shakes his head actively, you can create separate masks for head and figure. But someone moves across the screen in a straight line and hold his head straight, you’ll need separate masks for arms and legs, and you can create single mask for head and body.
It’s important to create masks namely for objects, not for spaces between them. For example, if a man is waving a flag held with both hands – Then the overall shape the hands, body and flagstaff would be much more consistent and easy for masking, than it would be if the whole body’s silhouette and spaces between arms and body.
Never try masking out a group of moving people with a single mask. The same thing applies for clenching fist. In this case you should use separate masks for each knuckle. Also for complex shapes, use several masks with just one “working” side (see below)
2. Always use tracking where possible. If the shape of the object changing slightly, and you have translating, rotation or zoom in the sequence, you can track the motion and attach mask vertices’s to the track. In this way you’ll get general motion and you’ll need create much less keyframes for compensate inaccuracy of tracking.
3. Find the frame where you can see whole object. Start masking from this frame. Try to use as few mask points as possible for the objects outline. Otherwise it could be hard to animate.
Next, to avoid jittering and sudden movements of mask, animate the mask in several passes. Firstly create basic keyframes and then add keyframes where its necessary.
4. First pass. Find the key moments – beginning of objects moving, stopping, changing speed. Create certain amount of keyframes accordingly.
While animating a mask its easy to forget the origins of the mask points – so for eg: what starts as the point of an elbow may end on the wrist by the end of the animation. – This should be avoided because the areas in-between the keyframes tend to look bad and you end up adding more keyframes to compensate for it.
5. Second pass. Check how mask interpolates between keyframes and how it follows the movement of object. Add keyframes where the mask has the most significant offset from the object. Repeat this 3 or four times.
Once you have the bare minimum number of keyframes needed, the masks animation will look smooth so you’ll be able to adjust mask’s shape with less effort.
Now you can enable motion blur on the mask node, adjusting individually for each shot. In Blender I usually use Shutter = 0.25-0.35.


