Doc:2.6/Manual/Render/Post Process/Passes
Page status (reviewing guidelines)
Copy
This page is a copy of the same page in 2.4 manual, need to be updated
|
Render Passes
Render Passes are necessary because of the different things the Blender Render Engine must calculate to give you the final image. In each 'pass' the engine calculates different interactions between objects.
Render Passes In Detail
Everything you see in a render must be calculated for the final image. All interactions between objects in your scene, lighting, cameras, background images, world settings, etc., must all be separately calculated in different passes for different reasons, such as calculating shadows.
In a render, every pixel has been calculated several times to make sure it will show the right color for the right part of the image. Various things that are calculated in a standard render include:
- Where are shadows cast?
- How is ambient light in the environment blocked (occluded) by objects in the scene?
- How is light reflected off mirrored surfaces? Like shadows, lines are calculated, except this time they come from the camera and bounce off mirrored surfaces, so that when these lines hit an object, the engine calculates that this is what the camera should see.
- How is light bent (refracted) as is passes through transparent objects? Does it go straight through? Does it bend? If so, at what depth in the object?
- What designated objects are in the scene, and what is their outline? Should the object appear blurred, or should it appear in sharp focus?
- How fast is something moving (velocity)? Should it appear blurred given our frame rate or is it slow enough to still be focused on properly?
- How far away from the camera are objects' surfaces (Z-depth)? Can the object's surfaces be seen at all, or are they being blocked by another object's geometry?
- Does an object have a normal vector (bumpmap)? Do shadows and apparent geometry need to be calculated for any objects?
- Is there any specularity? Are objects with textures such as metal shiny at all?
Renderer Rewrite
Starting with Blender 2.42, the render engine was rewritten. See Unified Renderer if you are using an old version of Blender.
|
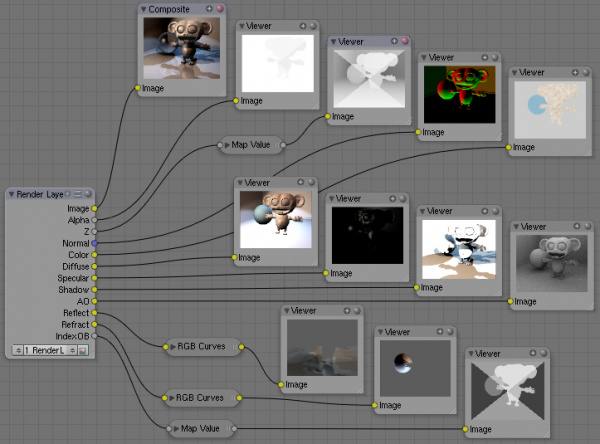
The answer to each of the above questions is an image or map, as shown below:
Each Render Pass puts out an image or a map. For the purposes of this example, a Render Layer was defined to produce all possible outputs. When a Render Layer input-node was added to the node diagram and the Render Layer input-node was subsequently associated with the Render Layer, all of the layer's outputs appeared as connection points on the right-hand (output) side of the node.
Render Passes that produce Images can be directly viewed in a viewer, or, if they are the only pass that is rendered, saved as the render image. If the pass is enabled, it can be saved in a multilayer OpenEXR format.
If the Render Pass output is not an image but is a map, it needs to be translated into something that we can see. For example, the Z-depth map is an array of values that specifies how far away from the camera each pixel is; values range between +/-3,000,000 Blender Units or so. The intermediate node you see above, between the Render Layer output socket and the Viewer node input socket (such as Map Value) does this translation or scaling. You must use that specific kind of translation node to get good results if you intend on operating on that map as an image. You must then, after making any adjustments, run the map back through that node to re-scale it back to the original before saving.
Selecting Render Passes
Render Passes are the various distinct outputs that the renderer is able to generate. All of the following render outputs are normally combined into a single output known, appropriately enough, as the Combined output. But you can also select any of them to be output as a separate pass. (If you do so, in most cases you can choose whether to also continue to include it in the Combined output.)
Some of these outputs must be enabled and used within your scene (and not just selected in the Render Layer panel) in order to show anything. For example, if you do not have any lights in your scene, or those lights have been set to not cast shadows, or objects in the limelight do not have materials which have been set to receive shadows, the Shadow pass will be blank; there's simply nothing to show you. If you have not enabled Ambient Occlusion in your World environment settings, the AO pass will be blank, even if you select it here.
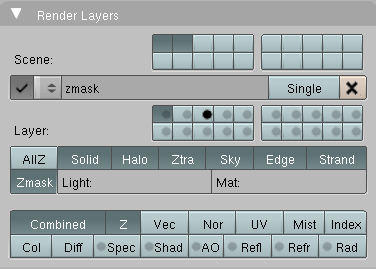
To save time and disk space, you have to tell Blender each of the passes to render in the Render Layers panel (which we first introduced on the previous page):
| Combined | This renders everything in the image, even if it's not necessary. ("The whole enchilada," so to speak.) This is all the options below, blended into a single output, except those options which you've indicated should be omitted from this pass, as indicated with the camera button. |
| Z | The Z-depth map; how far away each pixel is from the camera. Used for Depth-Of-Field (DOF). The depth map is inverse linear (1/distance) from the camera clip start. |
| Vector | The direction and speed things are moving. Used with Vector Blur. |
| Normal | Calculates lighting and apparent geometry for a bumpmap (an image which is used to fake detail on an object) or for changing the apparent direction of light falling on an object. |
| UV | Allows texturing after rendering. See UV node. |
| Mist | Deliver Mist factor pass. |
| Object Index | Masks selected objects. See MaskObj node. |
| Color | The color of materials without shading. |
| Diffuse | The diffuse shading of materials. |
| Specular | Specular highlights. |
| Shadow | Shadows cast. Make sure shadows are cast by your lights (positive or negative), and received by materials. To use this pass, mix multiply it with the Diffuse pass. |
| Emit | Emission pass. |
| AO | Ambient Occlusion. Make sure it's turned on in your environment and that RayTracing is enabled. |
| Environment | Environment lighting. |
| Indirect | Indirect lighting pass. |
| Reflection | Reflection off mirrors and other reflective surfaces (highly waxed white floors, for example). Mix Add this pass to Diffuse to use it. |
| Refraction | Refraction of colors through transparent meshes. Mix Add this pass to the Diffuse pass to use it. |
When you enable a pass, the appropriate socket on the Render Layers node shows up like magic, and can be used as shown in the example above.
Excluding Render Passes
As we said, the Combined output is an amalgam of several outputs which are also available separately. When you select one of these outputs, they will be provided separately and also included in the Combined pass.
When you enable the Camera icon that is beside several of the pass options, the particular pass will be excluded from the combined pass. They will be made available separately but not included in the combined pass.
Using Render Passes
The primary purpose of Render Passes is to enable you to process the various outputs in different ways, by constructing networks of render nodes. You can achieve many special effects, and economize considerably on the render times of complicated scenes, by creative and effective use of this facility. We'll show you a few examples of this in just a moment.
Quite a bit of information about the typical uses for some of the passes is discussed elsewhere:
- Image: Since this is the main product, all of Blender uses it.
- Alpha: See the AlphaOver node and all of the Matte nodes.
- Z: See the Defocus node.
- Vec: See the Vector Blur node.
- Normal: See the Normal node.
Recoloring Shadows
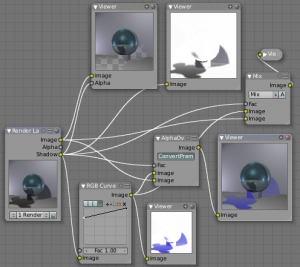
Let's run the Shadow buffer through a colorization noodle, then recombine it; all your shadows will be artificially colored. Lots of threads in this noodle are shown to the right, so let's walk through it. On the left is the Render Layer input node: it refers to one of the Render Layers that we have defined for our scene. In the scene, we have a reflective ball on a pedestal standing in front of a backdrop. Everything (except the ball) is gray. We use a standard four-light rig: backfill placed high, two sidefills at ground level, and a key light above and to the left of camera. Suzanne, a monkey-shaped geometry, is standing in front of the key light, so her shadow is cast into the scene on the floor. The ball casts shadows onto the backdrop and floor.
The output channels of the Render Layer node are determined by which buttons we selected when defining our Render Layer. The top two viewers show you the image output using the Shadow as the Alpha channel, and the node next to it just the Shadow channel. Where the Shadow is dark, the image in the left viewer is transparent. We have used the Shadow to cut out parts of the image.
We then take the shadow through an RGB Curve, which is set to magnify just the Blue by 75%; so a gray shadow of (R:40, G:40, B:40) becomes (R:40, G:40, B:40x1.75=70). That blue-tinged shadow is shown in the bottom viewer. Now we have two options: AlphaOver and Mix. For either option:
- Use the Shadow map as a Factor.
- Feed the Blue Shadow to the Top Socket.
- Feed the core or base image to the Bottom Socket.
The resulting image is the same in either case; a blue shadow. Note that Suzanne's reflection is not blue; there's a different Render Pass for that.
You could just as easily swap in another image entirely; for example, the shadow map from another render layer. You can even take an image from another project entirely and use that instead (using the Image Input node), to get a different effect. (For example, an effect similar to a Star Wars Episode One movie poster, where Anakin Skywalker already casts the shadow of Darth Vader.)
Compositing Ambient Occlusion
AO is a geometry-based dirt shader, making corners darker. It is separately enabled in the World settings and computed as a separate pass. When enabled, it has one of three Modes (Add, Subtract, Both), and variable Energy level (which changes the intensity of the shading). The third variable is the amount of Ambient light that the material receives. If it does not receive any, then ambient occlusion does not affect it. Based on these variables, Blender computes an AO pass. If you call it out as a separate pass and wish to composite it back into your image, you will need to enable the Color and Diffuse pass as well.
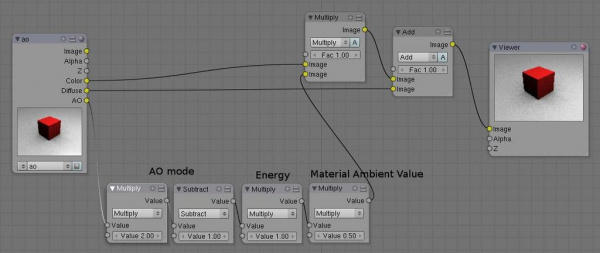
To configure your noodle, consider the example image above.
- . First, depending on the AO mode do one of the following: If AO mode is Add: directly use the AO pass. If AO mode is Sub: Calculate AO - 1, or if AO mode is Both: Calculate 2*AO - 1.
- . Multiply the output of Step 1 with the AO energy level.
- . Multiply the output of Step 2 with the material's ambience value. If you have materials which receive different ambience light levels (0.5 is the default), one would have to create an ambience map based on Object ID.
- . Multiply the output of Step 3 with the color pass.
- . Add the output of Step 4 to the diffuse pass.
If shadows, colored ambient light, specularity, reflections, and/or refractions are involved they have to be added to the diffuse pass before adding the converted AO pass.
Vector Blurring Shadows
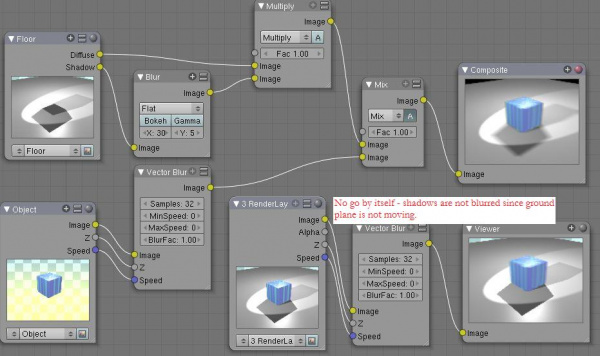
When using Vector Blur instead of Motion Blur, objects in motion are blurred, but objects at rest (with respect to the camera) are not blurred. The crossover is the shadow of the object in motion. Above, we have a cube in motion across a ground plane. If we just ran the combined pass through Vector Blur, you can see the result in the lower right-hand corner; the box is blurred, but its shadow is sharply in focus, and thus the image does not look realistic.
Therefore, we need to separate out the diffuse and shadow passes from the floor by creating a "Floor" render layer. That render layer has Diffuse and Shadow passes enabled, and only renders the floor object (layer 2). Another render layer ("Cube") renders the Z and Vector passes, and only renders the cube (on layer 1). Using the Blur node, we blur the shadow pass, and then combine the diffuse and blurred shadow by multiplying them together in a Mix Multiply node; we then have a blurred shadow on a crisp ground plane. We can then mix the vector-blurred object to provide a realistic-looking image.
Conclusion
Render Passes can be manipulated to give you almost complete control over your final image. Causing objects to cast shadows that aren't really their shadows, making objects appear out of focus or sharply in focus like a real camera, manipulating colors just for final post-processing or just reconfiguring your render passes to save render time, are all things which you might wish to manipulate the render engine for.
