Doc:2.6/Tutorials/Timeline/Timeline
If you've heard about 3D, then I'm sure you've heard of Animation too. And in Blender, if you hear animation, one area that comes into your mind too is the Timeline. Well, in this tutorial, lets learn basics of the Timeline and how we can use it. By the way, the screenshots in this tutorial are from Blender 2.64 version, but it is the same on 2.62+ versions (as at this writing).
The basic purpose of the Timeline is to control movements of your objects in 3D space. The Timeline isn't the one really moving your objects in 3D space. Rather, the Timeline gives you insight as to when what will be where in the 3D space. Furthermore, without the Timeline, it will difficult, if not impossible, to time our animations. The timelines helps us to know the number of frame or frames we are on, and how many more frame(s) are left, and so on.
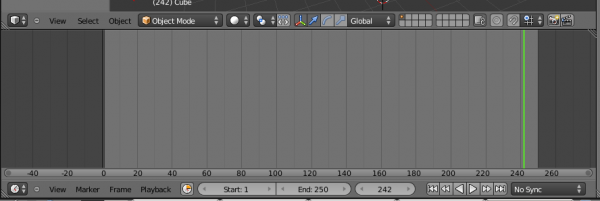
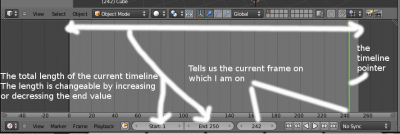
First of all, by default (in Blender's default layout arrangement), the Timeline lies at the bottom of the screen. It looks like this image. The green vertical line you see is the pointer. It tells us the frame on which we are. So in the image, we are on frame 242. How did I know? There are two ways to read the frame on which we are on. The first is to look at where the point is and plot downwards to read the value on the x-axis of the timeline. Yes, and the other, the simpler way, is to read the value from the little box beside the play and stop navigation buttons.
The timeline by default, displays framerates. However, you can change that to seconds instead. See image 2 to see how to do that.
By checking on the “Show Frame Number Indicator”, the number of the frame on which you are is displayed beneath the timeline indicator (the green vertical line)
You can play around with some of these settings to figure out what they do.
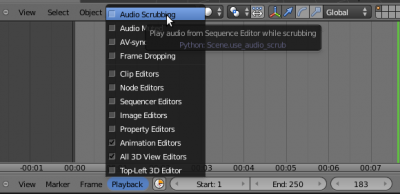
Next, you can play an audio you've attached in the video editor (or sequencer) in Blender while you move along the Timeline. To enable that, Left-Click on Playback and check on Audio Scrubbing. Other settings are available to help you work better using the Timeline. You can hover your mouse over them to read a short description of what they do. Many of those tool-tip descriptions are now much more sensible (recently), so you can rely on them for brief explanations of what they do and their function or functions.
To create animations, we need what is known in Blender as Keyframes. If you are familiar with Adobe Flash, you will find keyframes in Blender much the same in how they work. Keyframes themselves are on a frame and a frame, depending on the frame per second (fps) of the animation (in this case 25fps), is 1/25th of a second.
However, Keyframes are different in the sense that they mark specific points in the Timeline. For instance. I have on frame 1 a keyframe. The cube is in the middle of the 3D space. I click on frame 30 and add another keyframe in which, this time round, the cube is some Blender Units away from the center. When I press [Alt + A] to play, the cube will move from the initial point at A to B. The keyframes tell Blender where to put what object at what time in 3D space based on the explicit timings you have set in Blender. Don't worry, let's add a keyframe next.
] You can add a keyframe by pressing the [I] key ONLY when your 3D cursor is within the 3D window. If you press [I] while your mouse is in the Timeline, you won't achieve your aim of creating a keyframe. Please remember that. When you press the [I] key, it brings up the Insert Keyframe menu. Depending on the axes you wish to move your object, select its Keyframe insert.
When you insert a keyframe, in the timeline, the keyframe changes to a deep-yellowish color. That tells you that spot in the timeline has got a keyframe. If you've got many keyframes and you wish to move between them faster, use the up and down arrow keys. To move per frame at a time, use the Left and right arrow keys.
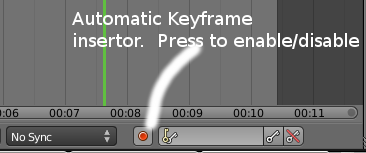
If you're animating, and don't wish to manually insert keyframes every now and then, you can toggle on the Automatic Keyframe insertion button and it will automatically insert a keyframe anywhere in 3D space you drop your object.
These are some of the basics of using the Timeline. It can be a handy tool when it's used the right way. By getting well-versed in its use, you can make your Blendering much more fun and enjoyable.
Be sure to go ahead to explore the timeline and try setting up stuff and adding keyframes and stuff like that!
Enjoy your day! +Rexford


