Doc talk:Manual/Physics/Force Fields and Deflection
Nice to see people starting to include stuff :)
The head template has now changed to take into account next/previous links too
THe images should be flushed right and resized, as the style guide specifies!
Please do not define new templates, there are the standard ones... well, actualli note might not be there yet, but it will!
S.
GUI images is unreadable if we resize them. Thats why I didn't follow the rules. If we use small images we should/could use them as is... K.
You are probably right on resizing, let's see what spidey manages to hack for images :)
Anyhow, flushing them to the right allows text to nicely flow around, obtaining a better look, IMHO
S.
Image links
Hello Styken, I see you fixed the image linking, but I think you should not have to use these. I'd rather see a good text & image flow, in such a way that the reader doesn't need to be redirected. It's only confusing to the reader when he/she is suddenly taken to another position on the page, while he/she was actually in the same position in the text!
Another thing to keep in mind is the fact that this text will be used for print aswell. In print of course, there are no hyperlinks, so the images would have to be positioned properly. You can either do this by floating them to the right of the text (read this page with examples to get an idea of how you can do that and also clearing the space below a paragraph) or, alternatively, put them in a nice table, like I did in the Sandbox. As you can see, it would be nice if all the images ware the same size aswell, that makes it easier on the eyes.
I really appreciate your work on these documents, so don't get me wrong! I just want to make sure we can all benefit from this in the best way possible!
--Ewout 00:02, 21 October 2005 (CEST)
Temporarily adding tutorial here: --Matt Ebb 07:13, 28 July 2006 (CEST)
Example
Here is a small example demonstrating particle deflectors.
- 1. Start with default scene with a cube object.
- 2. In top view, add a Circle Mesh and accept default 32 vertices. Press ⇆ Tab to exit EditMode. Switch to side view and move circle up 5 units.
- 3. With circle selected, press S, and scale it down to 0.1 in all directions.
- 4. Now press F7 and go to the Effects tab. Press NEW Effect and in the Popup-list select Particles.
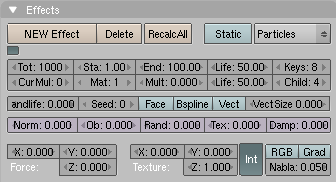 Effects panel.


- 5. Increase particle life from default 50 to 100 by changing the Life field to 100. In the force field in the lower section of the tab, set the Force Z to -0.100. If you press AltA you should see an animation of particles moving down towards our cube. See: Example frame 40. So far, the particles travel straight through without taking notice of the cube. This will change!
- 6. Now select our cube. With the Effect context still active, go to the Particle Interaction tab and set the Deflector settings as shown in th picture below
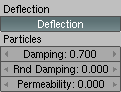 Example Deflection settings.


- 7. Now select the circle and press RecalcAll in the Effects tab. If you play the animation, AltA, you will see the particles bounce off the cube straight up and down. The problem is that the bounce is a bit away from the cube. This is an effect of too few Keys. In the Keys field enter 50, and press RecalcAll. Play the animation and the particles will now bounce on the cube, or close enough.
- 8. Select the cube and tilt it 10 degrees in either direction. Select the circle and recalculate the particles. Now play the animation and you will see the particles bounce off in the direction you tilted the cube!
Example Render
Here a Meta object is added and the circle is set as parent. Activate DupliVerts on the circle and set the material Alpha low to simulate a fluid. Play with the Rnd Damping setting to get a nice splash effect. Select a nice frame or whole animation and render away...
