Extensions:2.4/Py/Scripts/SpaceHandlers/3d View HotSpots
- go to Catalog | SpaceHandlers
| UI location | Group: Object | ||
|---|---|---|---|
| Usage | Place hotspots folder in .blender/scripts | ||
| Version | n/a - 2006.05.01 | Author(s) | Mariano Hidalgo (AKA uselessdreamer) |
| Blender | 2.42a - 2.48 | License | N/A |
| File name | hot_spots_init.py |
|---|
| Links | http://blenderscriptstorage.googlepages.com/hotspots3d_.rar |
|---|
Support
- Python & Plugins forum at Blender Artists.
Introduction
3dView HotSpots is a set of Python scripts for Blender using the new Space Handlers feature, which allows python functionality to work right on the 3d View.
It works by defining the so called hotspots, areas of the window you can click to run diferent tools. It also provides you with two extra labels on the bottom of the 3dView, one on the top with timecode and frame info, and optionally you can choose to display a set of icons in each of the spots.
Usage
Installation
The script is made of several Pythons script and you can get them here, in a zipped package: 3dView HotSpots 1.2
Please remove all previous versions of the script you may have installed before installing the latest version.
Unpack the zip file in you Blender script folder. You should end with a folder named hotspots with all the scripts inside.
Initialization
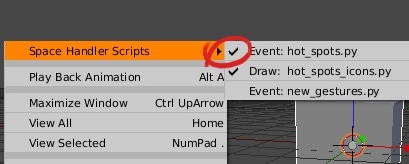
Run the script by choosing "Add HotSpots tho this .blend" in the Objects Scripts menu. This will add the HotSpots functionality to the current blend. Then you have to enable HotSpots for each 3dView you want they to work with. For this, go to the [View] [Space Handler Scripts] menu and enable hot_spots.py. If you want to display the icons enable hot_spots_icons.py too. If you split a 3dView with HotSpots enabled, the resulting windows will also have it enabled.
Instructions
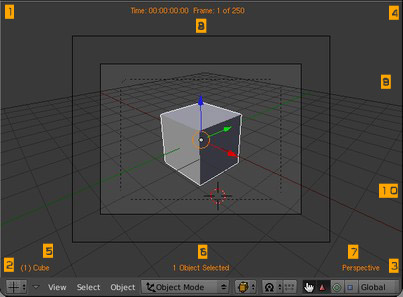
These spots are located in the corner of the 3dView and also on the labels at the bottom. A brief description of each spot follows.
1. Python Scripts: Click here and you´ll get a menu with all the object scripts or (if you are in EditMode) all the mesh scripts.
2. Camera Tools: This spot will show a menu where you can change your active camera, add new cameras or spotlights, etc.
3. Render Menu: A menu to easily render an image, to show or hide the render preview, to quicly set up or cancel the render border, etc. Also has the option to render the whole scene with a generic material.
4. Animation Menu: Menu with shortcuts to operations on the timeline.
5. Object Label: showing you the currently selected object. If you LMB over the label, it will show a menu where you can select or delete all the objects on scene of the same type.
6. Selected Objects Label: Shows the amount of selected object and it also has a menu that will list the names of the selected objects and with a single click you can define the active one. LMB and RMB have different menus with extra options.
7. Views Label: Shows you the current view type (left, right, perspective, etc) and upon click it will show a menu when you can switch to another view type.
8. Timecode Label: Shows the animation time and current frame/total frames.
9. Next/Prev Frame: Mouse wheel in here will move the timeline one frame ahead or behind.
10. Next/Prev Ten Frames: Mouse wheel in here will move the timeline ten frames ahead or behind.
- go to Catalog | SpaceHandlers


