Extensions:2.6/Py/Scripts/3D interaction/BatchTransforms
| UI location | |||
|---|---|---|---|
| Version | 0.4.9 | Author(s) | dairin0d, moth3r |
| Blender | 2.7.0+ | License | GPL 3+ |
| Category | 3D View | Distribution | External |
| File name | space_view3d_transform_utils.zip |
|---|---|
| Current version download | https://github.com/dairin0d/transform-utils/releases/download/v0.4.9/space_view3d_transform_utils.zip |
| Links | https://github.com/dairin0d/transform-utils |
|---|
(The addon is experimental, the documentation might be quickly outdated)
Overview
This addon provides various utilities for precision and batch transformations. Intended to be a spiritual (and actual) successor of the Enhanced 3D Cursor addon.
Coordinate Systems
A coordinate system (CS) is a customizable frame of reference, most useful for precision positioning/rotating/scaling.
- Coordinate systems are defined by 4 vectors (the system's origin T and the X, Y, Z axes) and can be represented as XYZT transformation matrices.
- Coordinate systems, just like regular objects, can also be composed from 3 independent aspects: position (defines the origin), rotation (defines the orientation of the XYZ axes) and scale (defines the scale of the XYZ axes).
- "Projection" coordinate systems (Camera and View) differ from the usual coordinate systems in that they deal with "screen-space" coordinates.
- You can use current coordinate system as the manipulator's orientation; for this, choose "System" transform orientation as the manipulator's orientation.
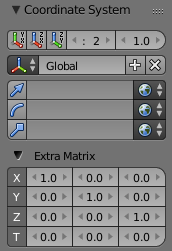
Coordinate System panel:
- The top row contains options related to the visualization of the current CS. On the left are three toggles for showing/hiding XY/XZ/YZ planes, then grid profile and grid size. Grid profile defines the shape of the planes.
- Next is the CS selector, displaying current coordinate system's name. There are a number of common-case coordsystems created by default, but you can add your own or modify/delete any of the existing ones. The "+" button has several modes of operation:
- Click: a copy of the current CS will be created.
- Ctrl+Click: current CS will be "baked" into a new coordsystem's Extra Matrix.
- Shift+Click: manipulator's position and orientation will be "baked" into a new coordsystem's Extra Matrix.
- Alt+Click: workplanes's frame of reference will be "baked" into a new coordsystem's Extra Matrix.
- Next are 3 coordinate system's aspects (origin, orientation, scale). Each aspect has a number of modes to choose from (the selectors on the right); for some of these modes you can provide the name of the object/bone/etc. to take the position/rotation/scale from. The buttons on the left can be used to automatically assign current object/bone name to the corresponding aspects.
- Finally, there is an Extra Matrix, which additionally transforms the matrix defined by the 3 aspects. If you like to learn what transformation matrix is, here is an illustrated introduction: http://www.codinglabs.net/article_world_view_projection_matrix.aspx
- Clicking on X/Y/Z/T buttons will reset the corresponding vector.
- Ctrl+Click on X/Y/Z/T buttons will set the corresponding vector to the current position of the manipulator.
- Shift+Click on T button will set the T vector to the current position of the manipulator, but will preserve the endpoints of XYZ vectors.
Aspect modes:
- Generic:
- Basis: in this mode, the raw position/rotation/scale values (before any constaints and transformations) will be used.
- Global: global (world / scene / absolute) coordinate system.
- Parent: the parent coordinate system of each individual object/bone (coincides with Global if there is no parent).
- Local: behaves as Active in edit modes and as Parent in non-edit modes.
- Individual: the coordinate system of each individual object/bone (useful for transforming objects around their local axes).
- Active: the coordinate system of the active object (coincides with Global if there is no active object).
- Object: the coordinate system of the specified object/bone (if no object is specified, then active one is used).
- Camera: the "projection" coordinate system of the specified camera (or active camera, if not specified).
- View: the "projection" coordinate system of the active 3D view.
- Workplane: the workplane's coordinate system.
- For origin:
- Cursor: use 3D cursor position as the coordsystem's origin.
- Average: use average position of the selection as the coordsystem's origin.
- Center: use center of the selection as the coordsystem's origin.
- Min: use minimal coordinate of the selection as the coordsystem's origin.
- Max: use maximal coordinate of the selection as the coordsystem's origin.
- Pivot: use current manipulator position as the coordsystem's origin.
- For orientation:
- Normal: use normal to calculate coordsystem's orientation.
- Gimbal: use gimbal axes to calculate coordsystem's orientation.
- Orientation: take coordsystem's orientation from the specified transform orientation (if not specified, then current manipulator orientation will be used).
- For scale:
- Range: use XYZ range of selection's positions as the XYZ scale of the coordinate system.
- Deviation: use XYZ deviation of selection's positions as the XYZ scale of the coordinate system.
Transform Tools
3D cursor is a Blender's built-in feature, but this addon will add some extra functionality to it (consider this addon a successor to the Enhanced 3D Cursor).
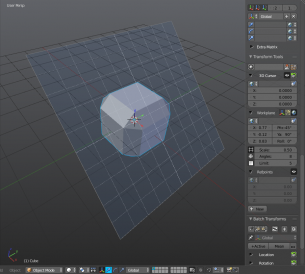
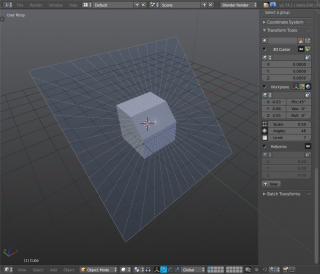
Workplane's primary purpose is to provide a plane/grid/angluar lines for snapping. When the workplane is enabled, the "numpad navigation" buttons will navigate relative to the workplane instead.
Reference points are primarily for defining positions and directions in 3D space to be used in snapping/aligning/matching operations.
Bounding Box transform scales/rotates the selection around the correspoinding corner/center of the selection's bounding box. Should be a pretty familiar feature to the users of some 3D packages.
Snap/Align/Match is a text-command tool for specifying snapping/aligning/matching operations.
Spatial Query is a text-command tool for selecting objects/elements based on certain geometric conditions.
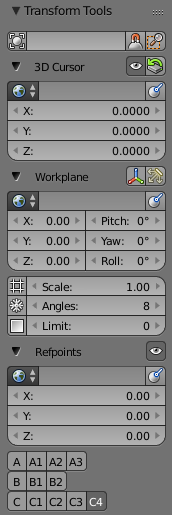
Transform Tools panel:
- Top row:
- Bounding box transform: the operator will calculate the bounding box of the selected objects in the current coordinate system, after which you will be able to pick the transformation point and select the transformation mode (scale or rotate).
- Command input: not implemented yet.
- Snap/Align/Match: not implemented yet.
- Spatial Query: not implemented yet.
- 3D Cursor:
- Show/hide (eye icon): show/hide the cursor. WARNING: cursor hiding reiles on moving the cursor out-of-view just before it's going to be rendered, which causes Blender to redraw the UI non-stop.
- Reset: resets the cursor position in the current coordinate system.
- Attach To:
- Options:
- Display in current CS: specifies whether the cursor coordinates will be displayed in the current coordinate system or as the "local" coordinates.
- Object/bone name: if a name of existing object is specified, the cursor will be "attached" to that object's/bone's space.
- Raycast operator: allows you to place the cursor to the surface under the mouse.
- Options:
- The XYZ values show the 3D cursor's position in the current coordinate system.
- Workplane:
- Adjust workplane: if enabled, the workplane will orient itself to the direction closest to the current view.
- Align view to workplane: will align the view to the closest workplane axes,
- Attach To:
- Options:
- Display in current CS: specifies whether the workplane coordinates will be displayed in the current coordinate system or as the "local" coordinates.
- Object/bone name: if a name of existing object is specified, the workplane will be "attached" to that object's/bone's space.
- Raycast operator: allows you to place and align the workplane to the surface under the mouse.
- Options:
- The XYZ values show the workplanes's position, and Pitch/Yaw/Roll show the workplane's rotation.
- Workplane parameters:
- Grid row: the grid button enables the workplane and the grid, and the scale specifies the size of the grid cell.
- Polar row: the polar button enables the workplane and the polar guides, and the polar angles specify how many polar guides will be displayed.
- Plane row: the plane button enables the workplane, and the limit specifies the number of grid cells to show (0 will result in the "unlimited" plane).
- Reference points:
- Show/hide button: shows/hides all refpoints.
- Attach To:
- Options:
- Display in current CS: specifies whether the refpoint's coordinates will be displayed in the current coordinate system or as the "local" coordinates.
- Attach to coordsystem: specifies whether the refpoint will be attached to object or to coordinate system.
- Inherit: if enabled, then the main point's attachment settings will be used.
- Object/bone/CS name: if a name of existing object is specified, the refpoint will be "attached" to that object's/bone's/coordsystem's space.
- Raycast operator: allows you to place the active reference point to the surface under the mouse.
- Options:
- The XYZ values show the refpoint's position (global or relative to the main point).
- New: creates a new refpoint. To conserve space, the button is visible only if no refpoints exist.
- Click on refpoint button selects the refpoint.
- Shift+Click on refpoint button copies it as a sub-point.
- Shift+Ctrl+Click on refpoint button copies it as a new point.
- Ctrl+Click on refpoint button deletes it.
The raycast operator has a number of options (located in popup menu in the header of the Transform Tools panel):
- "Snap: objects" -- you can specify the types of objects (and some extra features, like origins or bounding box) which will be used or ignored by raycasting
- "Snap: elements" -- you can specify what will be the target of snapping (by default it's vertices, edges, faces and depth buffer)
- "Snap: normal" -- this is useful for changing the axes by which the workplane aligns to normal/tangential directions
- "Snap: precise" -- enables snapping to vertices/edges/faces; otherwise, only snapping to depth buffer will work
- "Snap: loose" -- enables snapping to loose vertices and edges
- "Snap: solid only" -- if enabled, non-geometry objects and objects without visible polygons (e.g. with Wire or Bounds draw type) will be ignored during the snapping
- "Snap: midpoints" -- if enabled, snapping to edges/faces will always snap to their midpoints
During the raycast operator, the following shortcuts are available:
- Shift -- temporarily enable/disable "Snap: midpoints" mode
- F -- enable/disable snapping to faces
- E -- enable/disable snapping to edges
- V -- enable/disable snapping to vertices
- D -- enable/disable snapping to depth buffer
- F1 -- switch to cursor snapping
- F2 -- switch to workplane snapping
- F3 -- switch to reference-point snapping
| Warning | |
| The "Snap: precise" and "Snap: loose" modes require a temporary mesh to be built from all the visible objects in the scene, so snapping to vertices/edges/faces will not begin until the mesh is built (the more complex the scene, the more time it will take). Once the mesh is ready, "Snap: precise" uses raycasting (which is relatively fast), but "Snap: loose" uses edit-mode selection, which is VERY SLOW in high-poly scenes. So when you have high-poly scene, you can either try to disable these modes or to isolate unnecessary objects (by hiding or moving them to another layer). |
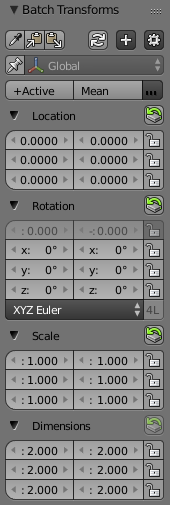
Batch Transforms
Batch Transforms provide summary information about the selection and allow its batch-modification.
A summary is a certain statistical information about the selection (e.g. mean value, minimal/maximal value, etc.)
Batch Transforms panel:
- Top row:
- Pick (eyedrop icon): not inmplemented yet
- Copy: not inmplemented yet
- Paste: not inmplemented yet
- Refresh: forces all background computations to run to completion (since the addon analyzes the selection in a low-priority background process, this analysis can take very long time in complex scenes or when editing high-poly objects).
- Batch Modification: sets the Batch Modification mode for the Active summary.
- Options menu: not implemented yet
- Coordsystem row:
- Use current CS (pin/unpin icon): if enabled, you can specify the coordsystem to be used in the summaries; otherwise, the current coordsystem will be used.
- Coordsystem selector
- Summaries row: a list of currently enabled summaries and a menu to enable/disable summaries. Summary copy/paste is not implemented yet.
- Vectors: vectors are (usually multi-component) properties of the objects/elements in the selection (e.g. location, rotation, scale, etc.), for which the summaries are displayed.
- The triangle to the left of the vector name folds/unfolds the vector.
- The button to the right of the vector name resets the vector (in the selected coordinate system). Ctrl+Click on this button will reset the vector respecting axis locks, and Shift+Click will reset all vectors.
- Each vector axis displays a numeric value for each enabled summary, and a lock button.
- Changing a summary's value will affect the whole selection according to the summary's Batch Modification rule.
- Holding Shift while modifying a value will offset other non-locked axes by the same amount.
- Holding Alt while modifying a value will multiply other non-locked axes by the same amount.
- Holding Ctrl or Alt+Shift while modifying a value will set other non-locked axes to the same value.
- Clicking on a lock button will lock/unlock the corresponding axis.
- Ctrl+Click on a lock button will lock/unlock the 3D-view transformation of the corresponding axis.
Batch Modification modes:
- Equal: the modified parameter will be set to the same value for each object/item in the selection.
- Offset: the modified parameter will be offset by the same amount for each object/item in the selection.
- Proportional: the modified parameter will be multiplied by the same amount for each object/item in the selection.
Summaries:
- Active: shows the properties of the active object. Batch Modification mode can be specified in the Batch Transforms panel.
- Min: shows the minimal values of the selected objects' properties. Batch Modification mode: proportional towards Max.
- Max: shows the maximal values of the selected objects' properties. Batch Modification mode: proportional towards Min.
- Center: shows the middle values (halfway between Min and Max). Batch Modification mode: offset.
- Range: shows the range of values (from the center). Batch Modification mode: proportional towards Center.
- Mean: shows the average values of the selected objects' properties. Batch Modification mode: offset.
- StdDev: shows the standard deviation of the values. Batch Modification mode: proportional towards Mean.
- Median: shows the median of the values. Batch Modification mode: offset.
Known issues
- Still experimental and a work-in-progress! Some important planned features are not even started.
- The addon hasn't been very thoroughly tested yet, so potentially there can still be situations when it crashes Blender.
- Don't use the built-in "View All" operator when workplane is enabled (since workplane is an unlimitedly huge object).
- Manipulator/pivot/orientation coordinate system modes do not always correspond to the actual position/orientation of Blender's manipulator. Since the current API provides no means to get this information directly, I calculate the position/orientation myself, but the formulas I use seem to be a bit different from the ones used inside Blender.
- Currently the addon's angle-axis rotations mode seems to be buggy.
- In current implementation, 3D-cursor-related functions work only for the main (scene) cursor. They ignore the local-view cursor.
- Certain features will work only in the main window.
