Extensions:2.6/Py/Scripts/NeuroMorph/Other Tools
| UI location | View3D » Other Tools | ||
|---|---|---|---|
| Version | 1.0.0 | Author(s) | Anne Jorstad, Biagio Nigro, Diego Marcos, Tom Boissonnet |
| Blender | 2.78 | License | GPL |
| File name | NeuroMorph_Parent_Child_Tools.py |
|---|---|
| Current version download | https://github.com/NeuroMorph-EPFL/NeuroMorph/tree/master/NeuroMorph_Other_Tools |
目次
NeuroMorph Links
Blender Wiki Home
Code on GitHub
For more information please visit the NeuroMorph project website.
Overview
Generate 3D Image Stacks
Macro for Fiji to creates image stacks in the X and Y dimensions, given an original image stack.
NeuroMorph Parent-Child Tools
An easy interface to show/hide/delete all children of an object and assign the parent of selected objects.
NeuroMorph Import Objects
Import object models from .obj files obtained through 3D image segmentation software into Blender.
NeuroMorph Naming
An interface for naming objects according to a naming convention developed for neural structures.
IMOD to Blender
A pipeline for importing IMOD meshes into Blender.
Generate 3D Image Stacks: Description
Macro for Fiji that creates image stacks in the X and Y dimensions, given an original image stack (which we define to be stacked in the Z dimension).
To use:
- Open the original image stack in Fiji (File - Import - Image Sequence)
- Open the Generate_3D_image_stacks.ijm macro file in Fiji
- Click "Run"
- Choose the desired location of the new image stack folders
- Confirm the voxel dimensions from the original imaging procedure
(Macro courtesy of Tom Boissonnet.)
Parent-Child Tools: Description
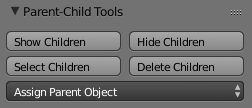
An easy interface to show/hide/delete all children of an object and assign the parent of selected objects.
Show Children: Make visible all children of active object.
Hide Children: Make invisible all children of active object.
Select Children: Select all children of active object.
Delete Children: Delete all children of active object. Note: parent object must be visible.
Assign Parent Object: Assigns all selected objects to be children of the object chosen from the drop-down menu.
Import Objects: Description
Import object models from .obj files obtained through 3D image segmentation software (e.g. ilastik or TrakEM2) into Blender. Allows the objects to be remeshed and rescaled according to user needs.
See full instructions here.
NeuroMorph Naming: Description
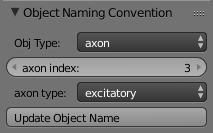
Previously part of the deprecated NeuroMorph Measurement Tools, provides an optional interface for naming objects according to a naming convention developed for neural structures that depends on the object type and numerical index. The object type options are:
- "other": gives the user the option to assign a custom name to the mesh by entering it in the box provided.
- "Axon": has a numerical index and a type (excitatory, inhibitory, unknown, N/A).
- "Dendrite": has a numerical index.
- "Spine": has a numerical index.
- "Bouton": has a numerical index.
- "Synapse": depends on the identity of the dendrite and the axon it connects, and also the identity of the dendritic spine and axonal bouton. For example, the name of an inhibitory synapse connecting spine 4 of dendrite 14 and bouton 2 of axon 23 will be syn_d14s4a23b2_I.
- Update Object Name: Changes name of currently selected object to abide by the naming convention.
IMOD to Blender: Description
These instructions describe how to move an IMOD model into Blender for use with NeuroMorph tools. (Contributed by Tom Boissonnet.)
1. In IMOD, set the pixel scales.
- ex: if 10nm in X,Y and 16nm in Z -> X:1 Y:1 Z:1.6
2. These three steps generate an .obj file from your IMOD mesh, and must be executed in the same console you usually use to launch IMOD.
- Move to the directory where your imod project is located:
cd c:\MyFolders\NotSameAsYou\imodProject\
- Execute the following command to generate the mesh of your model. WARNING: It modifies the way your model is represented in IMOD. Save a copy of the original project. Documentation here.
imodmesh.exe nameOfMyModel.imod
- Execute the following command to export the IMOD model into obj files (importable with NeuroMorphTools). Documentation here.
imod2obj.exe nameOfMyModel.imod newObjFileName.obj
3. The imported .obj file will be mirrored in the Y axis in Blender. This can be corrected using the python script correct_Y_mirroring.py (provided on the NeuroMorph github page), which should be placed in the same directory as the .obj file.
- Ensure python is installed on your machine (should be the case if you are running Blender).
- Determine the height of your image stack in pixels, and divide by 2 to obtain the Y axis value for mirroring, ex: 450 pixels.
- Execute the following command in the console from the same directory of the .obj file, where
- objFileName.obj is the exported IMOD file to transform
- resultFile.obj is the corrected file to use in Blender
- 450 is your calculated Y axis value for mirroring.
python correct_Y_mirroring.py objFileName.obj resultFile.obj 450

