Extensions:2.6/Py/Scripts/Object/Grow Modeller
| UI location | 3D View, Grow Modeller Panels | ||
|---|---|---|---|
| Version | 0.3.52 | Author(s) | John Michael Palmer (jump) |
| Blender | 2.6.4 | License | GPL |
| File name | |
|---|---|
| Current version download | http://projects.blender.org/tracker/download.php/153/467/30288/22437/grow_modeller_0p3p52.zip |
| Python modules | mathutils, math |
目次
pfueww!
Introduction
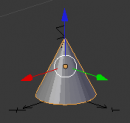
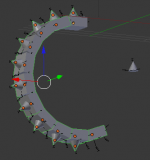
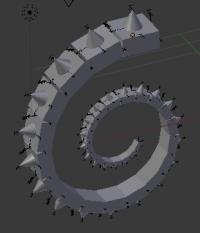
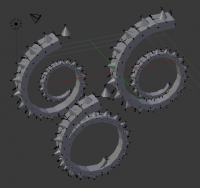
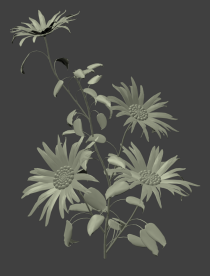
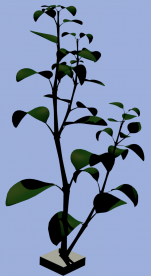
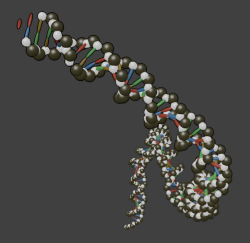
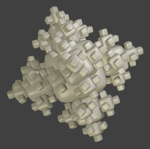
A different way to model objects by growing them. Models are pieced together from modified copies of Base Objects. Objects are given Budnodes and Footnodes. When a copy of a object is made it will be placed so it's Footnode is aligned with the Budnode of the Object it has 'grown' from. Here are some Models that have been grown:
|
|
|
|
Note, that from version 0.3.0 a Variable Propagation system has been included; The most recent version before this was introduced is v0.2.8 If you want to leave a comment or example of work using this script please add it here on the Discussion page.
Installation
- Uncompress the zip file.
- Move the grow_modeller folder into /2.62/scripts/addons folder in the blender install.
- Run blender
- In the User Preferences select Addons and then Object: Grow Modeller
Usage
Connecting Objects To Grow
In order for one object to grow from another objects we must consider Grownodes. Grownodes control where on an object a new object will grow from, how the new object will attach and what the new object will be. In the following example we will connect two simple objects and grow a model:
|
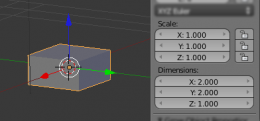
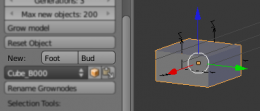
For the first object we will use the default Cube. If you do not have one use ⇧ ShiftA » Add » Mesh » Cube. Now scale the z axis to 0.5, SZ0.5↵ Enter. Now it is important that the scale is applied Object » Apply » Scale. The dimensions and scale should be like in Image a. With the Cube selected add a Footnode and a Budnode using the Grow Modeller panel buttons Foot and Bud.
When an object grows from another, Footnodes and Budnodes are aligned.
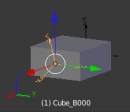
To demonstrate this better we are going to add some rotation to the first Budnode on the Cube. Select the first Budnode which will be called Cube_B000 and add 20 degrees of rotation on the y axis, this can be done from the properties panel or by keying RY20↵ Enter.
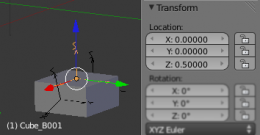
Now let's add a new Budnode to grow a second object from. Again select the Cube object and click Bud from the Grow Modeller panel. The new Budnode will be called Cube_B001, which can be moved to the top of the Cube by Giving it the Location values 0,0 and 0.5 as can be seen in Image d.
Now Add the second Object, a basic Cone, ⇧ ShiftA|Add|Mesh|Cone}}. Change the size of the Cone so it's half as large (S.5↵ Enter) and apply the scale as you did for the cube.
If we want this Cone to be able to grow from the Cube we need to add a Footnode, so select the Object and click Foot. Move the Footnode to the bottom of the cone by giving it the Location xyz values 0,0 and -0.5.
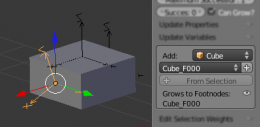
Now we are ready to Link the Budnodes to the Footnodes. We are going to link Footnode Cube_F000 to Budnode Cube_B000, this will cause the cube to grow another copy of itself. Select Cube_B000 and in the Budnode Panel on the right there is a grey box which starts Add:; in the drop-down menu select the object with the Footnode - Cube. In the next drop-down menu select the Footnode Cube_F000, click on the + button to add that Footnode to the list of Footnodes the Budnode can grow to.
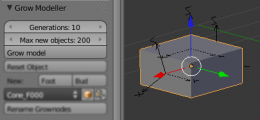
The Footnode should appear in the list as can be seen in Image f. Let's make the Cone object grow from the top of the Cube. Select the Budnode on the top of the Cube, Cube_B001 and using the Budnode Panel add the Footnode that we made on the Cone. With the Grownodes connected we are ready to grow a simple model. Select the Cube, and in the Grow Modeller panel change the number of Generations to 10. Click Grow Model. See Image g. If you want to grow another model you need to select the original Cube, move it to a new space, reset the Cube's grow properties by clicking Reset Object in the Grow Modeller panel and then click Click Grow Model. You may also select all the Grownodes using the Grow Modeller panel if you wanted to delete them.
|
Using the Update Properties
The Budnode Update Properties can be modified from the Budnode Properties panel. They are used to modify the new object that grows. These may be Scale, Position, Rotation and so on.
|
We are going to use the model from the previous example and add an Update Property.
First lets remove the model that we grew, just leaving the base objects. Using the Outliner, select Groups, and you should see a group called Growth_###, probably number 000 if it is the first run of the Grow Modeller, see Image a. Select the group, and then in the Grow Modeller panel click on Selection Tools » Add » Nodes, now just delete the selection.
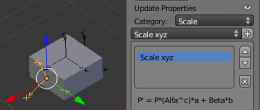
If we want to reduce the size of the Cube every time it grows we have to select the appropriate Budnode, in our example it is Cube_B000. Once selected we will need to add an Update Property to scale the next object that grows from the Budnode. Because there are many possible Update Properties, you must first select the category and then the property. Click on the eye next to where it says Update Properties to show this part of the panel. Now select the category Scale and the Update Property Scale xyz. Add this to the list using the + button - the panel should now look like Image b. With the property selected change the value a from 1 to 0.95, this will cause the new object to be 95% the scale of the last object. There is a more detailed explanation of this panel here. Reset the Cube object, set the number of Generations to 30 and grow the model. You should end up with something like Image c. You can also add random factors using the Update Properties, we will do that here with the scale property we just added. You may want to first delete the model we just grew before we move on, otherwise just move the first Cube object out of the way, this can be called a base object. Select the Budnode Cube_000, and select the Update Property Scale xyz. At the bottom of the property options, you will see it says Random Distribution:, and the distribution type is set to Uniform by default. Change the first value to 0.2 this will add a random range to the final scale value of ±0.1. Change the second value from 0 to 0.5, this is the probability that the random value is applied. A value of 0.5 will mean it is applied half the time. Reset the Cube Base Object and Grow a new model. You should see the effects of the random variations. Select the Cube, move it, reset it and grow it again, you should see a second model that is slightly different from the first. Image d shows three models with the random variation we added. Note that update properties are applied in the order of the list. |
Using Variable Propagation
Using Variables can make your model design more flexible and interesting. (In plants and animals this would be done chemically!).
|
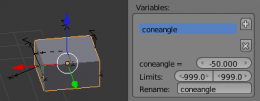
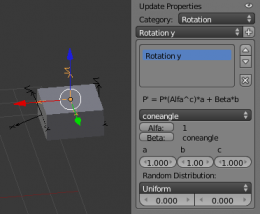
Again following on from our previous example and removing any grown models first, we are going to add a variable to control the angle the Cone grows from the Cube. Since the Cone grows from the Cube it is the Cube that must have the variable and the Cube's Budnodes that use the variable. Select the Cube and look in the Grow Object Properties panel on the right, click on the + under where it says Variables:. The new Variable you have just added will have a default name, change this to something like ConeAngle using the Rename input box. Now change the value of the variable to -50. The panel should now look like Image a.
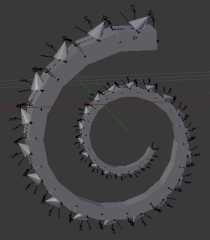
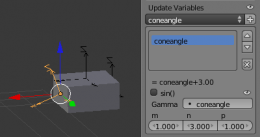
To use this value to rotate the Cone, select the Budnode that the Cone grows from. Add the Update Property Rotation y to this Budnode and select the variable from the drop-down menu. We want to add the value of this variable to the cones rotation after it grows, so click on the button Beta and change the value b form 0 to 1 (see Image b). If you grow a model now it will look like Image c with all the cones pointing off at 50 Degrees. All the objects that have grown from the Cube will have the variable we gave the cube... so why do this? Well, we can control how the variable propagates. Delete the model as before leaving the base objects, and select the Budnode where the next cube grows from, Cube_B000. In the Budnode Properties panel click on the eye next to the text Update Variables. Add our variable that controls the cones angle to the Update Variables list by using the drop-down menu and the +. Now we can change how the variable propagates by changing n to 3 and Gamma to the variable. The Update Variables sub-panel will look like Image d (notice here I have clicked on the eye to show the substituted new value for the variable instead of the equation).
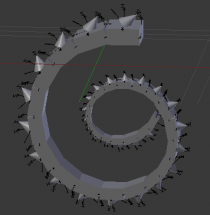
Now if you grow a new model you will see the effects of Variable Propagation, as can be seen in Image e. If you select the separate objects in the model you will be able to see how the variables value has changed. Note that like the Update Properties the Variable Update is applied in the order of the list. It is also important to know that for now there is no special handling of the variable names and a variable is updated and used based on its name. Changing a variable name after it has been used will not cause the name to change in the update lists...this is for future development! |
Example blend files
Here are some example blend files that use the grow modeller in each case you just need to load the file (you must have the grow modeller addon running) and click on 'grow model'. If you wish to grow another model, grab the first base object that was selected when the file was opend, move it to a new place in the 3d view, click on 'reset object' then click on 'grow model' again.
A Shell. (v0.2.8) ファイル:Growmodeller-eg-shell.blend
A Ball Tree. (v0.2.8) ファイル:Growmodeller-eg-balltree.blend
A Plant. (v0.2.8) ファイル:Growmodeller-eg-plant.blend
Grow Modeller Panels
Grow Modeller
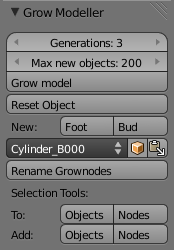
This is the main Grow Modeller tools panel. The button labelled Grow Model runs the grow modeller for chosen number of Generations. The Grow Modeller will not grow more objects per run than are chosen here as Max New Objects.
Clicking on the Reset Object button resets some values of the selected object, such as object age and whether it can grow or not. Sometimes an object won't grow because these values need resetting.
The buttons labelled Foot and Bud add new Footnode and Budnode objects to the selected object.
The next button is used to Paste a Grownode to the selected object(s). Here the drop down menu shows the Grownode Cylinder_B000 selected, clicking on the paste icon will paste it to all mesh objects in the selection. The choice of Grownodes in the drop down menu can be taken form objects or the selection by using the Object/Selection button.
The selection tools are used to modify the active selection to include or remove Grownodes or Grow Objects from the selection. Notice that clicking To Objects only selects objects that have Grownodes in the selection - anything else is not included in the new selection.
Grow Object
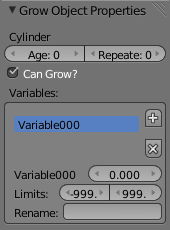
This panel is used to add variables to an object and see its general properties. Firstly the name of the selected object is displayed, here it is Cylinder. The properties Age, Repeated and Can Grow are altered automatically when the Grow Modeller is run. These can be reset using the Reset Object button on the Main Grow Modeller panel.
The box labelled Variables shows the Grow Modeller Variables an object has and their values. A variable can be added using the + button and removed with the X button. The name of a selected variable can be changed using the Rename input box. Its Value and Limits can also be set. The limits are the lower and upper ranges of the variable.
Budnode Panel
The Budnode panel controls how objects grow from the selected Budnode.
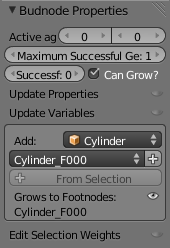
A Budnode has an Active Age range that it is allowed to grow in. It is set by default from age 0 to age 0, which means it can only grow a new object in the first generation after its creation.
A Budnode might not grow a new object even if it can, this is because random factors may be involved. When an object does grow however, it is said to have had a successful generation. The number of Successful Generations a Budnode has had are shown in this panel, along with a value which is set to control the Maximum Number of Successful Generations that a Budnode can have.
Update Properties and Update Variables options are described in the sub-panels further down this page.
The box that starts Add:, is used to connect the selected Budnode to Footnodes. There are two ways to do this,
- 1. Select the Grow Object with the first drop-down menu, then the Footnode from the second drop-down menu. Finally click on the + button to connect the Footnode.
- 2. Select the Footnode(s) you want to connect to the Budnode (in the 3d View) and make sure the Budnode is the active object. Now click on the + From Selection button.
All connected Footnodes are listed under Grows to Footnodes, the list can be hidden by clicking on the eye. By altering weights associated with the connected footnodes it is possible to control which objects are most likely to grow from the selected budnode, this is done using the Grow Weights sub-panel which is described below.
Update Properties Sub-Panel
Here properties are selected that modify the new object that grows from the selected Budnode.
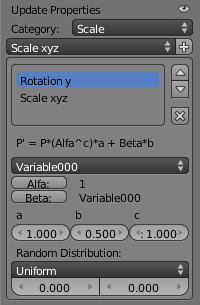
The Properties are selected first by Category and then by the Property Name. A Property only has an effect if it is added to the Update Properties List, this is done using the + button. It is removed with the X button.
When a new object grows from the selected Budnode, the properties in the list are applied in the order of the list. The up and down arrows are used to change that order.
The equation that is shown is to help the user make sense of how the selected property modifies the new object. The P′ represents the new property value and P the old value from the Budnodes object. Alfa and Beta represent Grow Object Variables and are selected using the drop-down menu and the Alfa and Beta Buttons. The constants a, b and c can also be changed in the panel.
In many cases a random value can be added to the property of the new object, this is done using the Random Distribution options for the selected property. The type of distribution the random value is generated from can be selected with the drop-down menu. The leftmost value under this is the Distribution Width and the value on the right is the Probability that a value is generated at all. The new property value is modified by the random value so P′ = P′ + Random Value.
Update Variable Sub-Panel
This part of the Budnode panel is used to control how the Grow Object Variables are modified when propagated to the new object.
When a New Object grows, the variables of the Budnode's object are past on to the New object and modified by the Budnode. This is what is meant by Variable Propagation. This modification of a New Object's variables is done before a New Object's properties are updated.
Variables are Updated in the order of the Budnode's Update Variables List which is shown on this panel. Variables can be added from the drop down menu using the + button and removed using the X button.
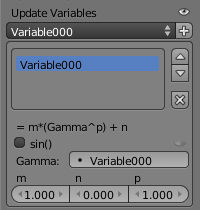
Like the Update Properties panel, there is an equation shown to represent the new value of the selected variable. Clicking on the eye, will automatically do some substitutions in this help text.
Gamma represents a Grow Object Variable that can be used to modify the new variable value. Here the selected variable is Variable000 and Gamma is also set as Variable000 so the new value of Variable000 uses the present value of Variable000. The constants m, n and p are also set here. There is also an option to use the sin() function in the calculation which takes a value in degrees.
Grow Weights Sub-Panel
New objects grow from budnodes using a roulette wheel type selection. The weights for that selection are modified here.
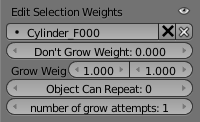
First a Footnode is selected and its weights are modified. The small white x removes the Footnode from the list of Footnodes the Selected Budnode is connected to. The larger black X removes all the Footnodes the selected Budnode can grow to.
It is often important that objects are unlikely to grow (a tree doesn't branch at every opportunity) and this is what the Don't Grow Weight is for.
When the New Object is made from the same Base Object as the Current Object, i.e. an object grows to the same object, its Repeated value increases in the New Object. The first Grow Weight value affects the likelihood that an object will grow until its Repeated value is larger than the Object Can Repeat value set here. After this a new object grows using the second Grow Weight value.
Each Generation an object can grow from a Budnode more than once by setting the number of grow attempts. This would be like spinning the roulette wheel more than once.
Glossary of Terms used
- Active Age - This is the age range of an object when its budnodes are allowed to grow.
- Age/Object Age - Every time an object is tested for budnodes to grow from, its age is increased by one. Effectively an objects age increases every generation.
- Base Object - These are the objects with the original Mesh data and Grownodes before copies are made.
- Budnode - This is an Empty, parented to an object and has grownode properties. Copies of objects with footnodes are made which attach to budnodes by aligning the budnode and the footnode for the two objects.
- Footnode - when a new object grows from a budnode, the new object attaches at by a footnode.
- Generations - When a model is grown all selected objects are checked for budnodes, then new objects grow from those budnodes accordingly; this is one generation. All new objects plus all the original objects are tested in the following generation.
- Grownode - A Budnode or a Footnode.
- Growto list - each budnode has a growto list. This is a list of all footnodes that can grow from that budnode. Those footnodes produce copies of their parent objects when they grow.
- Successful Generations - objects have the probability that they will grow from a budnode in a given generation. If this happens the budnode records a successful generation
Development and Release Log
The Development Roadmap, Issues, Features to be added and Ideas can be found on the Development page. There is also a separate Release log page.
