Extensions:2.6/Py/Scripts/Render/Tractor Dispatcher for Blender
| UI location | Properties → Render → Tractor Dispatcher | ||
|---|---|---|---|
| Usage | See below | ||
| Version | 1.0.0 | Author(s) | Ragnar Brynjulfsson |
| Blender | 2.65 | License | GPL |
| Category | Render | Distribution | Extern |
| File name | render_tractor_dispatcher.py |
|---|---|
| Current version download | http://ragnarb.com/downloads/render_tractor_dispatcher.1.0.0.tar.gz |
| Python modules | os, subprocess, time, tempfile, shutil |
| External Python Modules or dependencies | Render farm running Pixar's Tractor Engine and tractor-spool.py in path |
| Warning | Breaks Cycles texture paths in Blender 2.64 and earlier |
|---|---|
| Links | http://ragnarb.com/tractor-dispatcher-for-blender |
| Known Issues | Tractor's progress bar runs once for each pass when doing motion blur in internal render |
目次
[非表示]
Tractor Dispatcher for Blender is a simple tool for dispatching jobs to a render farm managed by Pixar’s Tractor render manager. It can be used both for rendering, and for running arbitrary batch jobs defined by a Python scripts.
To use it you need a render farm running tractor-engine, Pixar Tractor licenses and tractor-spooly.py in path when you start blender.
IMPORTANT NOTE!
If running Blender 2.64 and Cycles, this tool will break the paths to your textures, due to a bug in Blender that has since been fixed. Either use Blender 2.65, or make sure you save your file BEFORE dispatching a render job, and reload it after you dispatch it. Note that the file saved in the spool folder will still be intact, so you can grab that if the script corrupts your file.
Installation
- Download the latest version of Tractor Dispatcher for Blender from the link above.
- Unpack the render_tractor_dispatcher.tar.gz, and copy render_tractor_dipatcher.py into (blender_folder)/2.65/scripts/addons/
- In Blender open File>User Preferences…>Addons and enter tractor in the search field. And activate the Render:Tractor Dispatcher addon by checking the checkbox next to it.
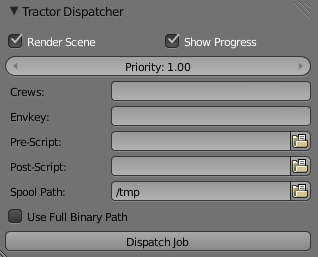
You should now have a Tractor Dispatcher pane at the bottom of the Properties>Render panel that looks something like this.
How to Use
Simply define a spool path (see below), assign a crew, and hit the Dispatch Job button. Tractor Dispatcher will create an .alf job script, save a copy of your .blend file and pre/post-scripts if you have any, and run tractor-spool.py
Options
Render Scene
Tells Tractor that it should render the scene. You would un-check this if you only wanted to run a python script on the scene, and not render this. This way you can for instance use the Tractor Dispatcher to dispatch fluid simulations to your farm (though it will unfortunately only run on one render node).
Show Progress
This shows progress bars in Tractor for each frame. This uses some basic *nix tools, so if running this on Windows you want to un-check this box (note that this script has only been tested on Linux). If you’re using Blender’s internal renderer the progress bar will run from 0 to full for each motion blur pass, like the progress bar does in Blenders interface.
Priority, Crews and Envkey
These are all standard features of Tractor. See Pixar’s Tractor documentation for details.
Pre/Post-Script
Pre-Script is a python script file that is run before a single frame is rendered, and Post-Script is a python script file that is run after a all frames have finished rendering. If you want to run a script before or after rendering each frame, look into bpy.app.handlers.render_post/pre in the Blender documentation.
Spool Path
This is the path where the .alf job script that Tractor uses to know which frames to render is placed. It is also where a copy of your .blend file and your pre/post-scripts is saved, and where Tractor reads them from. This means that all your render nodes must have access to this path, as well as any other textures and files your .blend file needs to render.
Use Full Binary Path
This defines if the full path to Blender should be written in the .alf job script. This can be handy if you’re using multiple versions of Blender, and want to be able to render from different ones, otherwise you can leave it unchecked.
Release Notes
1.0.0 – First public release
