Extensions:2.6/Py/Scripts/Rigging/Rigify
| UI location | Armature properties | ||
|---|---|---|---|
| Version | 0.5 | Author(s) | Nathan Vegdahl, Ivan Cappiello, Lucio Rossi |
| Blender | 2.79 | License | GPL |
| Category | Rigging | Distribution | Release |
| File name | rigify (module) |
|---|
目次
- 1 WARNING!
- 2 Description
- 3 Rigify Main Features
- 4 Basic Usage
- 4.1 Add-On Activation
- 4.2 Add a pre-defined meta rig
- 4.3 Edit bone positions
- 4.4 Bone Positioning Guide
- 4.5 Generating The Rig
- 4.6 Binding the geometries to the rig
- 4.7 Rig Features Description
- 4.8 Advanced Usage
- 5 Library Linking
- 6 Rigify 0.5 New Features
WARNING!
RIGIFY 0.5 DOCUMENTATION PROCESS IS STILL ONGOING! WILL HOPEFULLY BE FULLY ONLINE BEFORE 2.79 FINAL RELEASE DATE.
Description
Rigify helps automate the creation of character rigs. It is based around a building-blocks approach, where you build complete rigs out of smaller rig parts (e.g. arms, legs, spines, fingers...). The rig parts are currently few in number, but as more rig parts are added to Rigify it should become more and more capable of rigging a large variety of characters and creatures.
Rigify also operates on the principle that once a rig is created, that rig should no longer need Rigify. This means you can always distribute rigs created with Rigify to people who do not have it and the rigs will still function completely.
It is important to note that Rigify only automates the creation of the rig controls and bones. It does not attach the rig to a mesh, so you still have to do skinning etc. yourself.
Rigify Main Features
MODULAR RIGGING
Rigify build blocks can be mixed together to rig any character you want. If you need to build a character with 5 arms and 1 leg rigify can handle it for you creating all the required complex controls system (FK, IK, and all the relative snapping tools and the UI) in few seconds.
NON DISRUPTIVE RE-RIG
If the generated rig doesn’t fit all the features you need or, for example, you decide to add something more to your character (like a 6th arm or a tail), you can re-generate your rig without losing your previously generated features and your animation data.
ADVANCED AND FLEXIBLE FEATURESET FOR CHARACTER ANIMATION
The included rig samples (limbs, spines, tails, fingers, faces…) adds to all the stretchy FK/IK features a direct deformation secondary layer that lets you flex, bend and deform the character as you like through interactive bendy-bones controls.
SHAREABLE ANIMATION THROUGH ALL RIGIFY RIGS
Since the control system is generated by rigify, if you share a metarig through different characters you will be able to share data between them even if they have different proportions.
EXTENDABLE FEATURESET
You can save and encode your meta-rigs to a button to have them available at any time without re-creating it by hand or share your meta-rigs with other people. Through python you can also teach rigify how to create new rigify-types or new rig samples.
READY TO GO
Once you generate your rig you won’t need rigify or any other addon to use it.
Basic Usage
- Install the add-on and activate.
- Add a meta rig structure from the Add » Armature menu.
- Edit the bone positions to match the character geometry.
- In the armature properties click on the generate button to generate the rig.
Add-On Activation

- Go to file » user preferences to open the preferences menu.
- In the Add-On panel type “Rigify” in the search tab to highlight the add-on.
- Click on the checkbox to activate.
WARNING
Blender 2.79+ In blender 2.79 the add-on has been massively updated and has been subject to major changes. The old code is maintained through legacy mode. Enabling the Legacy Mode will force blender to run with the old and glorious original 2.77 rigify featureset.
To enable legacy mode, inside the rigify preferences panel, click on the small arrow to expand the rigify preferences menu. Then click the little “rigify legacy mode” checkbox.
|

Add a pre-defined meta rig
Rigify stores all the informations required to generate complex rig controls and mechanism in more simple armatures called “Meta-Rigs”. currently available meta-rig types are:
- Basic Human
- Basic Quadruped
- Human
- Cat
- Wolf
- Horse
- Shark
The precompiled meta-rigs can be found in the Add menu.
Mode: Object Mode
Hotkey: ⇧ ShiftA
Menu: Add → Add Armature
Edit bone positions
To correctly match your character, meta-rig bones must be moved to correct positions. This can be achieved in 2 different ways: pose-mode or edit-mode.
NOTE:
rigify assumes that 1 blender unit corresponds to 1 meter. So a human is about 2 BU tall. If your character is in a different scale and you are more familiar with modeling rather than rigging, it is suggested to scale it to rigify dimensions before positioning the meta-rig bones. If you want to scale the character’s geometries, we suggest you to first scale up the character in object mode, then apply the geometries scale through the Apply Menu:
ControlA » Apply » Apply Scale
|
Rigify Human Alignment Tips
- limbs:
Keep the legs as straight as possible in the front view (rigify human works better in predictable cases). Give the knee and the elbow a slight bend angle (rigify needs to know where your knee/elbow is pointing).
- torso:
Keep the spine as straight as possible in the front view (rigify human works better in predictable cases). The last bone of the spine is the head. By default the next two bones (top to bottom) are considered the neck bones. It is suggested to keep the neck bones as aligned as possible while editing.
- face:
Positioning face bones can be tricky if you are not expert in bone editing and they are almost useless if you plan to make facial animation through shape-keys. Consider removing face features from your character if they aren’t really needed. If you don’t need the face all the face bones can be deleted. All the face bones are on the first armature layer by default. You can select them by displaying only bone-layer 1, selecting all of its content and then deleting the bones in edit mode to correctly remove the face.
if you want to scale all the face bones at once, consider scaling the face master bone in pose mode (see Pose-mode matching method). The face master bone is placed in the same position of the head bone. To select it easily, hide all other bone layers.
Pose-mode matching (basic)
Enter the meta-rig pose-mode. Rotate, scale, and translate the bones in the correct position. When bones are in correct positions - always staying in pose mode - use ControlA » Apply » Apply Pose As Rest Pose.
NOTE
connected bones cannot be translated in pose mode. You can scale the parent bones to match the general length and then refine child bones scale.
For more detailed informations on Armature Modes please refer to the Armatures Wiki
|
Edit-mode matching (advanced)
Some basic armature display setup is suggested before entering bone edit mode.
With the meta-rig selected, go in the Properties Window and click on the Object tab. scroll down to the display dropdown and enable X-ray and under “maximum draw type” drop-down menu select “Wire”. This way the bones will always be drawn in wireframe on top of your geometry.

Then, always in the properties window click on the Armatures tab and under display check the Axis checkbox. This way you the bones rotation axes will be displayed during the edit process.

For more detailed information on armature display modes please refer to the Armatures Display Wiki
Bone Positioning Guide
Face Bones
Start by identifying basic face landmarks to follow as guide for bones placement.

- Orange Lines represent bones that should be placed in closed loops
- Yellow lines represent bones whose position depends on surrounding bone loops
- Red Lines represent outer edge bones
- Purple Lines represent bridging bones used to cover deforming flesh

The eyes-nose loop area is split in different parts identified by bone names. Follow the image to place the bones.

| Brow Placemet Tips | |
| keeping aligned the mid bones in brow, brow.b, lid.t, lid.t and cheek will give better results after rig generation. |

Also the jaw-ear area is split in different parts identified by bone names. Follow the image to place the bones.
| Jaw Placemet Tips | |
| try to place ear.L bone covering the part of the ear attached to the mandible. Do the same with temple bone trying to cover the part you don’t want to move with the jaw, this way you will also determine the jaw pivot position. |

WARNING
while placing the lip bones you should keep the opposite bone chains merged in the middle. Tearing the merge point apart may result in misalignments of controls in the final rig.
|

After the main face bones are placed use the cheek bone to connect the eye-nose area to the jaw mouth area. Then do the same with the brow area. This process will automatically define face muscles compression areas.
| Merge Points Tip | |
| the rig will generically work as its best if you keep the bone connected at their merge points. |
Position the eye bones in the eye pivot point facing right toward the face on the Y axis.

| Eye Pivot Tip | |
| if your eye has a spherical shape you can define its pivot by entering edit mode and selecting two opposite vertices on the center meridian - or the opposite poles - and snapping the cursor to selection by pressing ⇧ ShiftS » Snap » Cursor To Selected. If your eye is a complete sphere and its location it’s not applied, than you can just use its center of mass. |
finally position the teeth bones on your teeth geometries and the tongue bone chain as described in the figure.

| Tongue | |
| the tongue will work better if the bones are aligned at the symmetry line. |
Before generating the rig ensure the face master bone is facing upward.
Torso Bones
Start by identifying on your character basic torso zones to follow as guide for bones placement.
Head, Chest and Pelvis are rigid zones, so they require less bones. Having a good edge loop placement around zone boundaries on your model will help in having correct deformation after armature binding.

Starting from the side view 3 NumPad, place the main spine bones trying to use one bone for the rigid areas and 2 for the flexible ones. In addition to the main spine, the torso is provided with additional pelvis bones (to oppose the leg bending), two breast controls and two shoulder bones. Even if the pelvis bones will not appear in the final rig as controls, they will contribute to deformation.

| Bone Placement Tip | |
| try to keep the spine as centered as possible inside the mesh bounding volume, just apply a slight offset toward the back. In a similar way, consider the shoulder bones as general deformers; placing it too forward - where the collar bone should be - could cause undesired deformations. |
Limbs Bones
While placing the arm bones try to start having a straight line that goes from the shoulder to the hand in both front and top view. After this is done just add a slight bend to the elbow. This can be easily done by going in the top view 7 NumPad, entering armature edit mode and sliding the bone junction between forearm and upper_arm slightly toward the world’s Y axis.

For the leg you can follow a similar process. Start by aligning the leg bones creating a straight line from the hips to the ankle, then place the foot and the toe accordingly.
Remember to add a slight bend to the knee. This can be easily done by going in the side view 3 NumPad, entering armature edit mode and sliding the bone junction between thigh and shin slightly toward the world’s Y axis.

Finally align the heel bone by going in the front view 1 NumPad and placing his head and tail to fill the foot size from side to side then, in the side view 3 NumPad, align the bone at the point where the heel just touches the ground floor.
NOTE
From version 0.5 and above there is no more need of manual bone rolls alignment, the generate function will take care of that for you evaluating it from bend axis; just insert a slight bend in your limb and it’s done! if you need more control on the orientation follow the guidelines described in Advanced Usage
|
Fingers Bones
Start by placing, finger by finger, all the knocks in place.
| Fingers Placement Tip | |
| An easy and effective method to do this operation is to select on the mesh the corresponding edge loop in edit mode and use the cursor to selection snap. Then you can snap the bone to the corresponding loop using the selection to cursor snap. |

finalize the positioning by taking care of bone rolls (the x axis is set as bend axis).
| Bone Roll Tip | |
| If your character's hand is placed like the above figures, finger axis alignment can be easily done by selecting all the bones of the single finger chain and recalculating the bone rolls CtrlN » Recalculate Roll » Global -Z Axis. Thumb may require more tweaking depending on your character's mesh topology, usually CtrlN » Recalculate Roll » Global +Y Axis is a good starting point |
.

When the fingers are in place proceed placing the palm bones.

| Palm Placement Tip | |
| Try to keep palm bones' heads at a little distance between each other. This distance is required for rigify to define the palm controls hierarchy. Palm axis alignment can be easily done by selecting all the palm bones and recalculating the bone rolls CtrlN » Recalculate Roll » Global -Z Axis |
NOTE
For more detailed informations on bones and rolls refer to the Bone Structure Wiki and Bone Roll Wiki.
|
Generating The Rig

With the bones in the correct positions, jump back in object mode, go to the armature tab, scroll down to the bottom and click on the “Generate” button to finalize the rig creation. The generation process will take from few seconds to one minute depending on rig complexity and hardware specs of your machine. If the generated rig needs tweaking you can modify the metarig accordingly and then click again on the generate button. If the rig already exists, rigify will simply overwrite it retaining all your modifiers and constraints and - where possible - all the previously generated features.
If you need to generate more than one rig in the scene or update a specific one (when there are more than one in the same file) follow the instructions in the Advanced Rig Generation section.
| Rig Updating Tip | |
| To make the rig overwriting work as expected, you need to have both the rig and the metarig visible before generating again. |
WARNING
As with all python add-ons, blender interface cannot be updated until the python script execution is over. Wait until the rig appears to see the results.
|
Binding the geometries to the rig
just started
To bind the geometries to the rig you can use your preferred tools. Just few things you have to know:
- All the deforming bones are on the armature layer 30.
- Eyes and Teeth bones are not deforming. You are supposed to bind eyes and teeth geometries through child-of constraints.
- Usually armature deform with automatic weights do a really good job out of the box if you correctly place your bones (and there’s enough topology to work with!).
For more detailed information on armature layers, armature modifier and weight painting refer to the blender wiki.
Rig Features Description
going on well
After human rig generation a new armature named “Rig” will be added to your scene. This is the character rig you have generated from the human metarig and will contain all the features.
Limbs
Each limb will have a gear widget at his base. This is the utility bone that contains all the sub-rig properties. The rig features will be displayed anyway when the affected bone is selected but if you are looking in the graph editor for those properties’ animated values, this is most likely the bone to look at. Rigify’s Super Limb will list the following features:
- IK/FK snapping
To snap one chain to another just select the control you want to snap and in the properties panel the snap buttons will appear. Click on the snap you want and it’s done!
- FK limb isolation
Slider (0, 1)
When set to 1 the FK arm will not rotate with the torso and will retain is rotation in world space instead.
- IK following
Boolean (0=False, 1=True)
When the IK follow is set to 1 the IK limb will follow his parent depending on the Root/Parent slider. When set to 0 the IK limb will stay fixed in space whatever the rest of the rig will do. This is an useful option if you want to create your own child-of constraint on the IK limb toward another part of the rig itself (like parenting the hand to the head)
- IK limb domain space select
Slider Root/Parent (0=Root, 1=parent)
When set to Root the IK limb will move with the root, when set to Parent will move along with the torso. This value depends from the IK Follow option.
- IK limb domain space select
- IK/FK limb interactive blending
Slider (0=IK, 1=FK)
When set to IK the arm will follow the IK controls, when seto FK the arm will follow the FK controls.
- Pole vector type switch
Boolean (0=rotational Pole, 1=Standard pole vector)
When set to 0 (Default) the IK arm will use the rotational pole vector (the arrow at the base of the limb). Rotating/translating/scaling the the arrow will control the IK limb base. When set to 1 the classic pole vector will be displayed and used to orient the IK limb. The arrow will continue to handle the scale and the location of the IK limb base.
- Pole vector following
Slider (0= Root, 1=Limb)
If pole vector switch is set to 1 (standard pole), then this value defines the pole’s parenting. If Pole Following is set to 1 then the pole vector will be parented to the limb, if set to 0 will instead follow the root. This properties also depends on the IK follow control. When The general IK follow is set to 0, then the pole vector following will have no effect.
- Pole vector following
- IK Auto-Stretching
Slider (0=No stretching, 1=Full Stretch)
When set to 0 the ik limb it’s constrained to his rest length. When set to 1 the Ik limb will stretch till it reaches the IK effector.
- Bendy Bones flexible tweaking
For each limb - depending on the user defined metarig options - multiple bone segments will be created. Each bone can be controlled by controls placed at the respective bone’s head/tail. Tweaks movement will depend from the general IK limb position but they can be moved apart, twisted and scaled freely, even reaching virtually impossible limb shapes.
Just select the desired tweak control and do whatever you want with it.
Torso
- Neck Follow
Slider (0=Neck Follows Torso, 1=Neck Follows Chest)
This slider controls the rotations isolation for the neck bones. When set to 0 the neck will stay oriented as the Torso (the big box control). When set to 1 the neck will be oriented as the Chest (the big circle in the shoulder area). - Head Follow
Slider (0=Head Follows Torso, 1=Head Follows Neck)
This slider controls the rotations isolation for the head. When set to 0 the head will stay oriented as the Torso (the big box control). When set to 1 the head will be oriented as the neck.
Face
- Mouth Lock
Slider (0=Free Lips, 1=Lips Sealed)
This slider controls the mouth opening. When set to 0 moving/rotating the jaw bone will result in mouth opening, when set to 1 the lips will stay sealed while the jaw is moving.
- Eyes Following
Slider (0=locked eyelids, 1=automatic eyelids)
This slider controls the eyelid automation. When set to 1 (default) the eyelids and the lower eyebrow will follow the eye movement giving a realistic effect to the character, when set to 0 no automation will happen.
Advanced Usage
just started
- Install the add-on and activate.
- Add a single bone from the Add > Armature menu.
- Go in edit Armature Edit Mode and build the meta rig by samples or rigify-types.
- Define Rigify Layers, Bone Grouping and Selection Sets (New)
- In the armature properties click on the generate button to generate the rig.
How Rigify Works
just started
- Rigify Meta-Rigs are split in multiple Sub-Rigs
A Meta-Rig is an assembly of bone chains. A bone-chain is identified by the connected attribute. Bone-chains can be further connected together by parenting them without using the connected attribute (i.e. using the keep offset option while parenting). - A custom attribute is set on the first bone of the sub-rig chain
Each first bone of a bone-chain has a on it a Rigify Custom Property that identifies the sub-rig type. At Rig generation time Rigify will determine which controls and deform bones will be created processing the metarig from the first bone to the last of each chain.

- New meta-rigs are created assembling sub-rigs samples
Since a Meta-Rig is just a collection of sub-rigs, new meta-rigs can be built assembling sub-rigs in different ways. This way an infinite number of meta-rigs can be built from the same rigging blocks.

- All the mechanics, deformation bones and widget are created on a single clic
The Meta-Rig contains more information than the visualized bones. In fact at generation time rigify will identify each sub-rig type and depending on the selected options will create all the sophisticated controls, switches, and deforming bones with a single clic.
Rigify Rig Types
just started
Rig Types are the Properties Collection used by Rigify to identify what kind of rig the user is building.
NOTE
The list of available rig types appears in the bone properties tab when the bone is selected in pose mode. Scroll down the properties window to find Rigify Type panel.
|
The currently available Rig Types are:
Basics
- basic.copy_chain
will copy the bone-chain keeping all the parent relations untouched. Useful as utility rig-type for custom rigs.
requirement: a chain of at least 2 connected bones
available options:- control (boolean)
when checked control bones and widgets will be created - deform (boolean)
when checked deform bones will be created
- control (boolean)
- basic.super_copy
will copy the bone. Useful as utility rig-type for adding custom features or specific deform bones to your rigs.
requirement: a single bone
available options:- control (boolean)
when checked control bone and widgets will be created - widget (boolean)
when checked a circle widget will be created in replacement to the standard - deform (boolean)
when checked deform bone will be created
- control (boolean)
Spines
- spines.super_spine
will create a complete bendy and stretchy b-bones spine system based on bone numbers of your bone-chain and user defined options.
requirement: a chain of at least 3 connected bones (base system)
available options:- pivot position (integer)
defines the pivot position for torso and hips. - head (boolean)
when checked neck and head systems will be added to your spine rig- neck position (integer)
defines the bone where the neck system starts. The last bone will always be the head system. If neck position is the last bone of the chain, then only the head system will be created ignoring the neck.
- neck position (integer)
- tail (boolean)
when checked tail system will be added to your spine rig.- tail position (integer)
defines the bone where the tail system starts. The next bone will always be the hips system.
- tail position (integer)
- pivot position (integer)


Limbs
- limbs.simple_tentacle
will create a bendy and stretchy b-bones tentacle chain or automatic bendy and stretchy finger controls
requirement: a chain of at least 2 connected bones
available options:- Automation Axis (X, Y, Z, None)
Enables the automation on the selected axis. Multiple axis or none can be selected holding shift while clicking ⇧ ShiftLMB . When enabled the controls of the last bones will copy the rotations from the previous ones. The option is exposed on the controls of the final rig as a copy rotation constraint and can be disabled even after rig is generated, or at animation time.
- Automation Axis (X, Y, Z, None)
- limbs.super_finger
will create a bendy and stretchy chain or automatic bendy and stretchy finger depending on a master control bone.
requirement: a chain of at least 2 connected bones
available options:- Bend Rotation Axis (X, Y, Z, -X, -Y, -Z)
Defines the automatic rotation axis to be linked to the master-bone scale.
- Bend Rotation Axis (X, Y, Z, -X, -Y, -Z)
- limbs.super_limb
will create a full featured bendy and stretchy limb depending on the user defined options.
Available Limb Types:- Arm
requirement: a chain of at least 3 connected bones (upper_arm, forearm, hand)
available options:- Rotation Axis (Automatic, X, Z)
Defines the bend axis for the IK chain. FK chains will have a totally free degree of rotation on all axis. - Limb Segments (integer)
Defines the number of additional tweak controls each limb bone will have on the final rig, default is 2. - B-Bone Segments (integer)
Defines the number of b-bone segments each tweak control will be splitter into. default is 10. - FK Extra Layers
Defines on which bone layer the FK chain will be created. The yellow dot shows where will be placed the IK chain (by default is the same layer of meta-rig's limb chain). - Tweak Extra Layers
Defines on which bone layer the Tweak controls will be created. The yellow dot shows where will be placed the IK chain (by default is the same layer of meta-rig's limb chain).
- Rotation Axis (Automatic, X, Z)
- Arm

- Leg
requirement: a chain of at least 4 connected bones and a last child used as heel pivot (thigh, shin, foot, toe, heel)
available options:- Rotation Axis (Automatic, X, Z)
Defines the bend axis for the IK chain. FK chains will have a totally free degree of rotation on all axis. - Limb Segments (integer)
Defines the number of additional tweak controls each limb bone will have on the final rig, default is 2. - B-Bone Segments (integer)
Defines the number of b-bone segments each tweak control will be splitter into. default is 10. - FK Extra Layers
Defines on which bone layer the FK chain will be created. The yellow dot shows where will be placed the IK chain (by default is the same layer of meta-rig's limb chain). - Tweak Extra Layers
Defines on which bone layer the Tweak controls will be created. The yellow dot shows where will be placed the IK chain (by default is the same layer of meta-rig's limb chain).
- Rotation Axis (Automatic, X, Z)
- Leg

- Paw
requirement: a chain of at least 4 connected bones (upper_arm, forearm, paw, toe) or (thigh, shin, paw, toe)
available options:- Rotation Axis (Automatic, X, Z)
Defines the bend axis for the IK chain. FK chains will have a totally free degree of rotation on all axis. - Limb Segments (integer)
Defines the number of additional tweak controls each limb bone will have on the final rig, default is 2. - B-Bone Segments (integer)
Defines the number of b-bone segments each tweak control will be splitter into. default is 10. - FK Extra Layers
Defines on which bone layer the FK chain will be created. The yellow dot shows where will be placed the IK chain (by default is the same layer of meta-rig's limb chain). - Tweak Extra Layers
Defines on which bone layer the Tweak controls will be created. The yellow dot shows where will be placed the IK chain (by default is the same layer of meta-rig's limb chain).
- Rotation Axis (Automatic, X, Z)
- Paw

- limbs.super_palm
will create a palm system based on the distance between palm bones.
requirement: at least 2 bones child of the same parent. The property has to be set on the inner palm bones (think it as index's metacarpus), the rig control will appear on the last palm bone (think it as pinky's metacarpus)
available options:- Bend Rotation Axis (X, Z)
Defines the automatic rotation axis to be used on the palm bones.
- Bend Rotation Axis (X, Z)
Faces
- faces.super_face
will create a face system based on the bones child to the parent that has the property set on it.
requirement: All the face bones bundled in the faces.super_face sample had to be present and child of the master bone that has the rigify-type face property set.
Experimental
- experimental.super_chain
Rigify Rig Samples
just started
Rig samples are just pre-built bone-chains with corresponding Rig-Type assigned to the first bone of the chain. The currently available Rig Samples are:
Basics
- basic.copy_chain
- basic.super_copy
Spines
- spines.super_spine
Limbs
- limbs.arm
- limbs.paw
- limbs.rear_paw
- limbs.simple_tentacle
- limbs.super_finger
- limbs.super_limb
- limbs.super_palm
Faces
- faces.super_face
Experimental
- experimental.super_chain
Add a new armature object
building your own metarig from scratch requires an armature object to work with. Just add a single bone from the Add Menu.
Mode: Object Mode
Hotkey: ⇧ ShiftA
Menu: Add → Armature → Single Bone
| Tip | |
| At this stage naming the newly added armature metarig is a good idea. You can do it at any time (or not at all) but it's suggested to do it before going on so it will always be clear on which armature you have to work when editing the meta-rig structure. |
Edit Armature
just started
Now that there is an armature object to work - with the armature selected - enter armature edit mode. Building a metarig from scratch in edit mode can be done in two ways:
- Adding Rig Samples
- Creating Bone-Chains
Adding Samples (Basic)
just started
Adding samples in edit mode is a good way to start building a meta-rig. This way you can become familiar with the available building blocks and how they are meant to be used. To add a rig sample:
- go in the armature tab
- scroll down to Rigify Buttons section
- select a sample from the list
- click on the Add sample button
- edit the bone positions to match your character
Using Rig-Types (Advanced)
- create your bone-chains in edit mode
- assign the correct rig-type to the first bone of each chain in pose mode
NOTE
each sub rig has a required number of bones as input. If you are unsure on how to use rig-types properties, add a rig-sample to your armature to see how it is supposed to be used.
|
Layers, Bone Groups and Selection Sets
Armature Layers are usually used to isolate bones. Rigify can take advantage of armature layer to generate extra features and the user interface for the final rig. Blender 2.79 can handle 32 separate layers for each armature. The armature layers are visualized under the armature tab. They are split in two separate groups of 16: the top row contains layers from 1 to 8 and from 9 to 16. The bottom row layers form 17 to 24 and form 25 to 32.
Rigify Layers are displayed in a vertical layout inside their own separate panel named Rigify Layer Names.

- The first column shows the layer number.
- The second column is a display toggle.
This toggle controls the armature layer visibility. It has the same effect of enabling/disabling the layer visibility from the top armature layers menu. It is just redrawn here for a simplicity.
- The third column sets a specific layer name to be used to build the rig UI of the final rig. If set, a button with the specified name will be created in the rig_ui to control the visibility of this specific armature layer. If layer contains at least one bone but its name field is empty, a button with no name will be created in the rig UI.
- The fourth column defines in which UI row the layer button will be created.
This numbers define the layer ordering in the UI and will ignore the effective layer number. If two layer have the same row number their UI button swill be created in the same row.
- The fifth column is a toggle for the selection set.
If checked a selection set with that name will be created and associated to the final rig.
- The sixth column defines the Rigify Bone Grouping.
If Rigify Bone Groups are set, the user can make the association between the bones on the layer and the specified bone group from the list. The controls on the final rig will inherit the bone grouping through this value.
- The seventh column displays - if set- the associated bone group name.
In order to use the Bone Groups in the Rigify Layer Names fields, Rigify Bone Groups must be set through the specific panel. Usually this panel is displayed just above Rigify Layer Names panel.
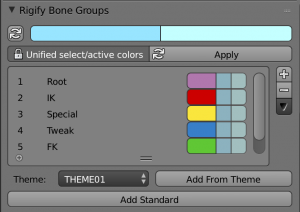
Rigify Bone Groups are used to define bone colors on the final rig. The top two rows of the Rigify Bone Groups panel are used to define the bone colors general behavior. Usually color themes use a gradient of colors to define the different bone states: default, selected and active. When multiple color themes are used in the same rig, identifying which bone is selected or active can be tricky since each color will have its corresponding state.
To override this behavior Rigify Bone Groups unifies the active and selected states with the same color. This is defined by two values:

- Unified selected/active colors
When this option is active adding a bone group in the list will always keep the colors consistent. When a color scheme is added as from a theme, the col scheme is loaded as is. Click on the Apply button to force the system to unify selected and active colors.
- Selected/Active Colors
This two color swatches define respectively selected and active colors. By default Rigify reads this colors from the theme defined by the user in blender preferences. This way the selected/active colors can always have a predictable and consistent behavior in the UI. The colors can be customized by clicking on the relative color swatch. To reset them to the blender current theme value just click on the button with the update icon ↻.
Bone Groups can be added and deleted as done in the general bone group panel by clicking on the + or - button. All Bone Groups can be deleted at once by clicking on the specials ▽ button.
To add the predifined Rigify Default Bone Groups list click on Add Standard button.
To add a specific Theme with its own color scheme, select it from the list and click on the Add From Theme button.
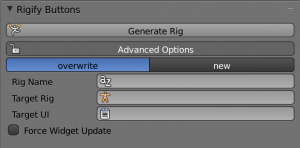
Advanced Rig Generation
Advanced Options Features
When Advanced Options are enabled, user will be able to:
- Generate more than one rig per scene.
- Generate a rig with a specific name.
- Update/Overwrite a specific rig.
Advanced Options Activation
Advanced Rig Generation Options are locked by default. Click on the "Advanced Options" button to enable. With Advanced Options enabled the panel will be updated displaying two main modes:
- overwrite
- new
By default overwrite is selected. At this stage if you don't touch anything in the UI the generate function will be invoked as is, meaning in fact that generating the rig now will create a new rig from the metarig if none is present in the scene, or overwrite the default one if you have already generated a rig from a metarig. For further information about the rigify generate function look at basic usage section.

New Rig Mode
The New Rig Mode will let the user generate a new rig from the metarig regardless an already generated rig is present in the scene. A specific name for the rig can be set by the user through the specific "Rig Name" text box. If no name is set, rigify will generate an armature object named "rig" and a python script named "rig_ui.py"
NOTE
Keep in minde that along with the rig, rigify generates also a rig_ui python script which controls the UI in the 3D view. This python script will be named accordingly with the specified rig name.
|
Overwrite Rig Mode
The Overwrite Rig Mode will let the user specify a target rig to be overwritten. If none is set rigify will search and eventually overwrite an armature object named "rig" and a python script named "rig_ui.py"
Library Linking
When linking a rig into another file, you generally want to create a group that includes the generated rig, the character mesh, and the "WGT-" objects. You do not need to include the metarig. You then link in the group, make a group instance, and make the rig proxy.
You also need to separately link in the rig_ui.py text block. Otherwise the rig UI will not appear in the n-panel.
Rigify 0.5 New Features
- Code Refactor
Old rigify types and meta-rigs were merged with the pitchipoy ones. Due to this change all the "pitchipoy" names were removed.
- Legacy Mode
In order to keep backward compatibility during the transition to the new feature set a "Legacy Mode" option was added in the add-on preference pane. When enabled rigfy will run with the old 2.77 feature-set.- Legacy Switcher
When the system detects an old/unsupported Meta-Rig will ask the user to switch to legacy mode. - Upgrade Meta-Rig
When a old but supported Meta-Rig is detected the system will give the user an option to upgrade the Meta-Rig types to the current version. When this is done the user can upgrade the rig too by clicking on generate rig again.
- Legacy Switcher
- Updated rig-types
All rig types now use the formerly known as "pitchipoy.type" as base. New feature were ported from the original rigify code and merged or updated as listed below:- super_limb
Formerly known as 'pitchipoy.super_limb' is the new base type to create Arms, Legs and Paws. All the types now support standard 'pole vector' as an option in the ui after rig generation. All the FK/IK snapping functions were updated to work seamlessly indipendently from the pole type (standard or rotational). Bone rolls are automatically calculated during the rig generation process, so no more eyeballing on the metarig's limbs bone rolls! - super_spine
Formerly known as 'pitchipoy.super_torso_turbo' is the new base type to create spines. This new type support the creation of stretchy spines complete systems splitting "head/neck" and "Tail" generation as an user defined option. This sample can generate a full bendy-bones spine (from tail to head). If the distance from head to neck is more than 3 bones will automatically generate an ik-stretchy neck useful for animals rigs. The spine system features rotation isolation modes for head, neck and even the new tail.
- super_limb
- Rigify Layers Redesign
 Rigify Layers - formerly used to define names in the UI - are now updated to support per-layer automatic creation of user defined bone groups and selection sets on the final rig.
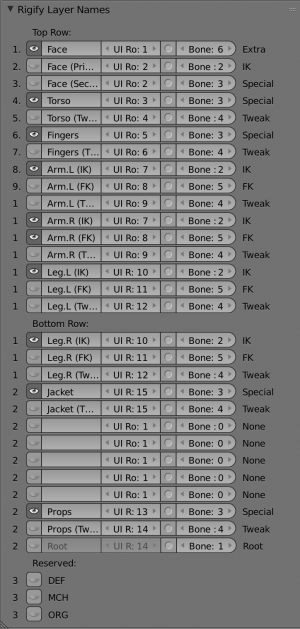
- Rig_UI automatic linking
The generated rig_ui.py script is now automatically set as python controller for the armature rig forcing the script to be imported along with the armature when a rigify rig is linked into another blend file.
- Advanced Generation OptionsRigify can now handle more than 1 rig generation per scene. Users can now select a specific target rig and python ui to be updated from the metarig generate panel. This feature also addresses the patch proposed in https://developer.blender.org/T51094.

- Rigify Animation Tools
When the add-on is enabled rigify rigs will benefit of a new animation tool panel that will allow the user to easily manage animation properties and switches on the whole animation or on a specific frame range. Rigify Animation Tools features are: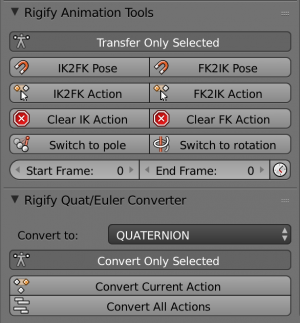
- ik2fk pose
Snaps the current IK pose to the FK pose and insert automatically a keyframe. - ik2fk action
Snaps the current IK pose to the FK pose and insert automatically a keyframe on each keyed frame within the selected frame range. - fk2ik pose
Snaps the current FK pose to the IK pose and insert automatically a keyframe. - fk2ik action
Snaps the current FK pose to the IK pose and insert automatically a keyframe on each keyed frame within the selected frame range. - clear IK action
Deletes all the inserted keyframes for the IK chain within the selected frame range. - clear FK action
Deletes all the inserted keyframes for the FK chain within the selected frame range. - switch to pole
Converts the keyframes animation from the rotational pole to the standard pole vector within the selected frame range. - switch to rotation
Converts the keyframes animation from the standard pole vector to the rotational pole within the selected frame range. - Quaternion/Euler converter
Converts any rotation order f-curves to the desired one (i.e. Quaternion > XYZ Euler).
- ik2fk pose

- New Metarigs
Along with the 0.5 featureset a bunch of new metarigs are added to the armatures list: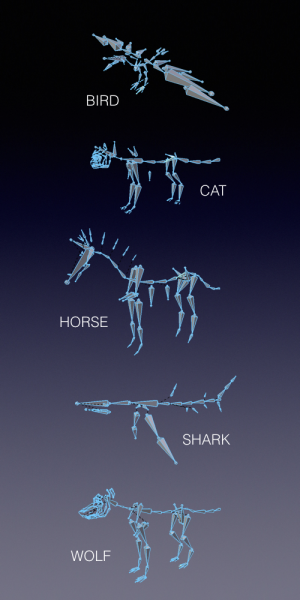
- Basic Human
A generic Human Meta-Rig, no fingers, no face. - Basic Quadruped
A generic Quadruped Meta-Rig including the new tail option in the spine. - Cat
A complete Cat Meta-Rig including claws, face bones and the new tail option in the spine. - Wolf
A complete Wolf/Dog Meta-Rig including claws, face bones and the new tail option in the spine. - Horse
A Horse Meta-Rig including the new tail option in the spine, hair, tail and the bend&stretch ik neck option. - Bird
A basic Bird Meta-Rig including wings, feathers, claws, beak and the new tail option in the spine - Shark
A basic Shark Meta-Rig including fins, jaws, and the new tail option in the spine.
- Basic Human


- Bug Fixes
- fixed typo errors in various part of the old pitchipoy code
- fixed eyes bones/widgets size
- upgraded limb types to avoid the errors in legs generation when bones were not aligned https://developer.blender.org/T50500
- upgraded limb types to correctly show all animated properties in the graph editor as requested in https://developer.blender.org/T50511
- upgraded limb types to allow user defined foot orientation as requested in https://developer.blender.org/T50502
- All bone widgets shapes are now created as child of the 'WGTS' empty.