Extensions:DE/2.6/Py/Scripts/Render/POV-Ray

- Developer's page
- design ideas
- regression files
Features
|
Some key features of the exporter include:
POV-Ray 3.7 features volumetrics and media (scattering/absorbing); depth of field; non mesh primitives (never show tesselation), etc. developement version already features motion blur, blurry reflection, etc. |
Standard Script Information at the bottom of this page.
POV-Ray 3.7 Exporter for Blender 2.7x
POV-Ray is an an SDL based (Scene Description Language) rendering engine with a long history that makes it very stable and feature rich. The latest version of POV-Ray 3.7 can be found at: http://www.povray.org/download/
See the Installation page for platform specific details on how to get, install or build POV-Ray.
Usage
Quick Start
| 1. Go to the menu File » User Preferences | |
| 2. Choose the Add-Ons tab and check POV-Ray 3.7 down the list of render Add-Ons. | |
| 3. Choose POV-Ray 3.7 from renderer choices. Then you can render as usual with the Image render button or its shortcut (F12 in default layout) |


Rendering with UberPOV
UberPOV is a development branch of POV-Ray. Just like MegaPOV used to be in the old days.
HERE you can download a standalone installer that will not interfere with a standard POV-Ray installation and HERE is an update to the main binary.
| Choose the feature set and just point the renderer path in File » User Preferences to the location of the engine you choose to use and you're good to go. |

Note that Feature Set is what features get written in the POV file and the Binary Location path points Blender at the binary to actually render it with. Whithout any Binary Location path, Blender will use the environment variables and try to find the most feature rich binary available in that directory. So if you installed UberPOV it's most probably being used for rendering, but you still need to enable its feature set to enjoy specific features, like blurry reflections. And if you want to be sure to use the plain official POV-Ray 3.7 engine instead, just explicitly point the Binary Location path to it.
UberPOV features are written to the POV file inside the scope of a specific condition to enable the files to be retro compatible with POV-Ray 3.7 syntax:
reflection { 1 metallic
    #ifdef(unofficial)
        #if(unofficial = "patch")
            #if(patch("upov-reflection-roughness") > 0)
                roughness 0.1
            #end
        #end
    #end
    }
It enables you to export a file for UberPOV while still rendering it with standard POV, but this solution makes files slightly heavier and longer to parse, so it might change in the future: cleaning up exported pov when the features get available in all versions.
Going Further: Video Tutorial
Here is a demonstration of the exporter by SMcA. This video is currently being worked on and may get replaced in the future.
| right |
Exported Properties Documentation
Render Properties
-Radiosity in POV-Ray is diffuse inter-reflection which has nothing to do with vertex color based radiosity.
-Anti-aliasing: two sampling methods are supported: recursive and non-recursive, sampling depth, Anti-alias threshold. (POV-Ray Wiki: Anti-Aliasing Options)
| Depth of Field Without Anti-Aliasing | |
| Using no anti aliasing when camera Depth of field is on will speed up rendering and often provide decent enough images. |
-Bounding method switched to automatic BSP by the exporter as it's generally the most efficient(POV-Ray 3.7 only) but other acceleration methods are available in POV-Ray.
-Command line switches allow some command line arguments to be passed to POV-Ray. Arguments are separated by spaces. Command line switches consist of a / (Slash), + (plus) or - (minus) sign, followed by one or more alphabetic characters and possibly a numeric value. (POV-Ray Wiki: Command line options)
| -D | Hide image while rendering Use the command line switch -D to not show the rendered image in POV-Ray (slightly faster and lighter on memory). The image will be sent back to Blender after completion (on Linux this is a hidden default switch to avoid OS specific editor problems).}} |
| +WT | Limit the number of threads used +WT1 limits POV-Ray to using only one single render thread. (Likewise, +WT2 would instruct POV-Ray to use two render threads.) |
| +C | Continue an interrupted render +C for "Continue trace" is able to recover the point at which your last render stopped and continue it from there (even if you switched off your computer) |
| /EXIT | Close POV-Ray after rendering the image There is also an option in POV-Ray for windows interface to do the same: The "On Completion" option to "Exit POV-Ray for Windows" (in the Render Menu).
|
| Fast Preview Renders | |
| When first setting up your scene, and for fast preview rendering, turn off anti aliasing, depth of field, photons, Radiosity, expensive material features, and in the scene Shading panel, turn off shadows. (other features might get turned off from this panel in future versions of the exporter) Alternatively, use the "quality" command line switches +q1 to +q11. These allow you to easily disable most of the CPU-intensive features. |
-Formatting of the exported POV-Ray file: Different indentation characters to choose from. Option to add comments to POV-Ray file. Option to write long lists of coordinates in one line for easier browsing of the POV file (and slightly faster parsing by the renderer)
Scene Properties
World Properties
-Background gets exported (sky texture appears a little different because of convoluted workaround used).
 Atmospheric Media (to create volume lights): |
Object Properties
Importance sampling can be set for Radiosity to shoot more rays at object that require them most.
Data Properties
-Exports Sky, Lights, Hair particles, Smoke, fluids, Meshes, Blobs (MetaBalls). (Limitation for Blobs: MetaBalls with same naming are not combined the same as in Blender. MBall, MBall.001 ...)
Camera
-Depth of field Based on Blender UI distance field, not object field. With fixed blur amount for now.
Lamp
-No Shadows toggle button can be used to deactivate tracing of shadows for specific lamps only
| For Realistic Light Attenuation | |
| Use Inverse square falloff, and a small falloff distance value with a higher light intensity will give the best results with Povray's implementation of inverse square law. See this discussion |
 Smoke |
Material Properties
-Emission (new in POV-Ray 3.7)
| Mesh Lights | |
| When used together with Radiosity, Emit property will allow you to create light bulbs or any luminous form that really illuminates other objects. |
-SSS Note that SSS in POV-Ray (called SSLT) is very sensitive and will give different results if the mesh normals are smooth shaded or flat.
-Translucency (new in POV-Ray 3.7)
-IOR Mirror option for using one consistent IOR for raytrace reflection and refraction and not breaking the law of conservation of energy between the two.
-Iridescence (Newton's thin film coating)
 Caustics: |
| Faster Photons | |
| To set up some caustics, try moving from the smallest photon depth value to a minimum at which you start to see the effect you are after. Check off the Receive Photons object property for any object that does not really need it. (A glass object casting caustics often doesn't need to receive any itself.) Then you can balance other parameters to tune photons distribution and smoothing (gathering). Don't set the global spacing too fine in scene settings, because then you can still make it finer on each object using its spacing multiplier. If your system has several threads, they can be used in the photons stage: one thread per light, so you can then complexify your scene lighting without overhead. |
| shaders emulation attempted from blender: -Specular and diffuse toon (no edges yet) -Phong and Cook Torrence (both the same) -Blinn (not perfectly matched) -WardIso -Fresnel and Minnaert, started but not finished yet |
| Glass Like Materials | |
| When trying to achieve some glass like material, keep low diffuse value, dark or totally black to avoid dull surface and keep clear transparency. |
Texture Properties
-UV coordinates: best with planar projection for now. (Silvio Falcinelli)
-Texture channels: Alpha ; Diffuse ; Bump ; Specular ; Mirror (uses same channel as specular) --(No other channel because of POV-Ray non uniform syntax for them)
-Custom gamma for image textures (read POV-Ray 3.7 doc before using since it generally needs not be used.) (POV-Ray Wiki: Gamma Handling)
Using Texture Image Sequences
Link to the original Tutorial by Markku Myllymäki
Note to the reader: this functionality works in Blender Internal, Cycles (see the end this document) and now it works with POV-Ray render (little change in POV-Ray exporter). For Blender itself it is old feature.
This document assumes that the reader is able to UV unwrap and texture a model and animate with keys.
Also, it is safest to set render engine to POV-RAY at the beginning. Otherwise some datablocks may vanish when you change renderer.
Image sequences are changing textures. For example, if your 3D scene has a TV set, and you want to animate, what the TV shows, you could use image sequence. There are many uses. Here, we will be using it for facial animation.
For facial animation, we want to be able to change texture (i.e. facial expression) with a key, so when something happens to a character, the expression changes as a reaction.
What you need at the beginning
You need UV mapped model:

You need a sequence of images:

These are separate images, here together only for illustration.
IMPORTANT NOTE: There is a limitation to how you can name the sequence files. For the exporter to work correctly, use this kind of naming:
filename.001.png filename.002.png ... etc.
For example, I used facetex.001.png etc. here in this example.
The dot, three number sequence and another dot. It is mandatory. The exporter fails otherwise. This also applies to some other image sequences in Blender, and the naming convention is from Blender docs.
Defining the image sequence
You can define the material normally. Also, the texture is defined as normal UV mapped texture:

But when you define image name, select first (filename.001.png) image in sequence and change Single Image to Image Sequence:

Now you have image sequence defined! Using the image sequence in animation
In an animation, you need to be able to to make keys for texture changes. It is useful to set viewport shading to GLSL and put textured mode on, so you can see what happens without rendering the animation.
You can make keys this way:

Set "Frames:" to 1. Set "Start:" to 1. Now you can with "Offset:" change the texture in sequence. You can set keys to animation by hovering over "Offset:" and pressing I-key.
Remember to set key Interpolation Mode to Constant:

That's because Blender's default is Bezier. It would change the value of the "Offset:" fractionally and that is not usually a good idea, because usually you want certain texture to show until you define a different one... Constant Interpolation Mode is good for textures.
Now, when you render your animation using POV-Ray, texture changes should work!
Example, frames 1, 5 and 10:


Sidenote: Cycles usage
For those who wonder how Cycles does this (you need to begin from scratch, because Cycles has different datablocks than BI or POV-Ray).
Set renderer to Cycles Render:

This is the material node setting for Cycles. As you can see, you can define image sequence there too!

Custom POV Code
POV-Ray files are not just pure data files (unlike with most other renderers). They are programs, with loops, functions, etc. This means that no matter how many features this exporter could support, POV-Ray will always have much more under the hood.
You can add custom POV code directly in Blender's text editor, all you have to do is to make sure this pov code has directly or indirectly a #declare keyword, followed by the name of your choice and the pov item you want to use. (Current POV syntax is closer to C than Python, so anything that follows two slash character ( // ) is a comment)
-Adding items directly Pov items can be anything but for now only the equivalent of Blender materials can be replaced with this method. In Povray, it is called texture {} don't get confused, it really includes all the material properties.
Though you can directly specify a texture {} block in POV-Ray files, the #declare directive allows to assign it to a variable and reuse it more easily. The exporter makes use of this feature by default, so you won't be able to use your custom texture, unless you declare it. Here is an example:
#declare MyTexture =
texture{
    pigment{
        brick color rgb< 0.99, 0.99, 0.99>  // color mortar
        color rgb< 0.75, 0.5, 0.30>*0.75  // color brick
        brick_size <0.25, 0.0525, 0.125> // format in x ,y and z- direction
        mortar 0.01                      // size of the mortar
        scale 3
    } // end of pigment
    normal {wrinkles 0.75 scale 0.01}
    finish {ambient 0.15 diffuse 0.95 phong 0.2}
    rotate<0,0,0>  translate< 0.01, 0.00, 0.00>
} // end of texture
| 1. Navigate the text window menu to display the text properties View » Properties | |
| 2. check Custom POV Code option. | |
| 3. Then you have to go into the material properties to the Custom POV Code field, and just type in the name of your declared item to use: MyTexture in the example Given. Then you can render your image normally and the material will be replaced. |


-Adding items indirectly from include files In any Povray scene you can use the #include directive to add items from an external Povray file. It's like the import function in Python. The files to be included have .inc as their name extension. Then in the replacement field, you can type in any of the declared names available in the include file. "Out of the box", Povray ships with a lot of include files. So you can use them for your textures, but you can also use them for some of their elements. For instance a very often used include file is one that allows to call colors by their names instead of numbers called colors.inc, so the previous example could also be written:
#include "colors.inc"
#declare MyTexture =
texture{
    pigment{
        brick color White*0.99  // color mortar
        color rgb< 0.75, 0.5, 0.30>*0.75  // color brick
        brick_size <0.25, 0.0525, 0.125> // format in x ,y and z- direction
        mortar 0.01                      // size of the mortar
        scale 3
    } // end of pigment
    normal {wrinkles 0.75 scale 0.01}
    finish {ambient 0.15 diffuse 0.95 phong 0.2}
    rotate<0,0,0>  translate< 0.01, 0.00, 0.00>
} // end of texture
Following this method, more custom objects are planned for future versions of the exporter: In POV-Ray a triangle mesh is just one primitive among many.
Until then You can explore the POV-Ray language by modifying the output file.
Combining Blender And POV-Ray Animations
While Blender is one of the best modelers in existence, it is primarily a polygon modeler. There are some cases when you want to use something like POV-Ray's CSG features, which are very good at pure, mathematical forms. But compositing POV-Ray and Blender output is hard work. However, there is a way to combine animations to one render with Blender's POV-Ray Exporter!
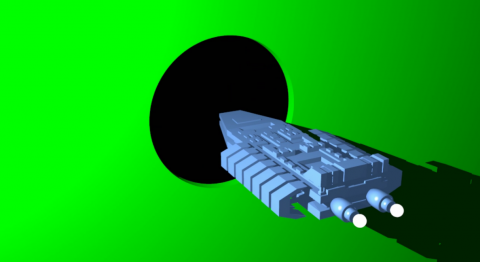
Let's make an (very simple) example case: Spaceship flying out of hangar. We wanted to make a dilating door animation in POV-Ray, spaceship animation in Blender and combine them.
Preliminary hacking
    def exportCustomCode():
        # Write CurrentAnimation Frame for use in Custom POV Code
        file.write("#declare CURFRAMENUM = %d;\n" % bpy.context.scene.frame_current)
        #Change path and uncomment to add an animated include file by hand:
        file.write("#include \"/home/quantum/povray_animation/animation_include_file.inc\"\n")
The exporter doesn't include an interface to this functionality yet but it's quite usable already. The folowing lines are from Blender's POV-Ray Exporters file, render.py. The only change you need to do is to write the file path for your own .inc file (which can be named as you want) and check that those two file.write statements are not commented out (i.e. no '#' in the beginning...).
This example uses Linux, so file path is Unix-style, in MS Windows paths are written differently...
Blender animation


We defined 100 frame animation in Blender. Basically just move (linearly) the spaceship.
Of course the world paramaters, lighting and objects materials/textures need to be what POV-Ray needs. Here, they are very basic. No image textures, one light, little ambient light.
POV-Ray animation
#include "colors.inc"

#declare doorpart = difference {
	cylinder { <0, 0, -0.1>, <0, 0, 0.1>, 3 }
	box { <-10, -10, -10>, <0, 10, 10>  rotate <0, 0, (-3*CURFRAMENUM+3)> }
	box { <-10, -10, -10>, <10, 0, 10> }
}

#declare wall = difference {
	box { <-100, -100, -0.2>, <100, 100, 0.2> }
	cylinder { <0, 0, -1>, <0, 0, 1>, 2.9 }
}

object {
	wall
	pigment { Green }
}

#if (CURFRAMENUM<30)
object {
	doorpart
	rotate <0, 0, 0>
	translate <0, 0, 0>
	pigment { Green }
}

object {
	doorpart
	rotate <0, 0, 90>
	translate <0, 0, 0>
	pigment { Green }
}

object {
	doorpart
	rotate <0, 0, 180>
	translate <0, 0, 0>
	pigment { Green }
}

object {
	doorpart
	rotate <0, 0, 270>
	translate <0, 0, 0>
	pigment { Green }
}
#end
We wrote the POV-Ray animation code. This is the animation_include_file.inc which was included in Python code. Note, that CURFRAMENUM is used. It is the animations current frame number in Blender! This way we can know what should happen and when in POV-Ray code. Here is the resulting animation:
Speed Tests
Comparison Blender <-> POV-Ray:
|
Setup: |

|
Same setup, |

Limitations
This version is POV-Ray 3.7 only, it won't work with POV-Ray 3.6
-Requires Blender version 2.7 revision or later.
-On every rendering POV-Ray will save an image in the TEMP directory, which couldn't be deleted by the script (tested only on Win7. Same behavior on other OS?).
May Do List
See Dev:2.5/Py/Scripts/Render/POV-Ray
Standard Script Information
| UI location | Renderer rolldown menu | ||
|---|---|---|---|
| Usage | If POV-Ray 3.7 is installed, activate the addon in the menu File » User Preferences. Choose it as the renderer and render with F12. | ||
| Version | 0.0.8 | Author(s) | Campbell Barton, Silvio Falcinelli, Maurice Raybaud, Constantin Rahn |
| Blender | 2.57 | License | GPL |
| Category | Render | Distribution | Release |
| Note(s) | After May the 10th 2011, some development to the script limited backwards compatibility: If you set up some files prior to that and always use the latest exporter from SVN. It is advised to run the update script and resave your scene with the new version: get to the search bar with Space and type pov to access this command. | ||
| File name | (Python script)+ POV-Ray 3.7 |
|---|---|
| Current version download | http://developer.blender.org/diffusion/BA/browse/master/render_povray/ |
| Python modules | Used standard Python modules |
| External Python Modules or dependencies | POV-Ray 3.7 current beta |
| Warning | Both POV-Ray 3.7 and this script are beta. |
|---|---|
| Links | http://povray.org/ |
| Release Log | Dev:2.5/Py/Scripts/Render/POV-Ray |
| Known Issues | Currently Important: |
目次
- 1 Features
- 2 POV-Ray 3.7 Exporter for Blender 2.7x
- 3 Usage
- 3.1 Quick Start
- 3.2 Rendering with UberPOV
- 3.3 Going Further: Video Tutorial
- 3.4 Exported Properties Documentation
- 4 Standard Script Information