Extensions:Uni-Verse/Layer Painter
Introduction
"Layer Painter" is the very descriptive name given to one of Eskil Steenberg's applications. It is part of the "Quel Solaar" suite of native Verse tools.
The purpose of Layer Painter is to allow the user to "paint" values into Verse geometry layers.
Installation
Requirements
Layer Painter requires:
- Verse
- The Verse client API implementation (
libverse.a) is required by all Verse client applications. You can find it either in the binary distributions, or build it youself from the verse CVS module. - OpenGL
- The visualization of the geometry being painted on is done using OpenGL, so you will need it.
- GLUT, SDL, GLFW, Xlib, or WGL
- Layer Painter depends on a library called "Betray" (include in the quelsolaar CVS module), that serves as a layer between the application and the underlying windowing system. Betray, in turn, can be compiled to use either GLUT, SDL, GLFW, Xlib, or WGL. You select the desired "back-end" by editing the betray.h header file.
Obtaining the software
Layer Painter is considered a standard "core" Verse tool, and as such is included in binary releases from the Uni-Verse web site.
If you want to build it yourself, you can find the source code in the quelsolaar CVS module in the project's repository. Compiling should be fairly easy in either Linux, Mac OS X, or Windows environments.
Building Layer Painter
Building Layer Painter should be as easy as typing "make" in the proper directory, assuming you have the required libraries available.
Layer Painter, being a Verse applications, requires the Verse API implementation (libverse.a).
Running Layer Painter
More about Layers
As its name implies, the Layer Painter application is about painting something into something called "layers". To anyone familiar with the Verse geometry node, the word "layer" should be familiar. It refers to the node's layers feature, which is at the core of the Verse data format. Basically, the node stores data in two "stacks" of layers, called vertex and polygon layers.
Vertex layers are organized around a layer called "vertex", which holds the vertex definitions for the mesh. Each additional layer in the stack will have space for one value (the type of which depends on the type of the layer, see the specification) per vertex.
Polygon layers, similarly, are formed to a stack with the layer "polygon" at its base, with each additional layer having one space for one value per polygon in the mesh. Polygon layers are very straight-forward to use for painting; just imagine the layer being a sheet of very flexible transparent material, streched on top of the mesh.
Command-Line Arguments
Layer Painter does not understand any command-line arguments.
The Window
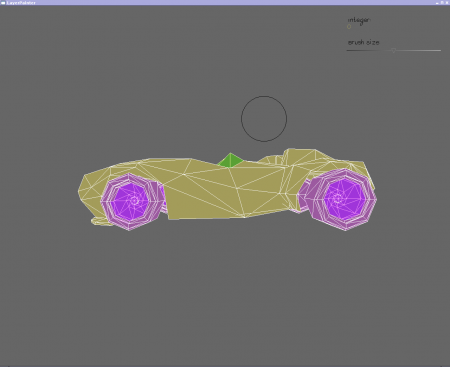
Here is a screenshot showing Layer Painter's main (and only) window:
Layer Painter does not have a "standard" user interface, with menus and buttons. Instead, it devotes almost all of its window space to a 3D rendering of the geometry node being edited.
The node is rendered, and the current layer is overlaid in a type-specific manner.
The screenshot above shows editing of the "matsel" layer, which is used when a single geometry node has multiple materials. The layer assigns an integer per polygon in the mesh, and that integer is used to look up the material to use for that polygon. Painting into this layer thus allows the user to control which material goes where fairly easily.
The on-screen color in Layer Painter is randomly chosen, i.e. it does not reflect the actual material. You can see that 0, the car's main body paint material, is assigned a kind of green beige color, with the tires going towards purple.
The black circle above the car is the "brush" used to paint. It follows the mouse cursor, but since the cursor was not captured for the screenshot, we only see the brush.
User Interface
In the top right corner, two simple controls are overlaid on top of the scene:
- The current value being painted into the layer. The value has different type depending on the type of the current layer.
- The brush size. This is a slider, that you can click and drag with the LMB
 left mouse button, to set the size of the brush.
Selecting Layer and Node
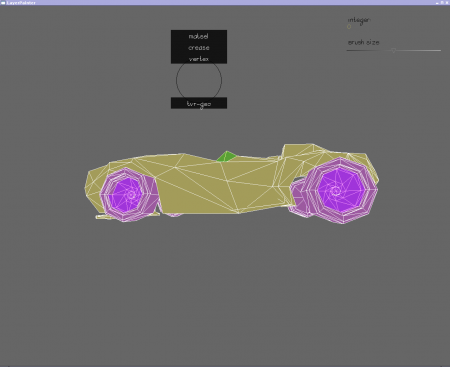
Layer Painter only allows you to edit a single layer, in a single node, at a time. To select which layer (or node) to work in, press and hold the middle mouse button (MMB ![]() ). This pops up a menu, visible in this screenshot:
). This pops up a menu, visible in this screenshot:
The menu pops open wherever the mouse cursor is, which is why you see the circular brush outline behind it.
Above the cursor location, is a listing of the current node's paintable layers. Move the mouse upwards until the desired layer is highlighted, and release the middle mouse button, to select a new layer to work with.
- Note: This list is actually not 100% verbatim from the node; Layer Painter does some interpretation and simplification. If a node has a triplet of layers called "color_r", "color_g" and "color_b", Layer Painter will list a single "virtual" layer, called "color".
Below the cursor, is a list of available geometry nodes. Move the mouse cursor downwards until the desired node name is highlighted, and release the button, to select a new node to work with.
Controls Summary
Layer Painter is primarily controlled by mouse. A three-button mouse is required, as Layer Painter assigns functions to all three mouse buttons. If you have a mouse with a scroll wheel, clicking it is the same as clicking the middle mouse button of a traditional three-button mouse. Layer Painter does not use the scroll wheel itself.
Mouse
The following functions are assigned to the mouse buttons:
- LMB
 (left mouse button)
 - Paints at the mouse cursor's position, with the current brush. Also used to manipulate the small user interface in the top right corner.
- MMB
 (middle mouse button)
 - Pops up the layer and node selection menu. See below.
- RMB
 (right mouse button)
 - Rotates scene, if you drag with it held down. See below for more about viewpoint control.
Mouse Chords
The right mouse button (RMB ![]() ) is used in Layer Painter to control the viewpoint. You first click it, then (optionally) click one of the other mouse buttons, and then move the mouse to move around. The combinations are:
) is used in Layer Painter to control the viewpoint. You first click it, then (optionally) click one of the other mouse buttons, and then move the mouse to move around. The combinations are:
- RMB

- Press the right mouse button and drag the mouse to rotate the scene.
- RMB
 +LMB
+LMB 
- Press and hold the right mouse button, then press the left mouse button and drag diagonally top-left to bottom-right to zoom in/out.
- RMB
 +MMB
+MMB 
- Press and hold the right mouse button, then press the middle mouse button to move the center of the scene, panning the view.
Keyboard
Layer Painter has few keyboard controls. However, the following are supported:
- 0 through 9
- If painting on an integer layer, this sets the current integer to the number pressed. This can greatly speed up painting, but is only useful when painting in the covered range, of course.
- +
- Increases the current integer by one.
- -
- Decreases the current integer by one.
- Space
- Swaps the current integer with the one used previously. Handy if you are frequently switching between two values that are far apart (and thus requires you to type in the value). Only works on integer layers.
Limitations
Currently, Layer Painter computes what face to paint on a bit too simplistically. Basically, it acts as if a cylinder with the radius of the current brush was shot from the cursor position and to infinity perpendicularly to the screen plane. This means that all forward-facing faces that lie within the cylinder will be painted on, not just the first or top ones. This requires frequent inspection by rotating the scene, to make sure paint is not "leaking" to where it should not be going, and also corrective painting when it does.

