Org:Institute/Open projects/Apricot/BGELogic
目次
Blender Game Engine Logic
By Campbell Barton - aka ideasman42
Overview
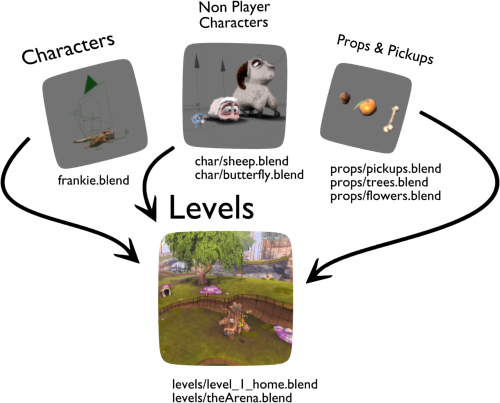
The game is separated into a number of blend files. characters, levels and props. The levels and props have almost no logic, only properties assigned to them that the characters use to define how to interact with them.
The levels contain mostly static scenery, linking in characters, props and effects as groups.
Having a character with its camera, animations, sounds and logic in an external blend file is extremely powerful not only being able to link the 1 character into multiple levels, but also have multiple instances of that character in a level.
Logic Sharing
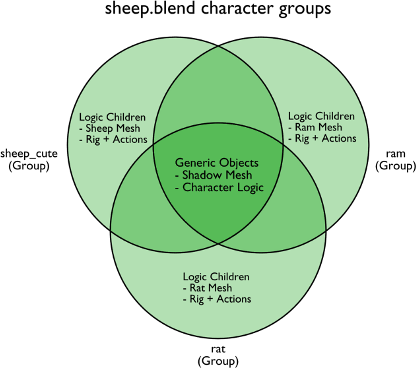
Once we had the logic for the sheep, we wanted to be able to add extra characters without having to redo the logic. This was made possible by the recent addition of group instances in the game engine added especially for Apricot.
Character specific objects such as the armature, mesh and shadow mesh each character are parented to a dummy mesh that runs the logic. All three group share the logic objects but have unique armature and meshes.
To avoid each character behaving in the same way, a script runs when the character starts that sets a "type" property based on the children. The type property determines if the character can attack, get kicked, carried and how aggressive they are.
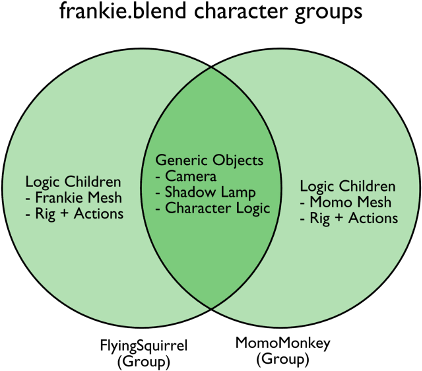
There are 2 playable characters (Frankie and Momo) which also share logic but have their own unique mesh and armature.
No changes in behavior are needed however they do need to use different key layouts and have their own section of the screen (split-screen). As with the sheep this is done on when the character starts, for the moment only 1 or 2 players are supported at once but adding more would be trivial.
States
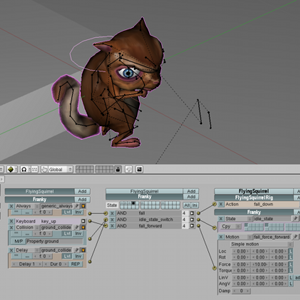
States are a new addition to blender added for the Apricot project, allowing us to group logic into states that can each be enabled and disabled (you could think of them as logic layers). States were used heavily with all complex game logic. Frankie for example has states such as idle, walking, running, falling, gliding, hanging, drowning and death. Each state has a number of sensor and actuators that will switch states under certain conditions.
Here is an example of how states switch during game-play
- Initial State -> Falling
- Ground Collision -> Idle State
- UpKey -> Walk State
- No Ground Collision -> Fall State
- Water Collision -> Drown State
Logic Elements
Frankies Camera
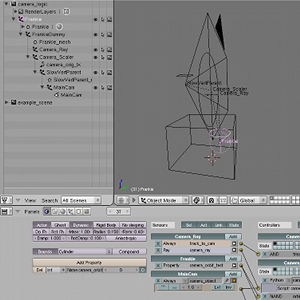
This file shows how the apricot camera works. Although a 3rd person camera facing forward is not overly complex there are are still various issues to overcome.
The initial problem we had with blender's camera was that Frankie could become obscured by objects which made the game unplayable.
We started by parenting a camera to Frankie, using blender's slow parent feature to dampen the cameras response to Frankie, avoiding jitter and jarring motion. To prevent trees and walls getting in the way of the camera, a ray sensor from Frankie points towards the camera and uses a python script to scale the camera parent based on the collision location.
Notes
- There is a dummy character in this file to test movement, added so the camera has something to look at.
- The scene with the terrain and pillars is a 'Set Scene' called "example_scene".
- Keys for movement are ArrowKeys and Space for jump. Keys 1 and 2 set orbit on and off.
Objects and their use (matching frankie.blend)
- Frankie - Parent mesh with all player control and properties
- FrankieDummy - Mesh that shows Frankie, is a rig and mesh in frankie.blend
- Camera_Ray - An empty that tracks the camera from Frankie's position. This casts a ray to the camera and detects if anything is in the way of the view.
- Camera_Scaler - This is a parent to the camera so scaling it changes the camera distance from Frankie. The scale is controlled by a python script that uses the Camera_Ray hit position to set the scale. (this is the only script used by this camera setup). There is also an orbit mode that makes this object rotate about to see frankie better from all sides while he is idle, drowning or dead.
- SlowVertParemt - This is the parent of the camera, slow parent is used so changes in scale or Frankie turning are not applied instantly to the camera. We needed to use a vertex parent for the camera otherwise the camera would have scale applied to it which caused distotion of the 3D view.
- MainCam - The main camera tracks to the Camera_Ray
Frankie's States (Simplified)
This character logic example is based on Frankie's logic and shows how you can use states to control behavior without setting any properties or running python scripts.
Python should be used to add more advanced functionality, but using states helps give scripts a limited context keeping them smaller.
Keys
- Up, Left, Right - Movement
- Space - Jump
Level Properties
- ground - use to detect floor you can walk on
- kill - sends you to the death state
States
- 1 - Idle state. Can jump, walk and turn from here
- 2 - Walk state. Can jump, idle and turn from here
- 3 - Jump State.
Only ever enabled for one logic tick, adds upward force and goes into fall state immediately. This is because motion from other states (walk in this case) can interfere with the jump force. - 4 - Fall State. Can land from here.
This state is enabled on startup (notice the black dot over the state) and is enabled whenever Frankie is not touching a 'ground' property object. - 6 - General State for turning, and checking if Frankie touches any 'kill' objects. This state is always enabled while Frankie is alive, having one of these states is useful for situations you want the character react to regardless of his current behavior.
- 15 - Death, this state turns off the general state, removing user input, waits for 4 seconds and ends the object.
Level Portals
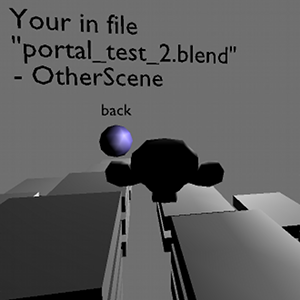
This collection of blend files show how a single character can be linked into any number of scenes and blend files, easily moving between them with portals.
The character is a group of objects with game logic and a camera. This group is then linked into many levels keeping the character logic in one place where it can be edited.
These examples focus on how we did portals, which can do the following.
- move to another location in the level.
- move to another scene in the blend file (object if it's defined)
- move to another blend file (scene and object if they are defined)
- keep the properties of the character such as life and inventory between scenes and blend files.
To make a portal just add an object you can collide with and give it the property "portal", value "SomeObjectName" for eg. On touching the portal you'll be transported to an object called "SomeObjectName".
If you want to move to another scene add the property "portal_scene", value "MyOtherScene" for eg.
To go into another blend file add the property "portal_blend", value "//level_2.blend" for eg. The value is a path to another blend file, the // prefix means it's in the same directory as the current blend file.
When using "portal_scene" or "portal_blend" properties, the "portal" property must be present, if you dont want to set an object location, it's value should be an empty string.
The properties described work the same way as the Apricot levels, however character scripts were modified for the purpose of this example.
Take a look at the portals in this directory for examples.
Splashing
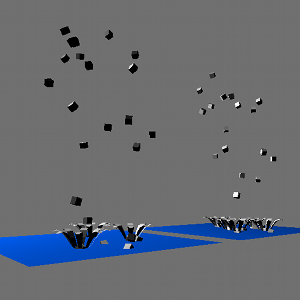
Here is an example showing how splashes are created for the water and lava levels.
Water objects need collision sensors linking to "splash_logic"'s controller. In this case there are 2 water objects, but there is no limit.
splash_logic runs a python script called "detect_splash" whenever there are collisions, The "detect_splash" script moves "splash_logic" to each collision location and adds a splash object.
This way. many splashes can happen at once.
It is up to the objects that land on the water to float, sink or be removed, they only need to collide with the water. In this example the cube's dynamics are suspended and it is removed after 200 logic ticks.
The empty objects above are there to create objects that make a splash however any object could be dropped.
The splash object its self must be in a disabled layer for the AddObject actuator to work. See layer 20.
2 Player Split Screen
This file shows how 2 instances of the same character group can have their own keys and screen assigned on starting.
This is done by having a python init script for each character that assigns a unique ID, used to configure each differently.
Once the script runs, the state is changed to respond to user input only. The character objects in this scene are dupligroup instances, change to the "character_group" scene to see their logic and see the "frank_init_2player" script to see how they are initialized.
Use the arrow keys for player one, WASD keys for player two.
Menu
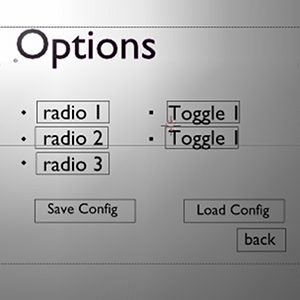
This blend file shows a simplified version of the YoFrankie start menu.
the menu has the following functionality
- input from mouse, keyboard or joystick
- menu items can load scenes, blender files or trigger your own actuators.
- toggle and radio menu items can be used to set configuration options.
- options can be saved an loaded to a file using new functionality in the game actuator.
- logic is generic, reusable between multiple menus.
Implementation
The basis of the menu is quite simple, all objects starting with "item_" are alphabetically sorted and treated as menu items. Only 1 item can be active at a time by pressing up/down or passing the mouse over it. Pressing enter or clicking will execute the menu items action.
The "menu_select" script is where most of the menu logic is controlled. It runs on the "menu_logic" object, reacting to user input by scanning the scene for "item_" prefixed objects and adjusting their properties accordingly.
The "active" property is used by all items. When set to 1, the items sensor detects this and plays an animation. For Yo Frankie we chose to use invisible items so we could attach animations to one or more objects, giving us a larger area for the mouse to activate as well.
Item Activation Types
trigger
These items only need an extra "trigger" property. When the menu item is activated trigger is set to 1. The items own logic needs to check for the trigger value to act on it. Once executed the trigger value needs to be set back to zero. See the menu items "Quit", "Save Config" and "Load Config"
portal
Using the same properties as in the levels, portals can load blend files, scenes and objects (to set the initial location).
the properties are
- "active": described above.
- "portal": object name
- "portal_scene": scene name
- "portal_blend": blendfile name
See the menu items "Open Blendfile", "Configure" and "Back" for examples of a portal.
Configuration
If you want to configure settings in a menu, you can use the python dictionary "GameLogic.globalDict" which is kept between loading files and can be saved and loaded to a file with the game actuator.
All game configuration is kept in a dictionary - GameLogic.globalDict['conf'].
There are currently 2 types of buttons that will automatically adjust the python dictionary when activated. Both use the "conf_key" property to specify which setting is changed.
Even through there are only a few buttons, many configuration buttons can be added without making any changes to the menus inner workings.
see the "init_options" script and menu items in the options scene to see how they work.
Toggle (configuration)
This is fairly simple, the toggle button switches value in the configuration dictionary on and off.
- "active": described above.
- "toggle": 0 or 1, the menu item checks this to display a larger dot when enabled.
- "conf_key": toggle this option, GameLogic.globalDict['conf'][conf_key] = True or False
Radio (configuration)
Unlike the toggle button, multiple radio buttons share the same conf_key.
- "active": described above.
- "radio": the value of conf_key when the button is enabled. So for instance 3 buttons low/med/high would have "radio" values of 0,1,2.
- "enabled": only 1 of the radio buttons sharing the same conf_key will ever be enabled at a time. This is used to play an animation making the enabled option stand out.
- "conf_key": toggle this option, GameLogic.globalDict['conf'][conf_key] will be set to the "radio" value of the button thats enabled.
Note, This example omits key binding configuration since it is fairly complicated and specific to Yo Frankie.
Logic Details
Frankies Logic
Overview
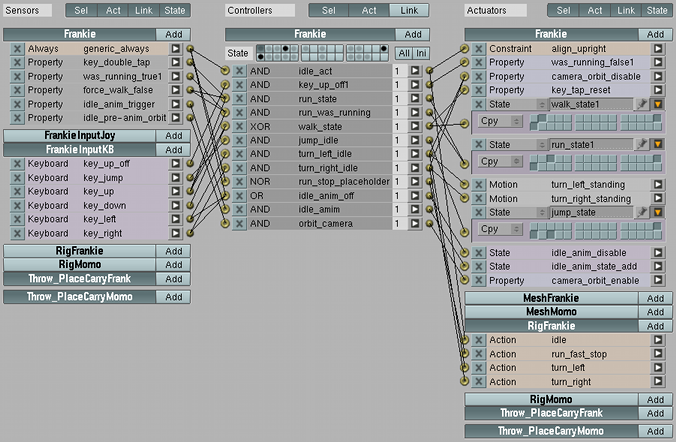
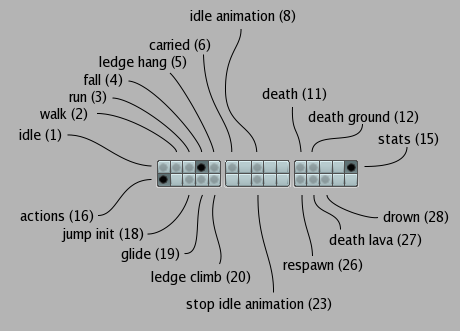
Frankie's behaviour is made from a number of objects with an invisible parent that does almost all the logic. The logic bricks are divided into manageable states (walk, run, fall, idle etc) so each state can be edited without dealing with the logic from other states.
There are 2 main exceptions to this rule, status (15) action (16) so Frankie can execute actions and his life is maintained throughout gameplay.
Sensor logic bricks detect...
- user input (keyboard or joystick)
- collisions with special level elements (eg. lava, water, bounce, portal).
- property changes to health and inventory.
Actuators are used to...
- play animations and sounds
- enter new states
- set properties for health, carrying and timers.
- apply physics forces (eg. jumping and running)
- constrain orientation (eg. walk - upright, run - ground parallel, glide - limit pitch).
Scripts are needed for advanced functionality like...
- gliding, where Frankie's pitch influences speed and decent.
- hanging off a ledge, where rays are cast to detect the top of the ledge setting Frankie's vertical position.
- Context sensitive actions that test surroundings for enemies, what Frankie's carrying and his inventory.
Frankie's States
- idle (1) state is the default state when Frankie is on the ground and not doing anything.
- walk (2) when holding forward or backwards.
- servo motion actuator to maintain constant speed.
- run (3) when holding down action key and forward.
- linear velocity only is used to move Frankie forward.
- a distance constraint actuator with the rotation option enabled is used to keep Frankie running parallel to the surface of the ground (making loop-the-loops possible)
- run speed is controlled from a the "frank_run_speed" script, that adjusts the run speed based on the "boosted" property and Frankie's pitch (to accelerate around a loop-the-loop).
- fall (4) state is set when Frankie is not colliding with any ground objects and immediately after jumping.
- Frankie is constrained to being upright while falling using orientation constraint actuator.
- From this state Frankie can also bounce or change states by landing on another player to be carried, grab onto a ledge or glide by holding down jump.
- ledge hang (5) state continuously keeps Frankie attached to an edge where Frankie can shimmy from side to side, drop off or climb if there is ground above the ledge.
- This is one of the few states where actions are disabled (state 16)
- dynamics are not suspended, the python script keeps Frankie attached to the edge.
- carried (6) when Frankie's "carried" property is non-zero, this state is set, almost all functionality is disabled and Frankie can only throw objects.
- idle animation (8) when idle for a while this state is added, using "frank_random_anim" script to play a random animation actuator.
- This state differs from others because it's added on top of another state. Since this state only plays an animation it doesn't matter if it's disabled by another state being set, such as walking or falling.
- death (11) is set when Frankie's life is zero, this state will immediately switch to state 12 or 27 if there is lava collision.
- death ground (12) plays the death animation then sets respawn state 26. This state is set exclusively, disabling all player input.
- stats (15) updates Frankie's health, reacts to being hit, touching water, collects pickups, activates portals and sends messages to the heads up display (HUD) overlay scene.
- This state will run most of the time, in all other states where Frankie has free movement - (not death, drown or respawn).
- actions (16) state detects input and performs actions - a combination of playing animations and performing action logic. The logic for catching and checking if Frankie is on the ground or not is also done in this state.
- the "frank_action_all" script senses key input, checks what there is to kick or throw then sets the "action_name" property and plays the animation. This keeps the script running while "action_name" is set. Running the logic on keypress would be simple but not very convincing, so the script has a frame set for each action to execute logic, after the frame in the armature animation and the "action_done" property is set.
- You can add your own actions by adding a key sensor, action actuator and following the conventions in "frank_action_all" script.
- this state also runs along side most other states (as with state 15), however it's disabled during ledge grab and ledge climb.
- jump init (18) state plays a sound, sets the linear velocity and resets the "jump_timer" and "grounded" property.
- After setting the properties we immediately switch to the fall state. This is done because having all jump actuators attached to controllers in idle, walk and run states would be hard to maintain.
- glide (19) state is enabled by holding jump while falling. All of the glide logic is performed in the "frank_glide" script which deals with the dynamics of speed and pitch to enable swooping and remaining airborne for a short time.
- ledge climb (20) is used when pressing forward while hanging on a ledge.
An animation plays while Frankie moves up onto the ledge above.- Servo motion actuators move Frankie up and forward at a fixed speed without having to suspend dynamics.
- The motion actuators are synchronized with the animation using delay sensors to time the change in motion from upward to forward.
- stop idle animation (23) resets the idle animation timer and disables camera orbit, then disables the animation state and its own state.
- respawn (26) resets Frankie's location and restores almost all his properties to their original values.
- death lava (27) is the same as death ground, except a different animation and sound play.
- drown (28) state is similar to the death states, except instead of respawning, the "frank_drown_revive" script moves frankie to the second last location where he was touching the ground.
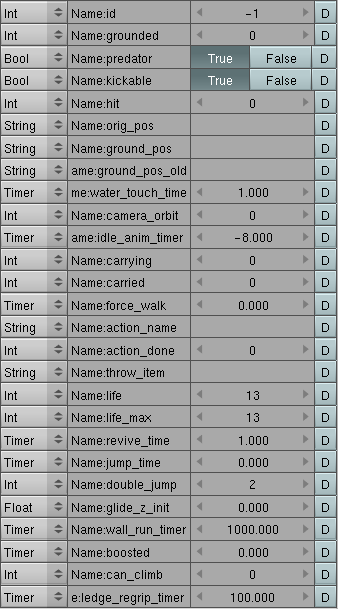
Frankie's Properties
- id This is a unique player ID integer for each player, 0 or 1 for players 1 and 2.
This is used when initializing the player to set key keyboard preferences and splitscreen.
When you throw an object, your "id" is assigned to its "projectile_id" so we know who last threw the object.
Starting as -1, correctly initialized in the script "frank_init" - grounded is used by a lot of Frankie's logic bricks and scripts to know if he is on the ground or not. This value is managed by the "frank_ground_test" script (State 16) where a "ground" collision and -Z ray sensor are used to detect if the ground state changes.
This property could be removed and be replaced with ground collision sensors everywhere, however a collision sensor alone can jitter on bumpy terrain, the combination of ground + ray gives better results. - predator is used by sheep, ram and rat logic to tell you're an enemy and to attack or run away from you.
- kickable is used for 2 player mode to allow you to kick each other. Sheep and rats also have this property.
- hit is set by other objects logic when you're attacked (rats, rams or a second player)
When this is set, Frankie's life property will have the hit value subtracted and the hit value set back to zero.
The "frank_health" script responds to non-zero hit values.
Using this method makes adding in your own enemies easier, all they need to do is set the "hit" value of the object they are attacking. - orig_pos stores Frankie's initial location when entering the level. When Frankie dies this position is used for respawning.
This value is initialized in the "frank_init" script. It is used in "frank_respawn" and as a fallback location in "frank_revive" scripts. - ground_pos and ground_pos_old properties are updated every second, storing the last instance Frankie was on the ground.
At the moment this is only used for reviving after drowning, where Frankie is revived at the (2nd) last point where he touched the ground.
ground_pos_old is always a second older then ground_pos to make sure the ground location used isn't too close to the water and set immediately before drowning.
These values are set in frank_ground_pos - water_touch_time Simply drowning when Frankie touches the water doesn't work well, especially jumping off drowning sheep. This timer is used to make sure Frankie is touching the water for a short period before switching to the drowning state.
(see water_timer sensors and controller in State 15) - camera_orbit is an integer used to set the camera orbiting around Frankie when he plays idle animations, drowns or falls in lava.
The "Camera_Scaler" object has a sensor that checks this property, running a motion actuator when its nonzero and plays an ipo when its false to set the rotation back.
See "Camera_scalers" orbit_on and orbit_off controllers. - idle_anim_trigger This timer is used to play idle animations when Frankie has been inactive for a while.
It is initialized to a negative number and will orbit the camera, then add the idle animation state around 0.0
See logic bricks in State 1 with the idle_anim prefix - carrying integer is set to 1 when Frankie is carrying something.
Many scripts use this to check if Frankie can do actions like collect items, tailwhip, double jump and run.
The main logic setting this value is the "frank_carry" script which runs whenever an object with the "carried" property touches Frankie.
See State 16 frank_carry controller. - carried defines this as an object that can be carried (player 1 can carry player 2 for example). Its value is used by scripts and logic bricks to know if you are being carried. When this is nonzero state 6 is set where dynamics are suspended and Frankie can't do very much (except throw anything he's already carrying).
- force_walk timer is used when we want to stop Frankie from running, when the timer is below zero the run state will switch immediately back to walk.
This is set to always be negative when carrying an object, and used to force walking for a short time when Frankie is hit, throwing, kicking and tail-whipping. - action_name is used when Frankie performs an action - currently its value will be either "throw_carry", "throw", "kick" or "tailwhip". This means we know what action is currently running and also stops multiple actions from running at once.
Once finished the value will be set to an empty string.
See state 16 where the "frank_action_all" script is used to control all the actions - action_done is used by the "frank_action_all" script to check if the function associated with an action has run yet.
Without this, actions could not take place in the middle of an animation.
See state 16 also - throw_item stores the item Frankie will throw next. If there were more collectible items that had different purposes, this could be used to cycle through active items.
See "frank_sense_pickup" script in state 15 where the last collected item sets the "throw_item" and "frank_action_all" in State 16 where the "throw_item" defines the item to throw next - life for storing Frankie's current health and for updating the HUD meter.
See the "frank_health" script in State 15 - life_max Frankie's maximum health value to limit how much life Frankie can pick up.
See "frankie_sene_pickup" in State 15 - revive_time is set to zero when Frankie is hit, another hit wont be applied until "revive_time" is over 1.0
See "frank_health" script from state 15 - jump_time timer is set to 0.0 upon jumping, where it is used to ignore any ground collisions for a short time and then to detect if it's too late to do a double jump.
jump time is also re-used for timing the glide duration.
See "frank_ground_test" on State 16 and State 18 where the jump values are set - double_jump is used to check if Frankie has double-jumped (since you can only double-jump once)
See "frank_fall" script in State 4. - glide_z_init is set to Frankie's Z axis when he starts gliding, its used to make sure he can never glide to a higher level then when he starts.
See the "frank_glide" script in State 19 - run_wall_timer is used so Frankie can flip off a wall when he runs into any wall with the "slip" property.
See "frank_wall_run" script in State 3 - boosted is set set when Frankie catches a butterfly (touches a pickup with a "boost" property), making his colour flash run a lot faster.
See "frank_run_speed" script in State 3, "frank_sense_pickup" where the boost value is set - can_climb is set when hanging by casting a ray above the ledge to detect if there is any ground for Frankie to climb onto.
If this is not zero, pressing up while hanging will make Frankie climb up onto the ledge.
See "frank_ledge_hang" script in State 5 - ledge_regrip_timer is used when dropping from a ledge (down key while hanging) to stop Frankie from grabbing the ledge immediately after dropping.
See the "frank_ledge_collide" script in State 4
Level Design Physics/Logic
Setting up a level to run with frankies logic is easy to start with, just make sure any area you want to stand on has the "ground" property.
From here you can play the level, you'll probably notice glitches but these can be dealt with by fine tuning the level, (see notes below).
Physics Objects
The current method of defining ground and barriers is limited in that it requires you to have separate objects for each.
For the Yo-Frankie levels it was easier to remove collisions from the scenery and add invisible physics objects.
Physics can be disabled for scenery in the game logic buttons.
Physics only objects can have their render option turned off in the outliner so they are initialized invisible (saves adding UV's and using the invisible option).
Materials
Walls and other vertical surfaces you dont want to run up should have a material with no friction (See the materials DYN button).
Properties
These properties are checked for in Frankie and other entities logic, so the characters interact correctly with the level.
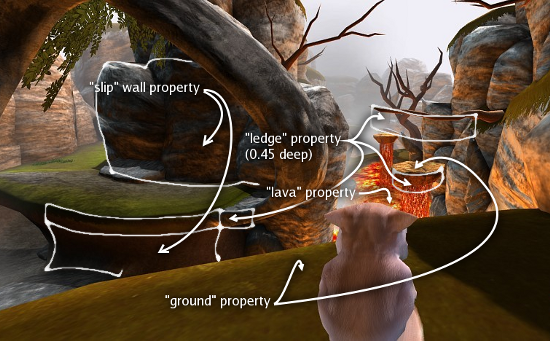
- ground property is used to define anything Frankie can stand on. These surfaces don't have to be flat (a loop-the-loop for instance has the "ground" property). However make sure this isn't assigned to walls and barriers.
Note, platforms you jump up onto should be surrounded by a barrier that doesn't have the "ground" property, The top should be outset about 0.05 so collision with the top of the barrier won't also collide with the ground, otherwise Frankie will start walking before he is on top of the platform. - slip wall property makes back-flips off walls possible when run directly into. Running at the wall from an angle will cause Frankie to run parallel to the wall.
This isn't necessary for gameplay to work but makes running around a level feel smoother.
The value of this property isn't used. - ledge property is used to define areas that Frankie can hang.on.
The value of this property isn't used.- These should be vertical strips 0.45 deep.
- Ghost collision option can be used if you want to be able to ungrip and fall through the ledge-grab geometry (with branches for example).
- bounce property will make the object bounce Frankie back up in the air when he falls onto it.
The value of this property isn't used. - kill property will make Frankie lose as many lives as the kill value which must be an integer.
- water property should be applied to the surface of a river so Frankie drowns when touching it for a short time.
Note this object should be a ghost
The value of this property isn't used. - lava similar to water, just plays a different animation for Frankie.
- liquid this property should be applied to water or lava objects so pickups will disappear when touching them.
The value of this property isn't used.
