「Doc:2.6/Manual/Materials/Properties/Ramps」の版間の差分
(→Options) |
細 (1版 をインポートしました) |
(相違点なし)
| |
2018年6月29日 (金) 04:39時点における最新版
Color Ramps
Mode: All Modes
Panel: Context Shading → sub-context Material → Ramps
In many real life situations — like skin or metals — the color of diffuse and specular reflections can differ slightly, based on the amount of energy a surface receives or on the light angle of incidence. The Ramp Shader options in Blender allow you to set a range of colors for a Material, and define how the range will vary over a surface, and how it blends with the 'actual color' (typically from a material or as output of a texture).
Ramps allow you to precisely control the color gradient across a material, rather than just a simple blend from a brightened color to a darkened color, from the most strongly lit area to the darkest lit area. As well as several options for controlling the gradient from lit to shadowed, ramps also provide 'normal' input, to define a gradient from surfaces facing the camera to surfaces facing away from the camera. This is often used for materials like some types of metallic car paint that change color based on viewing angle.
Since texture calculations in Blender happen before shading, the Ramp Shader can completely replace texture or material color. But by use of the mixing options and Alpha values it is possible to create an additional layer of shading in Blender materials.
Options
In Blender 2.5, the separate Ramp panels for the Diffuse shader and the Specular shader respectively can be toggled on and off using the ![]() button.
button.
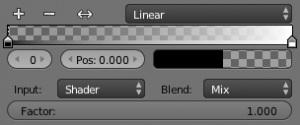
By default the Ramp panel opens with two colors; the first stop (0) is black and transparent (Alpha=0) and the second stop (1) is white and opaque (Alpha=1).
The position of the color stop markers can be altered by either (1) dragging the stop marker in the colorband or (2) by changing the Pos value in the ![]() box.
box.
Color and alpha values for each marker can be set by clicking the ![]() box.
box.
- Input
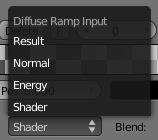
- The input menu contains the following options for defining the gradient:
- Shader
- The value as delivered by the material's shader (Lambert, CookTorr) defines the color. Here the amount of light doesn't matter for color, only the direction of the light.
- Energy
- As Shader, now also lamp energy, color, and distance are taken into account. This makes the material change color when more light shines on it.
- Normal
- The surface normal, relative to the camera, is used for the Ramp Shader. This is possible with a texture as well, but added for convenience.
- Result
- While all three previous options work per lamp, this option only works after shading calculations. This allows full control over the entire shading, including 'Toon' style results. Using alpha values here is most useful for tweaking a finishing touch to a material.
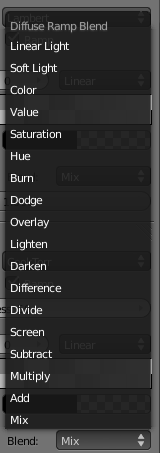
- Blend
- A list of the various blending modes available for blending the ramp shader with the color from Input.
- Factor
- This slider denotes the overall factor of the ramp shader with the color from Input.
Colorbands
Mode: All Modes
Panel: Context Shading → sub-context Material → Ramps
A colorband can contain a gradient through a sequence of many colors (with alpha), each color acting across a certain position in the spectrum. Colorbands are used in both materials and textures, as well in other places where a range of colors can be computed and displayed.
Options
- Add
- Add a new mark to the center of the colorband with the default color (neutral gray). New marks can also be added by CtrlLMB
 clicking in the colorband itself, which will add the mark at the position of the click with the same color that already exists underneath the mouse pointer.
 - Delete
- Remove the currently selected mark from the colorband.
- F
- Flip the colorband.
- 0
- The number of the active mark. The values for this mark are those being displayed, and in the colorband, the active mark is displayed as a dashed line. Another marker can be selected (1) using the arrows in the
 slider, (2) by clicking on the number being displayed and entering a number of a color mark, or (3) by LMB
  clicking a marker in the colorband.
- Pos
- The position of the active color mark in the colorband (range 0.0–1.0). The position of the color marks can also be changed by LMB
 dragging them in the colorband.
Reordering colors
If the position of the color marks are reordered, they will be automatically renumbered so that they always start with 0 from the left and increment to the right.
|
- The Colorswatch right of the Position slider displays the color of the active mark. LMB
 click it to display a color picker in which values for color (RGB) and transparency (Alpha) can be set.
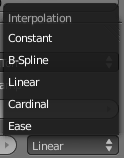
- Interpolation
- Various modes of interpolation between marker's values can be chosen in the Interpolation menu:
- Ease
- Ease by quadratic equation.
- Cardinal
- Cardinal.
- Linear
- Linear (default). A smooth, consistent transition between colors.
- B-Spline
- B-Spline.
- Constant
- Constant.


