「Doc:2.6/Manual/Composite Nodes/Types/Vector」の版間の差分
細 (moved Doc:2.5/Manual/Composite Nodes/Types/Vector to Doc:2.6/Manual/Composite Nodes/Types/Vector) |
細 (1版 をインポートしました) |
(相違点なし)
| |
2018年6月29日 (金) 04:44時点における最新版
Page status (reviewing guidelines)
Copy
This page is a copy of the same page in 2.4 manual, need to be updated
|
Composite Vector Nodes
Vector Nodes
Vector nodes manipulate information about how light interacts with the scene, multiplying vector sets, and other wonderful things that normal humans barely comprehend (except math geniuses, who may not be considered 'normal'). Even if you aren't a math wiz, you'll find these nodes to be very useful.
Vectors, in general, are two or three element values, for example, RGB color value, and surface normals are vectors. Vectors are also important for calculating shading.
Normal Node
The Normal node generates a normal vector and a dot product. Click and Drag on the sphere to set the direction of the normal.
This node can be used to input a new normal vector into the mix. For example, use this node as an input to a Color Mix node. Use an Image input as the other input to the Mixer. The resulting colorized output can be easily varied by moving the light source (click and dragging the sphere).
Vector Curves Node
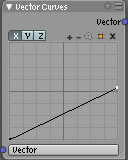
The Vector Curves node maps an input vector image's x, y, and z components to a diagonal curve. The three channels are accessed via the X, Y, and Z buttons at the top of the node. Add points to the curve by clicking on it.
Note that dragging a point across another will switch the order of the two points (e.g. if point A is dragged across point B, then point B will become point A and point A will become point B).
Use this curve to slow things down or speed them up from the original scene.
Map Value Node
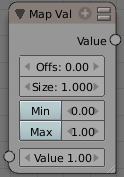
Map Value node is used to scale, offset and clamp values (value refers to each vector in the set). The formula for how this node works is:
- Offs will add a number to the input value
- Size will scale (multiply) that value by a number
- By clicking Min/Max you can set the minimum and maximum numbers to clamp (cut off) the value too. Min and Max must be individually enabled by LMB
 clicking on the label for them to clamp. ⇧ ShiftLMB
  on the value to change it.
- If Min is enabled and the value is less than Min, set the ouput value to Min
- If Max is enabled and the input value is greater than Max, set the ouput value to Max
This is particularly useful in achieving a depth-of-field effect, where you can use the Map Value node to map a Z value (which can be 20 or 30 or even 500 depending on the scene) to to range between 0-1, suitable for connecting to a Blur node.
Using Map Value to Multiply values
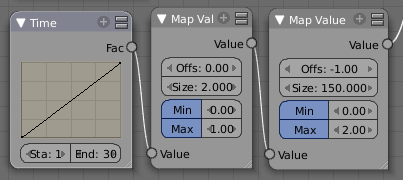
You can also use the map value node to multiply values to achieve an output number that you desire. In the mini-map to the right, the Time node ouputs a value between 0.00 and 1.00 evenly scaled over 30 frames. The first Map Value node multiplies the input by 2, resulting in an output value that scales from 0.00 to 2.00 over 30 frames. The second Map Value node subtracts 1 from the input, giving working values between -1.00 and 1.00, and multiplies that by 150, resulting in an output value between -150 and 150 over a 30-frame sequence.
Normalize
Normalizing a vector scales its magnitude, or length, to a value of 1, but keeps its direction intact.


