「Extensions:2.6/Py/Scripts/Modeling/Bridge」の版間の差分
細 (1版 をインポートしました) |
|
(相違点なし)
| |
2018年6月29日 (金) 04:39時点における最新版
| UI location | Group: Mesh | ||
|---|---|---|---|
| Usage | View3D > Ctrl+F > Bridge/Loft | ||
| Version | 1.4.0 | Author(s) | Crouch |
| Blender | 2.55 r#32738 | License | GPL |
| File name | mesh_bridge.py |
|---|
| Links | BlenderArtists support thread
Script homepage including an explanation with images. |
|---|---|
| Known Issues | Weights for the bevel modifier might be altered slightly |
目次
Important note
This script has been included in the LoopTools add-on. Further development will occur as part of that add-on, so it's highly recommended to cease using this individual Bridge script.
Installation
- Open Blender and go to the addons tab in User Preferences
- Install the script
- Enable the script
How to use
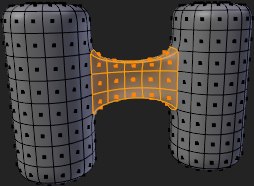
This Add-On lets you bridge two, or loft several, loops of vertices. With loops I mean selections of vertices that are connected to each other, so you aren't restricted to using closed edgeloops. After installing and enabling the Add-On you can find the functions in the Faces menu (ctrl+F in editmode). Simply select two loops, and select Bridge in the Faces menu.
Explanation of script options
Loop
This is is the only setting that is only available for the loft tool. It connects the first and the last loop to each other.
Segments
The number of faces used to bridge or loft the distance between two loops. One segment means that only faces will be created. Two (or more) segments means that an intermediary line (or lines) of vertices is created, so two or more faces can be defined between the loops. If the value is set to zero, the script automatically calculates the best amount of segments in order to keep the faces as square as possible. This is especially interesting for the loft tool, as it might create different numbers of segments between different loops.
Minimum width
This option has no label, but is located directly to the right of the segments setting. The simple explanation: 0% lot of triangles, 100% mostly square faces. There is a bit more to it though. It determines when a new vertex has to be created, or when to use the vertex next to it. It does this based on the distance between these vertices compared to the distance between the vertices in the original loops. So 50% means that if the distance between two vertices that will be newly created is smaller than half the distance between two vertices in the original loop, they will be merged together, resulting in only a single new vertex.
Interpolation mode
This can be set to either cubic or linear. Linear is just a flat interpolation, while cubic tries to retain the surface tangents, resulting in more fluid curves.
Strength
The strength option is only available when the interpolation mode is set to cubic. Setting the strength to zero gives a result very similar to linear interpolation, while higher strengths result in more fluid curves. Setting a negative strength changes the direction of the curve. Or described in a more visual way: it makes deflated volumes inflate and vice versa. The soft limits of this option are set to range from -3 to +3, but you can easily assign bigger or smaller values by manually entering a number, instead of using the slider. This works just the same as with normal sliders in Blender.
Remove faces
When using a face-selection input (as in the image above), the inner faces will be removed after bridging or lofting.
Because of some limitations in Blender the weight values assigned to the bevel-modifier might be slightly altered (by about 0.01) when this option is enabled.
Twist
Determines which vertices in both loops are connected to each other. This might be used for artistic reasons or to correct a wrong result given by the script.
Reverse
This option should only be used if the script gives a wrong result. It reverses the order in which vertices are connected and can fix problems when the script gives a result that looks inverted. It's a bit hard to describe, but just try it once and you'll immediately understand what it does.
- Back to Extensions:2.5/Py/Scripts
