「Doc:2.6/Manual/Composite Nodes/Types/Output」の版間の差分
(→Levels Node: minor edit) |
(相違点なし)
|
2013年8月17日 (土) 14:44時点における版
Page status (reviewing guidelines)
Copy
This page is a copy of the same page in 2.4 manual, need to be updated
|
Composite Output Nodes
At any point, you may want to see or save the working image in progress, especially right after some operation by a node. Simply create another thread from the image output socket of the node to an Output node to see a mini-picture.
Only one Viewer and one Composite Node is active, which is indicated with a red sphere icon in the Node header. Clicking on Viewer Nodes makes them active. The active Composite Node is always the first, and you should only use one anyway.
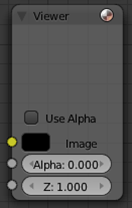
Viewer
The Viewer node is a temporary, in-process viewer. Plug it in wherever you would like to see an image or value-map in your node-tree.
LMB ![]() click on the image to update it, if it wasn't done automatically. You can use as many of these as you would like. It is possible to automatically plug a Viewer node to any other node by pressing ⇧ ShiftCtrlLMB
click on the image to update it, if it wasn't done automatically. You can use as many of these as you would like. It is possible to automatically plug a Viewer node to any other node by pressing ⇧ ShiftCtrlLMB ![]() on it.
on it.
Using the UV/Image Editor Window
The Viewer node allows results to be displayed in the UV/Image Editor. The image is facilitated by selecting the IM:Viewer Node on the window's header. The UV/Image Editor will display the image from the currently selected viewer node.
To save the image being viewed, use the Image->Save As menu to save the image in a file.
The UV/Image Editor also has three additional options in its header to view Images with or without Alpha, or to view the Alpha or Z itself. Holding LMB ![]() in the Image display allows you to sample the values.
in the Image display allows you to sample the values.
Composite
The Composite node is where the actual output from the compositor is connected to the renderer. Connecting a node to the Composite node will output the result of that node's full tree to the Renderer; leaving this node unconnected will result in a blank image. This node is updated after each render, but also if you change things in your node-tree (provided at least one finished input node is connected).
You can connect three channels: the actual RGBA image, the Alpha image, and the Z (depth) image. You should only have one Composite node in your map so that only one final image is rendered when the Compositing button is pressed on the Render Options Post-Processing panel. Otherwise, unpredictable results may occur.
Saving your Composite Image
The RENDER button renders a single frame or image. Save your image using F3 or the File->Save Image menu. The image will be saved using the image format settings on the Render panel.
To save a sequence of images, for example, if you input a movie clip or used a Time node with each frame in its own file, use the ANIM button and its settings. If you might want to later overlay them, be sure to use an image format that supports an Alpha channel (such as PNG). If you might want to later arrange them front to back or create a depth of field effect, use a format that supports a Z-depth channel (such as EXR).
To save a composition as a movie clip (all frames in a single file), use an AVI or Quicktime format, and use the ANIM button and its settings.
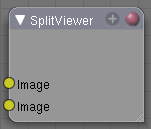
SplitViewer Node
The SplitViewer node takes two images and displays one half of each on each side (top socket on the right half, bottom socket input on the left). Use this node for making side-by-side comparisons of two renderings/images, perhaps from different renderlayers or from different scenes. When transitioning between scenes, you want to be sure the stop action is seamless; use this node to compare the end of one scene with the beginning of another to ensure they align.
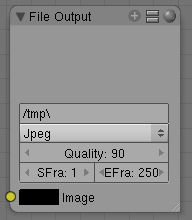
File Output Node
This node puts out an RGBA image, in the format selected, for each frame range specified, to the filename entered, as part of a frameset sequence. This means that the name of the file will be the name you enter plus a numeric frame number, plus the filename extension (based on format). Based on the format you choose, various quality/compression options may be shown.
To support subsequent arrangement and layering of images, the node can supply a Z-depth map. However, please note that only the OpenEXR image formats save the Z information.
The image is saved whenever Blender feels like it. Just kidding; whenever you press the Render button, the current frame image is saved. When you press the Anim button, the frameset sequence (specified in the Start and End frame) is saved.
This node saves you from doing (or forgetting to do) the Save Image after a render; the image is saved automagically for you. In addition, since this node can be hooked in anywhere in the noodle, you can save intermediate images automatically. Neat, huh?
Filespecs
As with all filename entries, use // at the beginning of the field to shorthand reference the current directory of the .blend file. You can also use the .. breadcrumb to go up a directory.
|
Levels Node
The Levels Node takes an image as an input, and can output a 1D value based on the levels of an image. It can read the input's Combined RGB, Red, Green, Blue, or Luminance channels.
It can output a Mean value, or average of values, or a Standard deviation, which measures the diversity of values.


