Dev:Ref/Release Notes/2.64/Sculpting
目次
Blender 2.64: Sculpting Improvements
Sculpt Masking

Usage
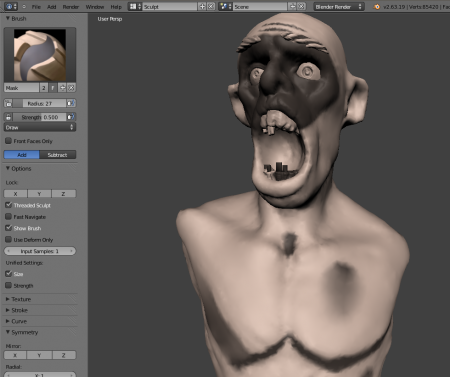
Masks are used to "protect" parts of the model from being edited by the sculpting tools. They appear as darkened areas of the mesh. The darker a masked area is, the less effect sculpting on it will have. Masks can be edited with the mask brush, as well as cleared or inverted accross the entire model. The masking feature is active as soon as sculpt mode is entered; there is no separate toggle.
Mask Brush
In order to edit the mask, select the mask brush from the Brush panel. The mask brush can also be toggled with the M. (Pressing M will also create a mask brush if none currently exist.) The mask brush has two modes, Draw and Smooth. Pressing ⇧ Shift with the mask brush active will toggle the mask smoothing mode.
Other Mask Operations
The 3D View header has a mask menu with the following operators:
- Invert Mask CtrlI
- Clear Mask AltM
- Fill Mask
- Hide Masked
Limitations
- Masks are only visible when drawing with the PBVH, so masks will not be visible if:
- Draw mode is not set to 'solid'.
- Shape key is unpinned
- Non-multires modifiers are visible
- Mask drawing breaks material drawing in sculpt mode.
Implementation Notes
Brush Map Mode
The existing Fixed map mode was split into two modes: View Plane and Area Plane.
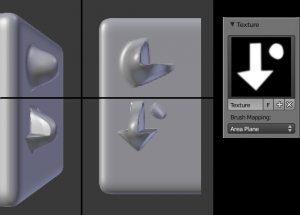
The View Plane mode is identical to Fixed — the current view angle is used to project the brush texture onto the model. Area Plane mode projects the brush texture along the local surface normal, which keeps the texture from stretching when sculpting on a portion of the mesh that is at an extreme angle to the viewpoint.
In the example to the right, two brush dabs were applied to the side of the model (left)-- the top dab applied using View Plane mode and the bottom using Area Plane mode. The result shown head-on in the middle demonstrated the texture shape preservation was optimized using Area Plane projection.
Input Stroke Averaging
Sculpt, vertex paint, and weight paint have a new Input Samples option (accessible from the 3D View toolbar). Recent mouse locations (input samples) are averaged together to smooth brush strokes.
New Hotkeys
Center on Last Stroke
To quickly focus on where an object is being sculpted, the 3D view centering operator Numpad . has been extended to center on the end of the last sculpt stroke.
Cancel Stroke in Progress
By pressing Esc while in the middle of a sculpt stroke, the stroke will be canceled and any changes will be undone.
Demo Video
