Doc:2.6/Manual/Modeling/Texts
Page status (reviewing guidelines)
Text
fix headings. Add reference
|
Text Objects
Mode: Edit mode (Text)
Panel: Curve and Surface, Font and Char (Editing context, F9)
Hotkey: F9
Menu: Add » Text
Text objects are exactly what they sound like: they contain some text. They share the same object type as curves and surfaces, as modern fonts (OpenType, TrueType, etc.) are vectorial, made of curves (generally Béziers).
Blender uses a “Font System” to manage mapping “letter codes → objects representing them in 3D views”. This implies that not only does the font system have its own built-in font, but it can use external fonts too, including PostScript Type 1, OpenType and TrueType fonts. And last but not least, it can use any objects existing in the current .blend file as letters.
Texts in Bender allow you to create/render 2D or 3D text, shaded as you want, with various advanced layout options (like justifying and frames), as we will see below. By default, letters are just flat filled surfaces, exactly like any closed 2D curve. But you can of course extrude them, and have them follow other curves.
Once you are happy with the shape of your text, you can convert it (with AltC, in Object mode), either to a curve, or directly to a mesh, allowing you to use all the powerful features of these types of objects on it.
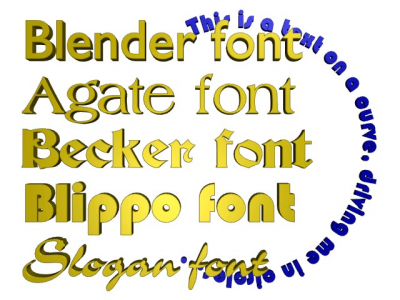
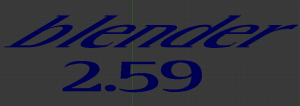
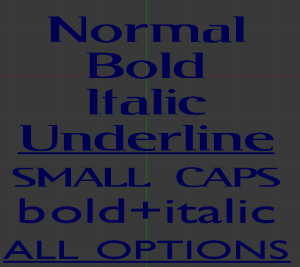
(Text Examples) shows some examples of various fonts in action, including the “blue” font that has been applied to a curve path.
Notes
A maximum of 50000 characters is allowed per text object; however, be warned that the more characters a single text object has, the slower the object will respond interactively.
As you can see when you switch between Object and Edit modes, the Font panel remains the same. This means that its settings can be applied equally in both modes, and implies that you cannot apply them to just a part of the mesh. So font, size, and so on are common to all letters in a Text object. There is just one exception: the Bold/Italic buttons control properties specific to each letter (this is a way to use up to four different fonts in a text).
For optimum resource usage, only characters that are being used consume memory (rather than the entire character set).
Editing Text
Mode: Edit mode
Hotkey: see below
Editing text is quite different from other object types in Blender, and happens mainly in two areas. First, the 3D view, of course, where you type your text, and have a few shortcuts, e.g. for applying styles – note however that most Blender hotkeys you know in Edit mode do not exist for texts! The second place is the Button window (Editing context, F9), especially the Font panel.
The menu of the 3D view header has nearly no use, and there is no Specials menu. You have no transform or mirror tools, either, however you can apply the same modifiers to texts as for curves.
Editing Text is similar to using a standard text editor but is not as full-featured and has some differences:
- Exit Edit mode
- ⇆ Tab doesn’t insert a tab character in the text, but rather enters and exits Edit mode, as with other object types.
- Copy
- To copy text to the buffer, use CtrlC or the Copy button in the tool shelf.
- Cut and Copy
- To cut and copy text to the buffer, use CtrlX or the Cut button in the tool shelf.
- Paste
- To paste text from the buffer, use CtrlV or the Paste button in the tool shelf.
- Delete all text
- To completely erase or delete all text, use Ctrl← Backspace.
- Home/End
- ↖ Home and ⇥ End move the cursor to the beginning and end of a line respectively.
- Next/Previous word
- To move the cursor on a word’s boundary, use Ctrl← or Ctrl→.
The text buffer does not communicate with the desktop. It only works within Blender. To insert text from outside Blender, see Inserting text below.
Inserting Text
You can insert text in three different ways: from the internal text buffer (Editing Text), or from a text file.
To load text from a text file, use the Text » Paste File tool. This will bring up a File Browser window for navigating to a valid UTF-8 file. As usual, be careful that the file doesn’t have too many characters, as interactive response will slow down.
Special Characters
Mode: Edit mode
Menu: Text » Special Characters
There are a few special characters that are available using the Alt key or the Text menu in the 3D window header.
Here is a summary of these characters:
| AltC: | Copyright (©) | AltR: | Registered trademark (®) |
| AltG: | Degrees (°) | AltX: | Multiply symbol (×) |
| AltS: | German “ss” (ß) | AltF: | Currency sign (¤) |
| AltL: | British Pound (£) | AltY: | Japanese Yen (¥) |
| Alt1: | Superscript 1 (¹) | Alt2: | Superscript 2 (²) |
| Alt3: | Superscript 3 (³) | Alt.: | Circle |
| Alt?: | Spanish question mark (¿) | Alt!: | Spanish exclamation mark (¡) |
| Alt<: | Left double quotation mark («) | Alt>: | Right double quotation mark (») |
All the characters on your keyboard should work, including stressed vowels and so on. If you need special characters (such as accented chars, which are not there on a US keyboard) you can produce many of them using a combination of two other characters. To do so, type the main char, press Alt← Backspace, and then press the desired “modifier” to produce the special character. Some examples are given below:
| A, Alt← Backspace, ~: | ã | A, Alt← Backspace, ': | á | A, Alt← Backspace, `: | à |
| A, Alt← Backspace, O: | å | E, Alt← Backspace, ": | ë | O, Alt← Backspace, /: | ø |
Convert text to text object
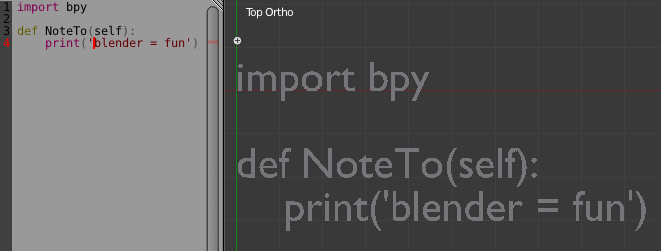
[[File:ConvertTextToTextObject.png|right|250px]Converting text to a text object.] An easy way to get text into Blender is to type it in The Text Editor. It is suggested to do this with a split window as you will be able to see the 3D view port and text editor at the same time. In the Text Editor select Text > Create Text Block. Then begin typing. When finished, select Edit >> Text to 3D Object >> One Object or One Object per Line depending on your needs. It is also possible to load a text file via Text >> Open Text Block which can be useful for importing large amounts of text at once.
3D Mesh
It is possible to convert a Text Object to a 3D Mesh object. This can be useful so that you may edit the vertices in Edit Mode, but you will lose the ability to edit the text itself. To do this, go to Object Mode and select your Text Object. Press AltC and select Mesh From Curve/Meta/Surf/Text. Now you can return to Edit Mode and manually edit the vertices. They are usually a bit messy, so it may be useful to use a Limited Dissolve deletion or Remesh Object Modifier at a low threshold to clean up your mesh.
Text Selection
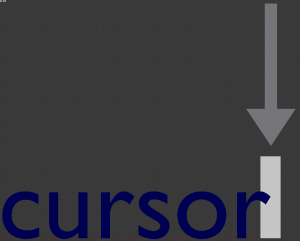
In Edit mode, your text has a white cursor, and as in any text editor, it determines where new chars will be inserted. You move this cursor with the arrow keys (→/↓/←/↑) or Page up/Page down and ↖ Home/⇥ End keys.
Hold ⇧ Shift while using the arrow keys to select a part of the text. You can use it to specify different materials, the normal/bold/italic state, and little else.
Formatting Text
Fonts
Mode: Edit mode
Panel: Font (Editing context, F9)
The Font panel has several options for changing the look of characters.
Loading and Changing Fonts
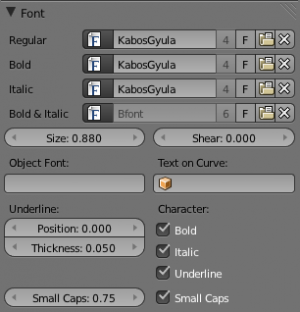
Blender comes with a built-in font by default and is displayed in each of the four font style choosers. The built-in font is always present and shows in this list as “Bfont”. The first icon contains a drop-down list displaying currently loaded fonts. Select one for each font style.
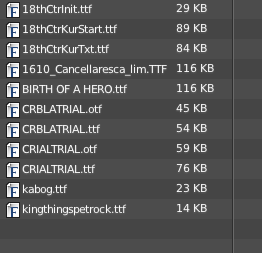
To load a different Font, click one of the Load buttons in the Font panel and navigate to a valid font. The File Browser window will give all valid fonts a capital F icon, as seen in Loading a Type 1 font file.
Unix note
Fonts are typically located under
/usr/lib/fonts, or some variant like /usr/lib/X11/fonts, but not always. They may be in other locations as well, such as /usr/share/local or /usr/local/share, and possibly related sub-trees. |
If you select a font that Blender can’t understand, you will get the error “Not a valid font”.
Remember the same font will be applied to all chars with same style in a text, but that a separate font is required for each style. For example, you will need to load an Italics font in order to make characters or words italic. Once the font is loaded you can apply that font “Style” to the selected characters or the whole object. In all, you would need to load a minimum of four different types of fonts to represent each style (Normal, Italic, Bold, Bold-Italic).
It is important to understand that Blender does not care what font you load for “normal”, “bold”, etc., styles. This is how you can have up to four different fonts in use in the same text – but you have to choose between different styles of the same font, or different fonts. Blender has a number of typographic controls for changing the style and layout of text, found in the Font panel.
Size and Shear
- Size
- Controls the size of the whole text (there is no way to control each char size independently). Note however that chars with different fonts (different styles, see below) might have different visible sizes.
- Shear
- Controls the inclination of the whole text. Even if this seems similar to italics style, this is not the same thing!
Objects as Fonts
You can also “create” your own “font” inside Blender! This is quite a complex process, so let’s detail it:
- First, you must create your chars. Each char is an object of any type (mesh, curve, meta…). They all must have a name following the schema:
common prefixfollowed by thechar name(e.g. “font.a”, “font.b”, etc.). - Then, for the Text object, you must enable the Dupli Verts button (Object context – F7 –, Anim Settings panel).
- Back in Editing context (F9), in the Font panel, fill the Ob Family field with the common prefix of your “font” objects.
Now, each time a char in your text matches the suffix part of a “font” object’s name, this object is duplicated on this char. The original chars remain visible. The objects are duplicated so that their center is positioned at the lower right corner of the corresponding chars.
Text on Curve
With the curve modifier you can let text follow a curve.
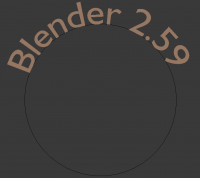
In (Text on curve) you can see a text deformed by a curve (a 2D Bézier circle).
To apply the curve modifier, the text object first has to be converted to a mesh, using AltC and click mesh.
|
Underline
- Underline
- Toggled with the Underline button before typing. Text can also be set to Underlined by selecting it then using the Bold button in the Tool Shelf.
- Position
- This allows you to shift vertically the position of the underline.
- Thickness
- This controls the thickness of the underline.
Character
- Bold
- Toggled with the Bold button before typing. Text can also be set to Bold by selecting it then using the Bold button in the Tool Shelf.
- Italics
- Toggled with the Italic button before typing. Text can also be set to Italic by selecting it then using the Italic button in the Tool Shelf.
- Underline
- Enables underlining, as controlled by the Underline settings above.
- Small Caps
- Text is entered as small capital letters.
Blender’s Bold and Italic buttons don’t work the same way as other applications, as they also serve as placeholders for you to load up other fonts manually, which get applied when you define the corresponding style; see above.
To apply the Bold/Italics/Underline attribute to a set of characters, you either turn on Bold/Italics/Underline prior to typing characters, or highlight (select) first and then toggle Bold/Italics/Underline.
Setting Case
You can change the text case by selecting it then clicking the To Upper or To Lower in the tool shelf.
Enable the Small Caps option to type characters as small caps.
The size of the Small Caps can be changed with the Small Caps Scale setting. Note that the Small Caps Scale is applied to all Small Caps formatted characters the same way.
Paragraph
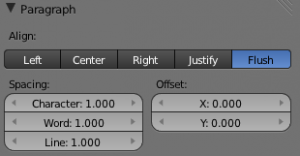
The Paragraph Panel has settings for the alignment and spacing of text.
Align
- Left
- Aligns text to left of frames when using them, else uses the center point of the Text object as the starting point of the text (which extends to the right).
- Center
- Centers text in the frames when using them, else uses the center point of the Text object as the mid-point of the text (which extends equally to the left and right).
- Right
- Aligns text to right of frames when using them, else uses the center point of the Text object as the ending point of the text (which extends to the left).
- Justify
- Only flushes a line when it is terminated by a wordwrap (not by ↵ Enter), it uses whitespace instead of character spacing (kerning) to fill lines.
- Flush
- Always flushes the line, even when it’s still being entered; it uses character spacing (kerning) to fill lines.
Both Justify and Flush only work within frames.
Spacing
- Character
- A factor by which space between each character is scaled in width
- Word
- A factor by which whitespace between words is scaled in width. You can also control it by pressing Alt← or Alt→ to decrease/increase spacing by steps of 0.1.
- Line
- A factor by which the vertical space between lines is scaled.
Offset
- X offset and Y offset
- These settings control the X and Y offset of the text, regarding its “normal” positioning. Note that with frames, it applies to all frames’ content.
Shape
Mode: Object or Edit modes
Panel: Curve and Surface (Editing context, F9)
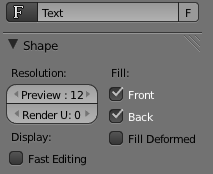
As you can see in the Curve and Surface panel, texts have most of the same options as curves.
Resolution
- Preview
- The resolution in the viewport.
- Render
- The resolution on the render.
- Fast Editing
- Disables curve filling while in edit mode.
Fill
The fill options control how the text curves are filled in when text is Extruded or Beveled in the Geometry Panel.
- Front
- Fills in the front side of the surface.
- Back
- Fills in the back side of the surface.
- Fill Deformed
- Fills the curves after applying shape keys and modifiers.
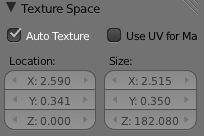
Textures
- Use UV for Mapping
- Use UV values as generated texture coordinates.
- Auto Texture Space
- Adjusts the active object's texture space automatically when transforming object.
Geometry
Text objects have all the extrusion features of curves.
