利用者:Roger/Sewing Clothes
目次
Intro
Starting with 2.46, Blender finally got a Cloth simulation. With cloth comes the need to clothe your characters. Sewing is an art that is a few thousand years old, has a whole vernacular, and is actually a pretty complicated way of forming a flat piece of cloth to fit a body. Ok, there's the first mistake right there. It's not a piece of cloth - it's a bunch of pieces that are cut out from a pattern. The pattern is usually X-symmetric, and has a front part and a back part. To cut, you fold the cloth in half, good side inward, and cut through both pieces of cloth. You then have two pieces of cloth that are mirror images of one another. you sew the left front part to the left back part and you have a seam. The edges are not straight, but are curved to fit the body. Where there are sharp curves, a dart is cut. A dart is a wedge cut-out, so that when you pull the fabric together, it bunches up. The fabric itself them forms a shell, or mesh; in fact stiff denim pants can sometimes stand up by itself!
Notice we are using some terms that should be familiar with you, although usually you do it backwards, where you seam your mesh so you can unwrap it to a flat UV texture. Well, in making clothing, we start with a flat square-ish piece of cloth and sew it together at the seams, to arrive at a mesh model that fits your character.
The patterns used in this tutorial are from a free [Modern Sewing Patterns] website. Since they are free, I assume we can use them here.
Workflow
- Model your character
- Create ensemble (the set of clothing to make)
- Select patterns
- Texture the fabric
- Cut and Sew
- Fit and Tailor
An ensemble is an outfit and accessories that all go together to make your character look authentic. For example, the ensemble for your Indiana Jones character, you want a bomber jacket, shirt, pants, belt, boots, socks, hat and whip. For a classy femme, a nice red dress, top coat, pearl strand necklace, earring, high-heel shoes and clutch purse make her ensemble.
This tutorial only deals with making the outfit part of the ensemble. We will be using Ludwig, because he is..well, he's just cool and gender-safe.
First, set the outer mesh to be a Deflector. Select the mesh in Object mode. In the Object Physics buttons, locate the Deflection panel, and enable Deflection. When you do, you will see a bottom set of settings dealing with Soft Body/Cloth. These settings say how much of a buffer area and damping strength to apply to a piece of cloth that intersects it. Set as shown.
An inner of .01 BU, if our model scale is 1 BU=1m, then .01m is a centimeter, or about a half-inch. This will allow enough "float" or air space, between the mesh and the cloth, but not too much.
Pants
The goal of this step is to create a base mesh that can be UV-mapped, so that patterns can be later applied to the mesh and not be all distorted.
Let's start with something simple, a pair of pants. Find [Pattern Men / Pants / #6038 Pants]. You will notice that it is smaller at the waist, wider at the hips, and then narrows. If you look at a sewing pattern, you will see a very odd shape that forms the crotch. We could model it from a pattern, but let's cheat. We can cheat because we are just going to use a procedural texture, and not UV map a print pattern.
Rough-In
NOTE: PICTURE IS BAD EXAMPLE> VERTS needed where leg bends - at hips and knees
The goal of this step is to create a mesh that deforms properly when deflected, balancing detail with overall performance. More detail=more verts=better deformation=more render/compute time.
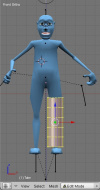
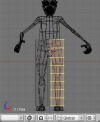
In top view, add a mesh->cylinder-> of 32 verts, Radius 1, Depth 5 units and do not cap the ends. In front view, scale inward in the X direction by .8. Use the Knife tool to multicut it in 4 places, and cut horizontally to chunk up the tube into faces that are 1 unit high. Position the center of the mesh at waist height (For Ludwig this is at (0,0,0), and then in edit mode grab and move the vertices so that they encircle his leg. You should now have something like that shown; the center of the object is at his waist, but the initial leg verts are grabbed and moved around his leg.
Select the top row of vertices, but then de-select 7 of the ones in the middle where the crotch is (use top view to easily RMB ![]() box un-select. In front view, extrude these verts up one BU (hold control). Repeat twice more and you should be up around his waist. Select the "torn" edges for the front side and the back side, including the one that forms the topmost ring (8 vertices total) and extrude them inward in the X direction about a face width, or 0.15 BU. Repeat and you should be right at center. You may wish to turn on the X-Mirror modifier at this point.
box un-select. In front view, extrude these verts up one BU (hold control). Repeat twice more and you should be up around his waist. Select the "torn" edges for the front side and the back side, including the one that forms the topmost ring (8 vertices total) and extrude them inward in the X direction about a face width, or 0.15 BU. Repeat and you should be right at center. You may wish to turn on the X-Mirror modifier at this point.
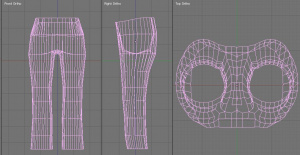
Now we need to sew the crotch together, so Ludwig doesn't feel the breeze, if you know I mean. For this, we first need to create the centerline seam. Let's work only with the crotch verts and hide everything else. Select all verts, then de-select the fifth row in front view. Then press H to Hide the selected verts, leaving only the horizontal crotch layer. Select the front and back center verts and connect them via F. Subdivide W multi this line into 6 segments. Now use Box select to go down the crotch, selecting and Facing the crotch. If you AltH unhide the verts, you can, in top view, delete the back (or front) section of the verts and turn on the Y-modifier. This should give you a top view that looks like the image to the right.
Congratulations! You now have the stiffest, most ugly pair of pants ever designed! :) Actually, you should now have the rough idea of some tubes that join somewhat. Apply the Y modifier to make one side of the the complete mesh, and now you should now have a integral skin or basic pants shape.
Tailoring
The goal of this step is to make the generic model "fit" the body. Just like you have sizes of clothes, you now need to size your mesh. Also, details like flares, cuffs, and collars, can now be added.
You may want to name this Mesh "Pants" (as well as the object) and save it for future reference. Looking at the pattern, we see that the knees are taken in a bit, while the ankle flares out. In Proportional edit mode, select the ring of verts around the knee and scale them in the X and Y direction ever so slightly, using a proportional influence circle not too big to include the bottom verts, but not too small to make the knee very sharp. You want pants, not bell-bottoms! In side view, let out the butt area, and take in the waist. Use a combination of solo and O proportional editing, in front and side views. In the zipper area, bring up the crotch center verts to make a rounded shape. Again, there are no straight lines in organics, so try to make the outline curvy. Leave more room at the butt, but keep the front vertical (ok, maybe stretch out the front a little to fit his paunch).
Lastly, turn on solid shaded view and Ludwig, and check for tears. A tear is where the mesh of Ludwig shows through the pants. When you are happy with the shape, apply the mirror modifier.
Pinning
The goal of this step is to mimic the way in which clothes bind to the body, because of fit, gravity, and normal movement.
Select the top row of verts at the waistline and create a new vertex group called Belt. This group will be used to tell the cloth simulation what not to move. Pinned vertices are not moved by the cloth simulation.
Parent the pants to Ludwig by selecting the pants, then shift-select Ludwig, then press CtrlP to make the pants the child of Ludwig the mesh. Now, when Ludwig walks, or as you re-position him in the scene, the pants will move with him. Note that in the future, however, that you will probably need to recompute any cache/cloth simulation if you change his animation, since his mesh will want to move the cloth differently.
Pressing
The goal of this step is to "relax" your mesh, and test your work.
Now it is time to turn our mesh into cloth. In the Object Physics buttons, locate the three panels shown that deal with Cloth simulation. First, select the Pants mesh in object mode
Depending on your patience and the power of your computer, set the quality settings as shown. A lower quality setting will give faster results, but will result in a poor simulation. The tradeoff is up to you.
Shirt
A shirt pattern has a front part, back part, collar and cuff parts
Blouse
A blouse is trickier than a shirt because of the mammaries and the fact that you want to accentuate the curves of the femme.
Dress
Ok, so there are a zillion dress designs, and are like all the above put together. We will use a simple pattern.


