利用者:Greylica/Doc:2.6/Manual/Modeling/Meshes/Editing/Basics/Adding
Introduction
In Blender, for modeling, you have several ways of adding mesh elements. Some of them are basic objects that adds a starting block of data (called datablock in Blender ) when adding their basic geometry to the scene. We have 10 available mesh Objects, and those starting meshes are also called mesh primitives. In Blender, we have a set of basic primitives so you can add a starting mesh to modify and model to suit your specific needs. Also, you have specific tools to add, duplicate, move and delete elements, which will be explained in other pages of the modeling section present in this manual.
This page explains how to add basic geometry creating objects from primitives and how to add more elements to your primitives, including the addition of other primitives and basic elements when you're modeling.
Basics of adding meshes and mesh elements
There are three ways of adding basic mesh elements to model in Blender:
- Adding a Mesh primitive in Object Mode
- Adding a Mesh primitive to the already existing element when in Edit Mode;
- Adding elementary parts that forms a mesh or a face topology from the most basic parts of a mesh (vertices, edges and faces).
Adding in Object Mode
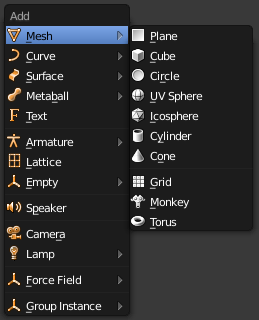
The basic shortcut to add one of the existing mesh object primitives in Blender, when in the Object mode is the shortcut ⇧ ShiftA. This will present you with a list of possible elements also including ones that aren't meshes. In addition, you can also use Blender Search, pressing the shortcut Space and typing the search word add and the object primitive you want to add, for example Add plane.
In this section, we will cover the addition of the primitive mesh objects shown in this dropdown menu list when in Object Mode. For a detailed description of each primitive an their specific options based in their geometry and possible contexts, visit the Mesh Primitives page.
The shortcut ⇧ ShiftA when in the object mode, opens a drop down menu from which you can select a type of object you want to add to the scene. Among them are mesh objects. The sub-menu which opens when you hover with the mouse over will show you the list of mesh primitives Blender offer to start modeling. (see Fig. 1 - Menu for adding elements in Object Mode, mesh objects selected)
When you add meshes in the object mode, Blender will add a new mesh primitive of the selected type as a separate object, it does not modify any existing objects.
When you add a primitive mesh object. Blender will also change the modal creation context according to the chosen primitive, and at the bottom of the “Object Tools” panel, Blender will show you a list of options including the ones related to object mesh geometry.
Adding in Edit Mode
To enter Edit you can select Edit from the modes menu as explained in the Interface overview, or use the shortcut ⇆ Tab with a mesh object selected.
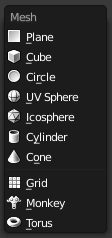
To select and add one of the primitives to work with press ⇧ ShiftA in Edit. Blender automatically detects the appropriate context for the object type you are editing, and will show a list of compatible, combining elements. If you are editing Mesh types, Blender will show a list of primitive meshes to add to your object. Other contexts are also automatically detected for the correct element additions. (See Fig. 2 - List of Blender mesh primitives, you can add primitives to already existing objects, in Edit Mode)
A dropdown menu opens from which you can select the primitive you wish to add to the object.
There are many cases when it is useful to directly add a mesh to an object. Maybe you want to model a teapot. It would be useful to model the cup and the handle as separate meshes and only combine them when you are done.
Adding elementary parts to meshes
As explained before in Mesh Structures, meshes are objects formed from basic elements such as vertices, edges and faces.
The most elementary part of a mesh is the vertex, a point in 3D space; the line between two or more interconnected vertices is called an edge, and three or more edges can be connected to form a face. The geometry of the faces performing the model is called topology.
Creating vertices
- Creating vertices and interconnected vertices.
Note: Vertices can only be created in Edit Mode
The most basic element, a vertex, can be added with a left button mouse click while pressing ctrl when no other vertices are selected, or CtrlLMB ![]() .
.
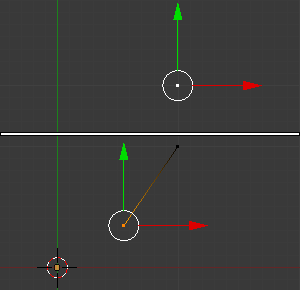
To create interconnected vertices, you can add a vertex and continuously make subsequent CtrlLMB ![]() operations with the last one vertex selected. This will link the last selected vertex with the vertex created at the mouse position with an edge (See Fig. 4 - Adding vertices, one by one with CtrlLMB
operations with the last one vertex selected. This will link the last selected vertex with the vertex created at the mouse position with an edge (See Fig. 4 - Adding vertices, one by one with CtrlLMB ![]() ) , and will continuously connect them creating vertices if you continue repeating this operation. (see Fig. 3 - Creating simple connected vertices with CtrlLMB
) , and will continuously connect them creating vertices if you continue repeating this operation. (see Fig. 3 - Creating simple connected vertices with CtrlLMB ![]() ).
).
Creating Edges
In addition to automatically creating edges from vertices, if you have 2 vertices selected, you can connect them with and edge using the shortcut F (Fill). If you have more than 2 vertices selected, this will automatically create face(s).
Creating Faces
- Creating Faces with CTRL and Left Mouse Button
If you have 2 vertices selected and already connected with an edge, left-click while pressing Ctrl CtrlLMB ![]() will create a planar face, also known as a quad. Blender will follow your mouse cursor and will use the planar view from your viewport to create those quads.
will create a planar face, also known as a quad. Blender will follow your mouse cursor and will use the planar view from your viewport to create those quads.
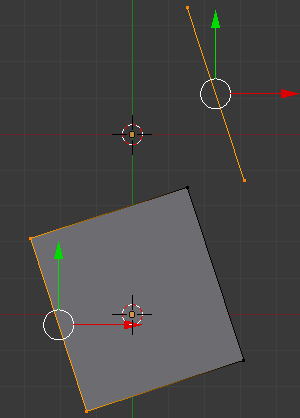
For CtrlLMB ![]() , Blender will automatically rotate the last selected Edge (the source) for the subsequent operations if you have at least one face created, dividing the angles created between the newly-created edge and the last two edges, performing a smooth angle between them.
Blender will calculate this angle using the last positive and negative position of the last X and Y coordinates and the last connected unselected edge. If this angle exceeds a negative limit (following a quadrant rule) between the recently created edge and the last two, Blender will wrap the faces.
, Blender will automatically rotate the last selected Edge (the source) for the subsequent operations if you have at least one face created, dividing the angles created between the newly-created edge and the last two edges, performing a smooth angle between them.
Blender will calculate this angle using the last positive and negative position of the last X and Y coordinates and the last connected unselected edge. If this angle exceeds a negative limit (following a quadrant rule) between the recently created edge and the last two, Blender will wrap the faces.
But if you don't want Blender rotating and smoothing edges automatically when extruding from the shortcut CtrlLMB ![]() , you can also inhibit Blender from rotating sources using the shortcut Ctrl⇧ ShiftClick. In this case, Blender won't rotate the source dividing the angle between those edges when creating a face.
, you can also inhibit Blender from rotating sources using the shortcut Ctrl⇧ ShiftClick. In this case, Blender won't rotate the source dividing the angle between those edges when creating a face.
For both cases, Blender will inform the user about the source rotation during the creation process. If you look at the Bottom of the Mesh Tools Panel, if you pressed the CtrlLMB ![]() combination, you will see that the Rotate Source is automatically checked and if the Ctrl⇧ ShiftLMB
combination, you will see that the Rotate Source is automatically checked and if the Ctrl⇧ ShiftLMB ![]() is used, it will be automatically unchecked.
is used, it will be automatically unchecked.
Examples:
- Creating Faces with shortcut CtrlLMB
 , (see Fig. - Faces created with source automatically rotated}}
 - Creating Faces with shortcut Ctrl⇧ ShiftLMB
 , (see Fig. Faces created with no source rotation)
If you have 3 or more vertices selected, and left click with mouse while pressing ctrl CtrlLMB ![]() , you will also create planar faces, but along the vertices selected, following the direction of the cursor. This operation is similar to an extrude operation, which is explained in the Extrude page.
, you will also create planar faces, but along the vertices selected, following the direction of the cursor. This operation is similar to an extrude operation, which is explained in the Extrude page.
- Filling faces
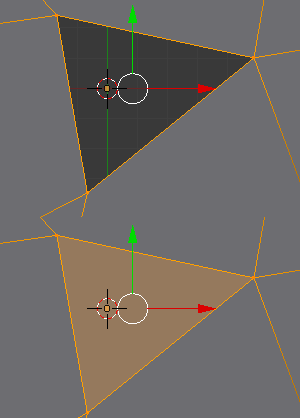
You can also create faces with at least 3 vertices selected, using the shortcut F to fill them with edges and faces, or only fill edges with faces if they are already connected (Fill) (See Fig. 5 - Filling a triangle with F). For 4 or more vertices, it's mandatory that you have coplanar vertices. 4 coplanar vertices will create a quad when filled, and more than 4 coplanar vertices will create a Ngon face.
Note that you can only modify the mesh of the object you're editing. To modify other objects you need to leave, select them and re-enter Edit Mode.
Other ways of adding elements
In this modeling chapter, we have pages explaining how you can use and interact with tools to model your mesh objects to suit your needs. Some of them will add, duplicate, extrude, delete, etc.
Actions that can add vertices to your mesh are: Using a duplication tool like extrude. Using a subdividing tool like subdivide. Using many other tools from this overview. Applying a modifier on your mesh.
Hints
it's important to note, when you're modeling, that, in order to facilitate the modeling, the best solution is to imagine what primitive type suits better for your model. If you will model a cuboid, the best solution is to start with a primitive cube, and so on.
There are some operations that can be achieved faster than to model using certain modifiers and addons, one of the most used to connect different Object meshes is the Boolean Modifier, explained at the Boolean modifier page.
Useful Links
There are add-ons for blender which will enable you to add complex primitives such as landscapes.
Here we show some examples of Modifiers that will add geometry to the the already existing Object. Note that, like the modeling tools, they will only modify and add to the existing geometry of the object.
- Modifiers
The Boolean modifier can apply boolean operations on two meshes. The Array modifier will duplicate your object. The Mirror modifier will mirror a part of your object. The Screw modifier forms spirals from your shape.
- Addons for adding complex primitives
Some usefull addons are:
The landscape addon. The manson addon. The addon for Extra Objects like cogs or diamonds.
Link for helping addons – there are no pages in the wiki for specific add ons
