利用者:Witt/GSoC2017/Documentation
目次
Documentation (GSoC 2017 - Silhouette Operator)
Disclaimer
The tool is not finished yet and keybindings, settings etc are still subject to change.
|
The goal of this Project was to improve the existing sculpting tools and give the sculptor more freedom to make drastic changes to the geometry. With only one stroke completely new shapes can be drawn with the new Silhouette Operator. (Proposal)
Give your sculpture a new arm, give that two-headed-beast a third head or cut the nails of your lion sculpture. All should be possible by just drawing without the need to enter edit mode and model new topology.
Besides the Silhouette Operator a small addition to the spacing functionality has been added. (Adaptive Spacing)
When to use the Silhouette Operator?
The Silhouette Operator is intended as a quick prototyping tool. It is best used to get a rough basic mesh structure for further refinement. Normally a sculptor would first model a rough base mesh in edit-mode to later refine and sculpt on. Now one can simply generate this base mesh in sculpt mode.
Where to get the tool?
The tool is still unfinished in the soc-2017-sculpting_improvements branch. Once a more stable status is achieved I will upload binaries for easier testing. If you want to test it right now you can build the branch. (https://wiki.blender.org/index.php/Dev:Doc/Building_Blender + git checkout soc-2017-sculpting_improvements)
The Silhouette Operator
The Operator can only be used in the sculpting mode. The settings are in the tools panel in the section “Silhouette”.
Warning: The Silhouette Operator is destructive. Vertex data and mesh features might get deleted!
The Silhouette Operator has two modes:
Add Mode
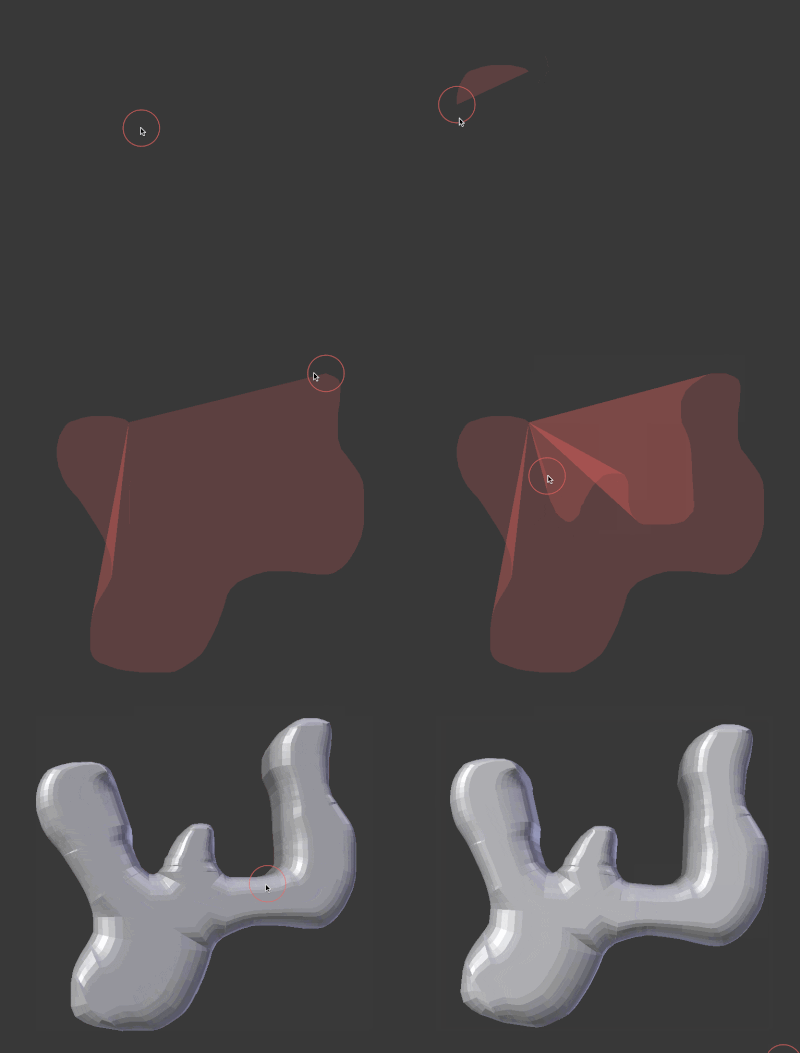
Within add mode a silhouette can be drawn and a shape with the drawn outline will be generated. To start drawing press and hold AltLMB ![]() while drawing the desired shape.
Upon releasing the mouse button the new topology is created. Depending on the settings, it will be placed on the plane orthogonal to your view direction crossing the cursor. Therefore to control how far the silhouette should be placed from the view is controlled by the cursor. If the silhouette intersects with existing geometry it will be connected and merged similar to a boolean union operation.
while drawing the desired shape.
Upon releasing the mouse button the new topology is created. Depending on the settings, it will be placed on the plane orthogonal to your view direction crossing the cursor. Therefore to control how far the silhouette should be placed from the view is controlled by the cursor. If the silhouette intersects with existing geometry it will be connected and merged similar to a boolean union operation.
Subtract Mode
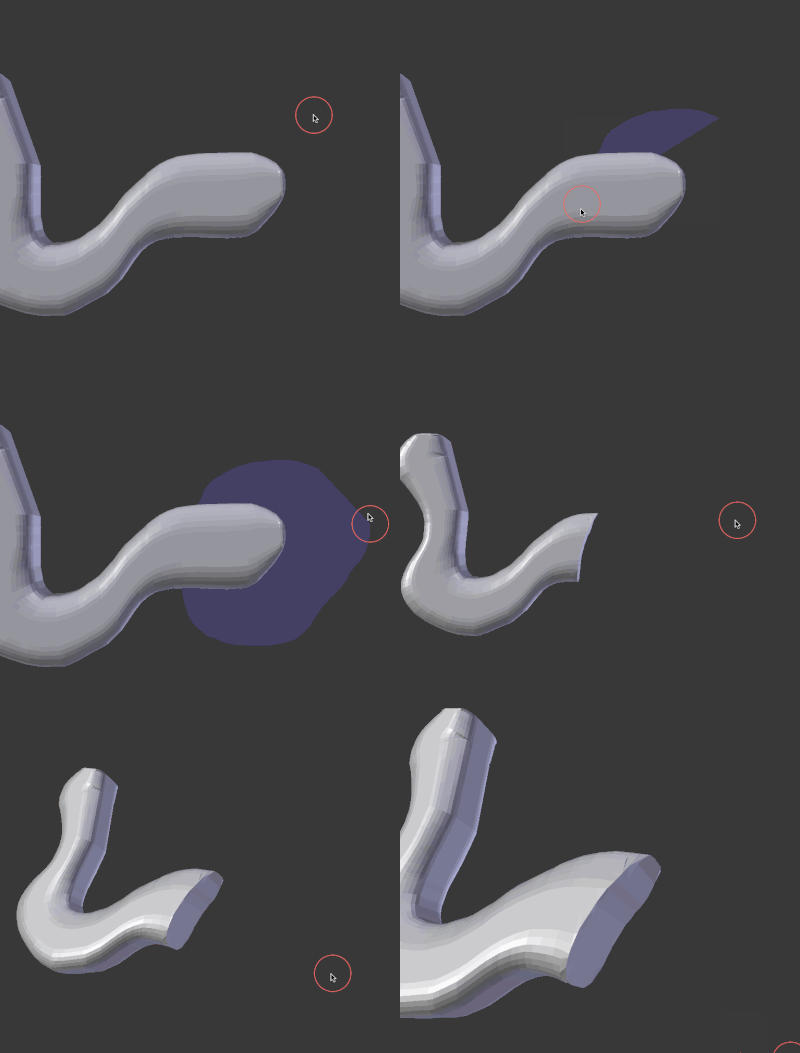
To subtract instead of adding a new shape pressing AltRMB ![]() enters subtract mode. Within subtract mode the drawn shape is subtracted instead of added to the geometry. Even though it works different it is possible to use this like a clipping brush.
enters subtract mode. Within subtract mode the drawn shape is subtracted instead of added to the geometry. Even though it works different it is possible to use this like a clipping brush.
Settings
Currently the tool comes with three settings to control the appearance and shape of the silhouette.
- Smoothness
- The smoothness is a value between 0% and 100%. Smaller values result in a more rectangular shape while bigger values result in a more elliptical shape. This setting does not influence the 2D drawn shape. It influences only the appearance in the third axis.
- Depth
- The depth setting controls the extrusion in the third axis. Currently it is measured in blender units but more intuitive settings are planned.
| Clipping functionality | |
| To use the subtract mode like a clipping brush, set the depth bigger but similar to the object you want to cut and set the smoothness to 0%. |
- Resolution
- The resolution controls the vertex density of the generated depth. This works similar to subsurface levels. As an example: Resolution 4 has double the amount of vertices as resolution 3. The vertex count rises exponentially with the levels, high settings might take a while to generate. Like the depth setting, this is currently also constant to the object size. Generating a big silhouette generates more vertices than a small silhouette.
Adaptive Spacing
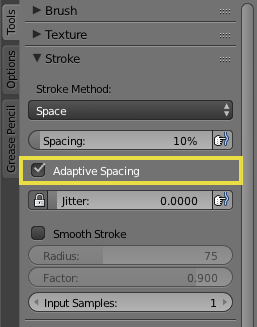
Adaptive spacing can be enabled in the stroke settings. The spacing controls the distance between the "dabs". Without adaptive spacing, dabs are placed relative to the 2D screen space. For example every dab will be spaced 20 pixels from the last. This is sometimes undesirable when working with 3D objects especially when working with curved surfaces. With adaptive spacing, daubs are placed with a constant distance to each other on the surface.
Further Development
The tools are still in an early development stage. Unfortunately the time was not enough to make the Silhouette Operator stable enough for real testing. Fixing the bugs and solving the issues is top priority right now. Apart from that a few key features still need to be implemented to make the silhouette brush usable. Drawing directly on the topology or a more intuitive depth setting is necessary for extensive usage. A lot of other features and ideas are also worth investigating or implementing. An updated list of bugs and features as well as the general development status can be found here:
Development Status
If you have suggestions, questions or general feedback post them in the general discussion at:
https://blenderartists.org/forum/showthread.php?427124-GSoC-2017-Silhouette-Brush


