Doc:2.6/Manual/Modeling/Meshes/Primitives
Page status (reviewing guidelines)
Page reviewed and in good shape |
Mesh Primitives
Mode: Object mode
Hotkey: ⇧ ShiftA
Menu: Add » Mesh
A common object type used in a 3D scene is a mesh. Blender comes with a number of “primitive” mesh shapes that you can start modeling from.
Options included in more than one primitive are:
- Radius
- Sets the starting size for Circle, Cylinder, Cone, UVSphere and IcoSphere.
- Depth
- Sets the starting length for Cylinder and Cone.
Note about planar primitives
You can make a planar mesh three-dimensional by moving one or more of the vertices out of its plane (applies to Plane, Circle and Grid). A simple circle is actually often used as a starting point to create even the most complex of meshes.
|
Plane
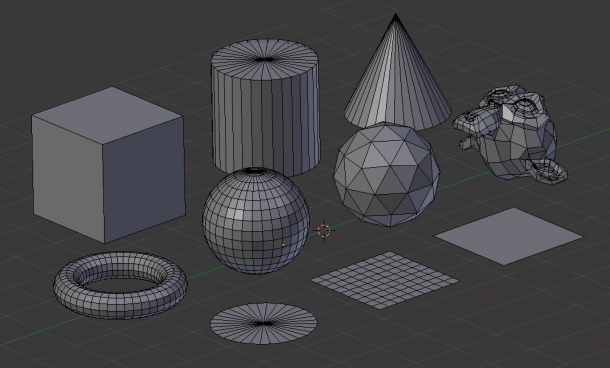
A standard plane contains four vertices, four edges, and one face. It is like a piece of paper lying on a table; it is not a real three-dimensional object because it is flat and has no thickness. Objects that can be created with planes include floors, tabletops, or mirrors.
Cube
A standard cube contains eight vertices, twelve edges, and six faces, and is a real three-dimensional object. Objects that can be created out of cubes include dice, boxes, or crates.
Circle
A standard circle is comprised of n vertices. The number of vertices and radius can be specified in the context panel in the Tool Shelf which appears when the circle is created.
- Vertices
- The number of vertices that define the circle. The more vertices the circle contains, the smoother its contour will be; see (“Circles” obtained with various settings). In contrast, a circle with only 3 vertices is actually a triangle — the circle is actually the standard way of adding polygons such as triangles, pentagons, et cetera.
- Radius
- Sets the radius of the circle.
- Fill Type
- Set how the circle will be filled
- Triangle Fan
- Fill with triangular faces which share a vertex in the middle.
- Ngon
- fill with a single ngon
- Nothing
- Do not fill. Creates only the outer ring of vertices
UV Sphere
A standard UV sphere is made out of n segments and m rings. The level of detail and radius can be specified in the context panel in the Tool Shelf which appears when the UV sphere is created. Increasing the number of segments and rings makes the surface of the UV sphere smoother.
- Segments
- Number of vertical segments. Like Earth’s meridians, going pole to pole and
- Rings
- Number of horizontal segments. These are like Earth’s parallels.
Note
If you specify a six segment, six ring UVsphere you’ll get something which, in top view, is a hexagon (six segments), with five rings plus two points at the poles. Thus, one ring fewer than expected, or one more, if you count the poles as rings of radius 0.
|
Icosphere
An icosphere is a polyhedra sphere made up of triangles. The number of subdivisions and radius can be specified in the context panel in the Tool Shelf after the Icosphere is created. Icospheres are normally used to achieve a more isotropical and economical layout of vertices than a UV sphere.
- Subdivisions
- How many recursions are used to define the sphere. Increasing the number of subdivisions makes the surface of the Icosphere smoother. At level 1 the Icosphere is an icosahedron, a solid with 20 equilateral triangular faces. Any increasing level of subdivision splits each triangular face into four triangles, resulting in a more spherical appearance.
- Size
- The radius of the sphere.
Note
It is possible to add an icosphere subdivided 500 times. Adding such a dense mesh is a sure way to cause a program crash. An icosphere subdivided 10 times would have 5,242,880 triangles, so be very careful about this!
|
Cylinder
A standard cylinder is made out of n vertices. The number of vertices in the circular cross-section can be specified in the context panel in the Tool Shelf that appears when the object is created; the higher the number of vertices, the smoother the circular cross-section becomes. Objects that can be created out of cylinders include handles or rods.
- Vertices
- Then number of vertical edge loops used to define the cylinder.
- Radius
- Sets the radius of the cylinder.
- Depth
- Sets the height of the cylinder.
- Cap Fill Type
- Similar to circle (see above). When set to none, the created object will be a tube. Objects that can be created out of tubes include pipes or drinking glasses (the basic difference between a cylinder and a tube is that the former has closed ends).
Cone
A standard cone is made out of n vertices. The number of vertices in the circular base, dimensions and option to close the base of the cone can be specified in the context panel in the Tool Shelf that appears when the object is created; the higher the number of vertices, the smoother the circular base becomes. Objects that can be created out of cones include spikes or pointed hats.
- Vertices
- The number of vertical edge loops used to define the cone.
- Radius 1
- Sets the radius of the base of the cone.
- Radius 2
- Sets the radius of the tip of the cone. A value of 0 will produce a standard cone shape.
- Depth
- Sets the height of the cylinder.
- Base Fill Type
- Similar to circle (see above).
Torus
A doughnut-shaped primitive created by rotating a circle around an axis. The overall dimensions are defined by the Major and Minor Radius. The number of vertices (in segments) can be different for the circles and is specified in the context panel in the Tool Shelf with both radii (Major Segments and Minor Segments).
- Major Radius
- Radius from the origin to the center of the cross sections
- Minor Radius
- Radius of the torus's cross section
- Major Segments
- Number of segments for the main ring of the torus. If you think of a torus as a "spin" operation around an axis, this is how many steps in the spin.
- Minor segments
- Number of segments for the minor ring of the torus. This is the number of vertices of each circular segment.
- Use Int+Ext Controls
- Change the way the torus is defined:
- Exterior Radius
- When Use Int+Ext Controls is active, if viewed along the major axis, this is the radius from the center to the outer edge.
- Interior Radius
- When Use Int+Ext Controls is active, if viewed along the major axis, this is the radius of the hole in the center.
Grid
A standard grid is made out of n by m vertices. The resolution of the x-axis and y-axis can be specified in the context panel in the Tool Shelf which appears when the object is created; the higher the resolution, the more vertices are created. Example objects that can be created out of grids include landscapes (with the proportional editing tool or Displace modifier) and other organic surfaces. You can also obtain a grid when you create a plane and then use a subdivide modifier in Edit mode. However, there is a Landscape add-on available in the User Preferences.
- X Subdivisions
- The number of spans in the x direction. Minimum of 3, creating two face loops.
- Y Subdivisions
- The number of spans in the y direction.
- Size
- The length of the sides of the grid.
Monkey
This is a gift from old NaN to the community and is seen as a programmer’s joke or “Easter Egg”. It creates a monkey’s head once you press the Monkey button. The Monkey’s name is “Suzanne” and is Blender’s mascot. Suzanne is very useful as a standard test mesh, much like the Utah Tea Pot or the Stanford Bunny.
Add-ons
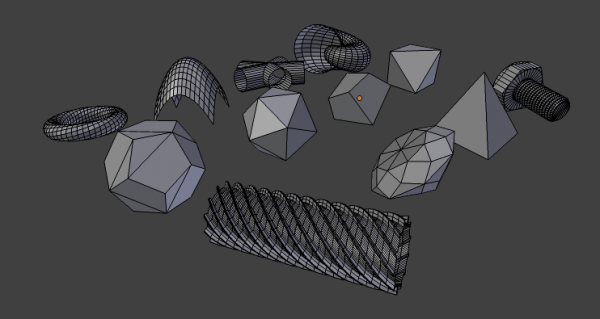
In addition to the basic geometric primitives, Blender has a constantly increasing number of script generated meshes to offer as pre-installed add-ons. These become available when enabled in the User Preferences' Add-ons section (filter by Add Mesh). Only a few are mentioned here:
- Landscape
- Adds a landscape primitive. Many parameters and filters appear in the Tool Shelf.
- Pipe Joints
- Adds one of five different pipe joint primitives. Radius, angle, and other parameters can be changed in the Tool Shelf.

