Doc:2.6/Manual/Vitals/Screencasts
Page status (reviewing guidelines)
Page reviewed and in good shape |
Blender Screencasts
Mode: All modes
Hotkey: AltF3
The shortcut AltF3 starts the screencast function. Screencasts will record your actions over time either as a video or sequence of image files. The type and location of the output is determined by the settings in the Output panel of the Render context window.
The default settings will generate a screencast consisting of a series of PNG images captured every 50 ms and stored in the /tmp folder. If you want to record a video, set the Output to one of the Movie File Formats supported by your system listed in the Output panel format menu. If you are unsure what video codecs your system supports, select AVI JPEG.
The FPS for video Screencasts and time between each Screenshot for an image series Screencast can be set from the System panel of the User Preferences window.
(See Fig: Options in the User Preferences Editor)
Audio support
Blender Screencast doesn't support audio recordings, so you will have to do it manually using other software, e.g. Audacity, in conjunction with Blender.
|
When you start Blender Screencasts, the header of the Info Window will change, and it will show you a button for stopping your capture.
Below, we show the normal header of the Info Window, when in normal Blender operation (See Fig: Info Window - Header - Normal Operation), and with the Stop button for the Screencast, when in Screencast Mode. (See Fig: Info Window - Header - Capture Stop Button).
(Note: The header Image was taken using Blender 2.61)
The only way to stop the Screencast
Pressing the Stop button in the header of the Info Window is the only way to stop the Screencast capture. If you press Esc, the shortcut will only work for operations performed in the Blender User Interface, (it will stop animations, playbacks and so on...), but will not work to stop Screencasts.
|
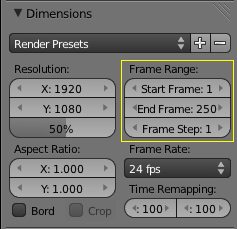
The frames are stored using a suffix added to their file name, where the suffix is composed of the numbers present in the fields for start and end frames, defined in the Frame Range of the Dimensions panel, Render context. (See Fig: Dimensions Panel - Frame Range - highlighted in yellow)
| Important: | |
| The configuration of the End frame, present in the Frame Range of the Dimensions Panel, will not stop your capture automatically. You will always have to stop the Screencast manually, using the Stop button. |
The Videos are generated internally in the same manner as the Screenshots, using the width and height of the Window you are working in. If you choose to capture to a Video file, Blender will have to pass those frames to a Video codec.
Warning: Some codecs limit the output width/height or the video quality.
- When you save your Screencast in an Image format, the Images will be saved using the entire Blender Window, with full width and height, and the quality of the Image will be defined by its type (i.e. JPG, PNG, and so on) and configuration (i.e. Slider quality of the .JPG format).
- When you save your Screencast in a Video format, it will be sent to a codec. Depending on the codec limitations, the resulting output Video could be scaled down. Furthermore, some combinations of Window width and height cannot be processed by certain codecs. In these cases, the Screencast will try to start, but will immediately stop. In order to solve this, choose another Window format and/or another codec.
Blender Window Dimension
There is a way to match the Blender Window dimensions with the Output Video File, achieving standard dimensions for the output of the Blender Screencast. (I.e. NTSC, HD, Full HD, etc). You can control the width and height of your Blender Window, starting Blender from a Command Line. To learn more about starting Blender from a command line, see the page about Blender Console Window.
Addon: 3D View:Screencast Keys
The community based Addon 3D View:Screencast Keys will show you the keys, combination of keys pressed and mouse clicks on the left bottom corner of your 3D screen every time you press a key or mouse button when capturing Screencasts. The community Addon comes with the default installation of Blender. The Image below shows the community Addon with its Tab Open. (See Fig: 3D View: Screencast Keys - Addon). To enable the Addon, open the User Preferences Editor Window CtrlAltU, go to the Addons Tab, and go to the 3D View Addons. Just click on the checkbox (Highlighted in yellow) to enable the Addon.
Mode: All modes → Addon Enabled
Hotkey: Use N to show the Properties Panel → Screencast Keys Tab
Menu: View » Properties → Screencast Keys Tab
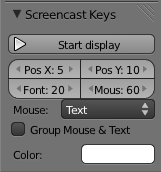
Once the Addon is enabled you will see the Screencast Keys section at the end of the list, on the Properties panel.
Description:
- Start display button: When you press this button, Blender will display any Key or combination of Keys you are pressing on the bottom left corner of the 3D window as floating text. If you press several times the same Key or combination of Keys, Blender will add an “ xn” tag at the end of the Keys or combination of Keys, indicating how many times you pressed the Key or combination of Keys.
- Stop display button: will stop Blender from displaying ScreenCast Keys.
- PosX: postion of the Screencast text on X axis.
- PosY: position if the Screencast text on Y axis.
- Font: Screencast text font size.
- Mouse: Screencast mouse icon size.
- Mouse display: In this drop down menu you can select how the Screencast text will be displayed
- Text: Will display the Keys pressed and Mouse buttons pressed as text.
- Icon: Will display the Mouse as an icon and Keys pressed as text.
- None: Will display info about Keys pressed only, without mouse button info.
- Group Mouse & Text Check box: When this is checked, Blender will display a box around the Screencast Text to make reading easy.
- Color: Lets you choose the color of the Screencast text.
| New Community Addon | |
| There is also currently an Addon for Blender 2.5/2.6 which will take a screenshot of any area you like at the click of a button, and proceed to upload it directly to Pasteall. The Addon currently has no development page, but it will be linked to here when it's finished. |


