利用者:Fade/Doc:2.6/format test4
The Grease Pencil
Mode: Object and Edit modes
Panel: Object/Mesh tools » Grease Pencil
The Grease Pencil is a tool that allows you to draw sketches and annotations in the 3D view and UV/Image editor windows using freehand strokes. The name is a tool can be linked back to traditional 2D paper and pencil workflows where rough “guideline” sketches were often used for planning and quickly communicating ideas. In digital fields, a similar workflow was used by drawing on monitors with wax crayons and pencils. It is often useful to be able to directly scribble on to a work in progress instead of having to do so in a separate place (i.e. another part of the window, or even in a different application altogether).
In addition to uses for animators in planning their poses and motion curves, the Grease Pencil can also be useful in a number of scenarios, including but not limited to:
- Planning topology and/or layout of models.
- Director’s shot review tool.
- “Whiteboard” and assignment review tool for educators.
- Enable the Grease Pencil by clicking Draw, Line, Poly or Erase from the Toolshelf (T). A new layer will be automatically added for you to draw on.
- A new layer can be added from the Grease Pencil Properties panel. This panel can also be used to customise the color, opacity and thickness of the pencil lines. Changes to these settings will affect all strokes on the current layer.
Grease Pencil sketches can be converted to editable geometry and used to aid the animation process.
Drawing with the Grease Pencil
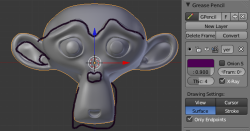
The Toolshelf provides a number of options for drawing with the Grease Pencil which are detailed below. The Toolshelf can be seen in the screenshot Grease Pencil Tool Shelf and Properties Panel above.
Sketching Sessions
A Sketching Session allows for rapid sketching with the Grease Pencil when multiple strokes are desired. With this option set, a sketching session starts when a Grease Pencil stroke is made. The type of session (Draw, Line, Poly, Erase) is determined by the first stroke made which can be done via hotkeys or the Toolshelf. Use Esc or ↵ Enter to exit the sketching session. Note that in a Erase Sketching Session both LMB ![]() or RMB
or RMB ![]() can be used once the session has started.
can be used once the session has started.
Drawing Settings
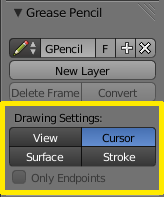
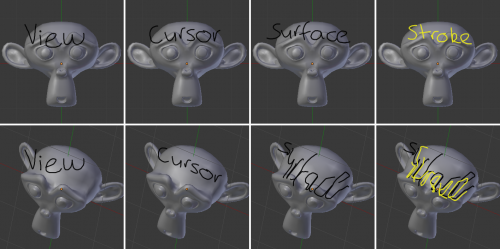
In the Grease Pencil Panel of the Properties shelf (N) there are several choices for Drawing Settings.
- View
- New strokes are locked to the view.
- Cursor (3D view only)
- New strokes are drawn in 3D-space, with position determined by the 3D cursor and the view rotation at the time of drawing. Cursor is available as an option in the UV/Image Editor but it functions identically to the View option.
- Surface (3D view only)
- New strokes are drawn in 3D-space, with their position projected onto the first visible surface.
- Stroke (3D view only)
- New strokes are drawn in 3D-space, with their position projected onto existing visible strokes. Note that strokes created with View are not in 3D-space and are not considered for this projection.
Enabling the Only Endpoints setting applies the drawing setting only to the endpoints of the stroke. The part of the stroke between the endpoints is adjusted to lie on a plane passing through the endpoints.
Sensitivity When Drawing
The default settings for the sensitivity of mouse/stylus movement when drawing have been set to reduce jitter while still allowing fine movement. However, if these are not appropriate they can be altered in User Preferences window » Editing » Grease Pencil.
- Manhattan Distance
- The minimum number of pixels the mouse should have moved either horizontally or vertically before the movement is recorded. Decreasing this should work better for curvy lines.
- Euclidean Distance
- The minimum distance that the mouse should have traveled before movement is recorded.
- Eraser Radius
- The size of the eraser “brush”.
- Smooth Stroke
- This turns on the post-processing step of smoothing the stroke to remove jitter. It is only relevant when not drawing straight lines. By default this is enabled. It should be noted that it can often cause “shrinking” of drawings, and may be turned off if the results are not desirable.
- Simplify Stroke
- This turns on the post-processing step of simplifying the stroke to remove about half of current points in it. It is only relevant when not drawing straight lines. By default this is disabled. As with Smooth Stroke, it can often cause “shrinking” of drawings, and loss of precision, accuracy and smoothness.
Additional Notes For Tablet Users
- The thickness of a stroke at a particular point is affected by the pressure used when drawing that part of the stroke.
- The “eraser” end of the stylus can be used to erase strokes.


