Doc:2.6/Manual/3D interaction/Sketching/Converting to geometry
Converting Sketches to Objects
In the 3D view, sketches on the active layer can be converted to geometry, based on the current view settings, by transforming the points recorded when drawing (which make up the strokes) into 3D-space. Currently, all points will be used, so it may be necessary to simplify or subdivide parts of the created geometry for standard use.
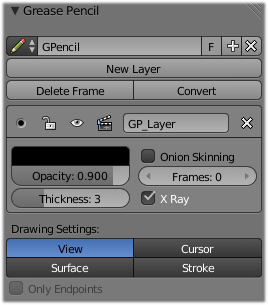
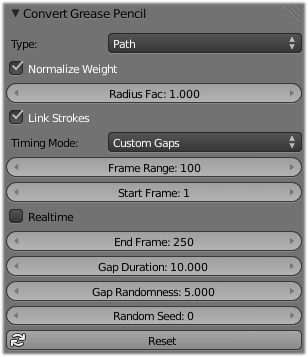
Sketches can currently be converted into curves, as proposed by the Convert Grease Pencil menu popped-up by the Convert button in the grease pencil properties
- Path will create NURBS 3D curves of order 2 (i.e. behaving like polylines).
- Bezier Curve will create Bezier curves, with free “aligned” handles (i.e. also behaving like polylines).
Why “polyline-like” curves?
To get by default curves following exactly the grease pencil strokes. If you want a smoothed curve, just edit it to get auto handles (for Bezier), or raise its order (for NURBS).
|
Converting to Mesh
If you want to convert your sketch to a mesh, simply choose first NURBS, and then convert the created curve to a mesh…
|
General Options
Stroke’s width will be used to set the curve’s control points’ radii and weights (not NURBS weights, but those used e.g. as goal by the softbody simulation…). The default behavior is to get strokes’ width (as defined in its settings – and which might have been modulated by the pen pressure), to multiply it by a given constant (0.1), and to assign it directly to weights. Radii get the same value scaled by the Radius Fac factor (e.g. with a 10.0 factor, a stroke width of 3 will give radii of 3.0…).
Normalize Weight (enabled by default) will scale weights value so that they tightly fit into the [0.0, 1.0] range.
All this means that with a pressure tablet, you can directly control the radius and weight of the created curve, which can affect e.g. the width of an extrusion, or the size of an object through a Follow Path constraint or Curve modifier!
Link Strokes (enabled by default) will create a single spline (i.e. curve element) from all strokes in active grease pencil layer. This especially useful if you want to use the curve as a path. All the strokes are linked in the curve by “zero weights/radii” sections.
Timing
Grease pencil now stores “dynamic” data, i.e. how fast they were drawn. When converting to curve, those data can be used to create an Evaluate Time F-Curve (in other words, a path animation), that can be used e.g. to control another object’s position along that curve (Follow Path constraint, or, trough a driver, Curve modifier). So this allows you to reproduce your drawing movements.
All those “timing” options need Link Stroke to be enabled – else they would not make much sense!
Please note that if you use this tool with older grease pencil's strokes (i.e. some without any timing data), you will only have a subset of those options available (namely, only linear progression along the curve over a specified range of frames…).
- Timing Mode
- This control let you choose how timing data are used.
- No Timing
- Just create the curve, without any animation data (hence all following options will be hidden)…
- Linear
- The path animation will be a linear one.
- Original
- The path animation will reflect to original timing, including for the “gaps” (i.e. time between strokes drawing).
- Custom Gaps
- The path animation will reflect to original timing, but the “gaps” will get custom values. This is especially useful if you have very large pauses between some of your strokes, and would rather like to have “reasonable” ones!
- Frame Range
- The “length” of the created path animation, in frames. In other words, the highest value of Evaluation Time.
- Start Frame
- The starting frame of the path animation.
- Realtime
- When enabled, the path animation will last exactly the same duration it took you do draw the strokes.
- End Frame
- When Realtime is disabled, this defines the end frame of the path animation. This means that the drawing timing will be scaled up or down to fit into the specified range.
- Gap Duration
- Custom Gaps only. The average duration (in frames) of each gap between actual strokes. Please note that the value entered here will only be exact if Realtime is enabled, else it will be scaled, exactly as the actual strokes’ timing is!
- Gap Randomness
- Only when Gap Duration is non-null. The number of frames actual gap duration can vary of. This allows the creation of gaps having an average well defined duration, yet keeping some random variations to avoid an “always the same” effect.
- Random Seed
- The seed fed to the random generator managing gaps duration variations. Change it to get another set of gaps duration in the path animation.
Example
Here is a simple “hand writing” video created with curves converted from sketch data:
And the blend file : ファイル:ManGreasePencilConvertToCurveDynamicExample.blend

