利用者:Dairin0d/BatchIdeas
目次
Batch operations / frame-of-reference tools:
Proof-of-concept
Starting from early 2015, we (dairin0d and moth3r) were brainstorming how certain aspects of Blender could be improved. Specifically, we were concerned with:
- Multiple-object UI
- Vector-editing UI
- High-level datablock management
- Coordinate systems
- Custom Workplane
- Bounding-box transform
- Advanced snapping
Fleshing out the vision for such features is practically impossible without a working prototype. So, being a developer/artist team, we set out to make one (well, two):
Batch Operations / Manager
Batch Transforms (Transform Utils)
Ideally, we would want to finish those prototypes before making any kind of feature proposal. But, seeing recent talks about the inclusion of coordinate systems ([1]) and multiple-object UI ([2], [3]), we believe we should participate in the discussion while it's still in the design stage. Perhaps Blender developers might benefit from the considerations outlined here? :-)
| Disclaimer | |
| The designs we came up with can hardly be considered optimal, in no small part due to some implementation specificity and the intimidating amount of options presented to a new user. Currently, the aim of this document is simply to share the ideas we found most useful while developing these proof-of-concept addons. |
Multiple-object UI
When working with multiple objects, how to display and edit a property that has multiple values? We came to the following conclusions:
Properties that have multiple different values should be displayed in a different way (e.g. in a different font, or tinted with different color).
Sometimes it might be desirable to consider values "equal" when they are within some tolerance from each other (for example, this is necessary for position/rotation of objects that have different parents).
Having access to various statistics is very useful in certain cases. One reason is precision editing; the other reason is the statistics' editing behavior (outlined below).
The user should be able to choose the statistic (s)he wants to see/edit, or even to display multiple statistics at once (side-by-side).
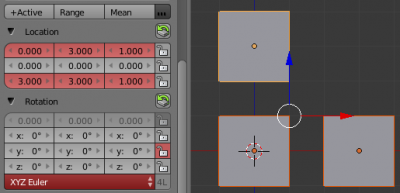
Numerical property statistics:
- Active: displays the value from the active object, but affects other objects in the selection in one of the following ways ("batch-modification modes"):
- Equal: all other values are set equal to the displayed value.
- Offset: when the value is changed, all other values are offset by the same amount.
- Proportional: when the value is changed, all other values are scaled by the same amount.
- Minimum: displays the minimal value; scales all the values towards the maximum.
- Maximum: displays the maximal value; scales all the values towards the minimum.
- Center: displays the midpoint between minimum and maximum; offsets all the values by the same amount.
- Range: displays the range (difference between maximum and minimum); scales all the values towards the center.
- Mean: displays the average of the values; offsets all the values by the same amount.
- Standard deviation: the number itself doesn't mean much to non-statisticians, but this is a useful mode to "scale" the values towards the mean.
- Median: displays the median value; offsets all the values by the same amount. Unlike center and mean, the median value is guaranteed to be one of the original values.
Boolean property statistics (also applicable to individual entries of ENUM_FLAG properties):
- All: displays True when all values are True; sets all the values to the inverse of the currently displayed value.
- Any: displays True when at least one value is True; sets all the values to the inverse of the currently displayed value.
- Majority: displays True when at least half of the values are True; sets all the values to the inverse of the currently displayed value.
Enum (single-choice) property statistics:
- Mode: displays the most-frequently-used value; sets all the values to the currently displayed value.
String property statistics:
- Pattern: displays/edits a (pseudo) regular-expression pattern that matches the original strings (probably just the longest common substring); useful for batch-renaming objects that have some standard naming scheme.
Vector-editing UI
This was inspired by the related feature in Modo. When dealing with multi-component ("vector") values (position, rotation, scale, etc.), it's often useful to be able to edit multiple components simultaneously. We came up with the following approach:
By default, editing one component does not affect others ("INDEPENDENT" mode).
Editing a component with SHIFT modifier will offset other components by the same amount ("OFFSET" mode).
Editing a component with ALT modifier will scale other components by the same amount ("PROPORTIONAL" mode).
Editing a component with CTRL modifier (or SHIFT+ALT, due to specifics of current Blender behavior) will set other components to the same value ("EQUAL" mode).
Each component has a "uniformity lock" property which defines whether this component is affected by vector operations. By default all components are not locked (i.e. all components are affected).
Vector values take at least several lines of vertical space, so it's useful to be able to fold them when they are rarely used.
The name of the vector property, instead of being just a label, could present a popup menu with extra options, for example:
- Copy: copy vector components to OS clipboard (in comma-separated, tab-separated or some other format)
- Paste: replace vector components with the ones from clipboard
- Math paste: combine the current and clipboard values using a math expression (e.g. "v0+v1", "x1-x0, y1-y0, z1-z0", or even swizzle "z1, x1, y1")
- Apply (bake): shortcuts for Apply Position / Apply Rotation / Apply Scale operators
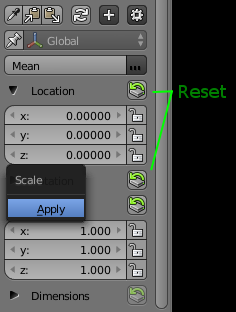
It's also useful to have a quick way to reset the vector's components to their default value (e.g. 0,0,0 for position or 1,1,1 for scale). We found it convenient to have a "reset" button on the same line as the vector property name:
- By default, clicking on this button resets all components irrespective of their "uniformity lock" state.
- Ctrl+clicking on this button resets only the "not locked" components.
- Shift+clicking on this button resets all related vector properties, not just the current one (e.g. reseting position in this way will also reset rotation and scale).
High-level datablock management
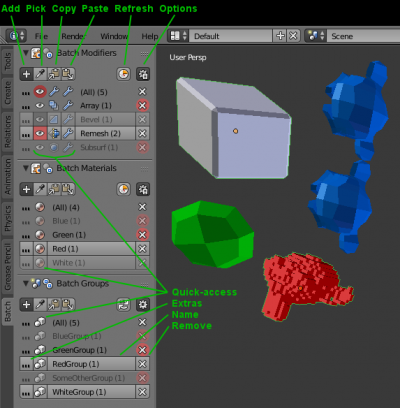
In moth3r's workflow, it's often desirable to have a general overview of what modifiers/materials/groups are used in the scene, as well as the ability to manage them. After some number of iterations, this is the design we have at this point:
Each datablock manager shares a more-or-less standard layout:
- Header: displays current modes of behavior (e.g. filter mode, paste mode -- see below).
- Toolbar: contains certain action buttons (Add, Pick, Copy, Paste -- see below) and options (as a popup menu).
- Item table: for N databloks displays a table of N+1 rows of datablock-manipulation buttons. The first (top) row is a special case and affects all the active datablocks.
The filter mode determines what items (modifiers/materials/etc.) will be displayed in the table:
- Selection - only the items present in the selection.
- Visible - only items present in the visible objects, i.e. non-hidden and in the currently visible layer(s).
- Layer - only items present in the objects in the currently visible layer(s).
- Scene - only items present in the objects in the current scene.
- File - all the items in the whole .blend file.
By default, the buttons in the table affect only the selected objects; but if no objects are selected, the buttons will affect all the objects defined by the filter mode.
To have a quick way of transfering modifiers/materials/groups/etc. between objects, the following actions are provided:
- Copy: copies the corresponding datablocks from the active object to datablock-specific clipboard.
- Paste: applies the contents of datablock-specific clipboard to the selected/filtered objects, in one of the following ways ("paste modes"):
- Override: overrides each object's datablocks with the contents of the clipboard.
- Add: adds the contents of the clipboard to each object (leaving the existing datablocks intact).
- Filter: removes from each object the datablocks that are not present in the clipboard.
- Pick: allows the user to visually pick the object which (s)he wants to copy datablocks from; the copied datablocks are also automatically applied to the selected/filtered objects.
The Add action allows to add to the selected/filtered objects a datablock not currently present in the item table. In the case of real datablocks (materials, groups) it also presents an option to create a new datablock.
The item table is populated with datablocks detected by the current filter mode. To affect multiple datablocks in one operation, there is an extra row (named "(All)" and located at the top of the table); by default these operations apply to all the rows, but the user can also exclude certain rows by "deselecting" them.
Row selection: selected rows are displayed in full color, and deselected rows are displayed as greyed-out.
- Shift+clicking on a datablock's name will toggle its selected state.
- Shift+Ctrl+clicking on a datablock's name will also set all other rows to the inverse of this row's selected state.
- Shift+clicking on the "(All)" row will toggle the selected state of all the other rows
- Shift+Ctrl+clicking on the "(All)" row will (de)select all the other rows.
The items present in the selected objects are displayed as "embossed" rows, and items not present in the selected objects are displayed as "flat" rows.
Selection synchronization: moth3r found it useful to have an option to synchronize item table selection with object selection (i.e. selecting some objects will also select the corresponding datablocks' rows in the table, and selecting some rows will select the corresponding objects in the scene).
Row layout:
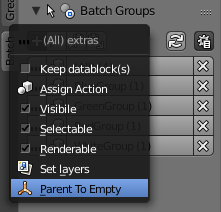
- Extras: a popup menu with the list of all actions/buttons.
- Datablock-related actions: zero or more buttons with datablock-specific functionality. The list of these quick-access buttons is customizable. Examples:
- "Keep this datablock even if it has no users" toggle.
- Assign Action menu (see below).
- Modifier-use toggles (show in viewport, use in render, etc.).
- "Apply modifier" button.
- Datablock name: a button that displays the name of the datablock and its number of users (within the range of objects specified by the filter mode).
- Simple click will select all objects that have this datablock.
- Ctrl+click allows the user to rename the datablock (e.g. directly in the table or in a popup dialog). In the case of the "(All)" row, a batch-renaming pattern (e.g. longest commong substring) will be calculated.
- Alt+click and Alt+Ctrl+click will invoke an assign action (see below).
- Object-related actions: zero or more buttons with object-related functionality. The list of these quick-access buttons is customizable. Examples:
- "Restrict viewport visibility" toggle: sets viewport visibility for the selected/filtered objects with this datablock.
- "Restrict viewport selection" toggle: sets selectability for the selected/filtered objects with this datablock.
- "Restrict rendering" toggle: enables/disables rendering of the selected/filtered objects with this datablock.
- Set layers: allows the user to batch-specify the layers for the selected/filtered objects with this datablock.
- Parent to Empty: reparents the selected/filtered objects with this datablock to a new Empty object (named the same as the datablock). This is useful for exporting scenes to external software that supports only hierarchical grouping.
- Remove: a button for removing the datablock. If attempts to remove the datablock would do nothing (e.g. when the datablock is not present in the selected/filtered objects), it will be displayed in red color.
- Simple click will remove the corresponding item from the selected/filtered objects.
- Ctrl+click will apply this operation globally (i.e. to all objects in the file); as the result, the corresponding datablock(s) will have no users.
- Alt+click will purge (delete) the item from the .blend file completely.
Since the toggles in the table can display information about multiple items/objects, they are shown in red color when some values are different.
As a general rule, holding Ctrl while clicking on a button will perform the corresponding action globally (for all objects in the file).
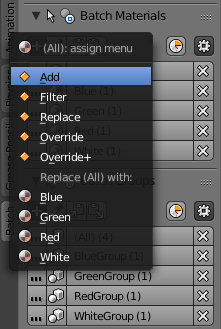
Assign actions "assign" the corresponding datablock(s) from the table to the selected/filtered objects. There are 4 main types of assign actions:
- Add: makes sure that each selected/filtered object has at least one instance of the given datablock(s). In terms of sets, this is the "union" operation.
- Filter: makes sure that each selected/filtered object has only instances of the given datablock(s). In terms of sets, this is the "intersection" operation.
- Replace: replaces one set of datablocks with another set of datablocks. There are 2 variants:
- Replace: replaces datablocks of all selected rows with the datablock of the current row.
- Replace with: replaces the datablock of the current row with the datablock the user chooses from a menu.
- Override: for each selected/filtered object, overrides its datablocks with the given datablock(s).
- Override+: applicable only in the case of materials; the difference from Override is that Override+ does not remove material slots, if there are more of them than necessary.
Finally, for high-level datablock management, it is very useful to have the following options:
- Purge unused: delete all datablocks with 0 users (optionally even the ones with fake users).
- Merge identical: replace all the identical datablocks with the one that has the greatest number of users and/or the shortest name (for the cases like "Material", "Material.001", "Material.002").
A design note: due to so many options and so little screen-space estate, we saw no other choice than to cram as many functions into one button as possible (thus all the various modifier+click combinations), and to make the list of the buttons customizable.
Coordinate systems
Custom coordinate systems (CS) are an invaluable tool for precision editing and are very useful in certain positioning/alignment situations.
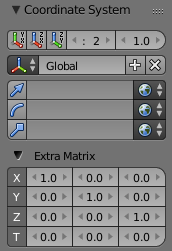
In the most general case, a coordinate system can be defined both via 3D-object-like aspects (position, rotation, scale) and via "3 axes + origin" transformation matrix.
The most useful property of object-like aspects is that they can be taken from actual objects, bones and other 3D entities. When an arbitrarily-defined set of axes is necessary, an extra transformation matrix comes in handy.
Besides the typical "inertial frame of reference" behavior, the following variants can be also useful:
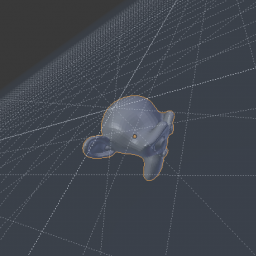
- "Projection" coordinate systems -- for positioning objects and elements in screen-space coordinates, even if the camera/lamp/3D-view is in perspective mode.
- "Contextual" coordinate systems -- for mass manipulation of objects and elements along individual axes, instead of axes of some global coordinate system.
While some set of predefined CS should be provided by default, the user should also be able to create, manipulate and delete his/her own CS. We consider the following options of creating CS to be useful:
- make a copy of the default (global/world) CS
- make a copy of the current CS
- bake current CS into a new coordsystem's extra matrix
- bake the 3D manipulator's position and orientation into a new coordsystem's extra matrix
- bake the workplanes's frame of reference into a new coordsystem's extra matrix
- a visual way to define a coordinate system (as seen, for example, in SketchUp)
When it comes to customizing a CS, it's useful to have separate options for position, rotation and scale, as well the ability to explicitly manipulate the extra transformation matrix.
The position, rotation and scale components of CS may be defined in one of the following ways:
- General:
- Global: global (world / scene / absolute) coordinate system.
- Basis: a "contextual" CS; in this mode, the "raw" position/rotation/scale values (before any constaints and transformations) will be displayed and edited in the UI (i.e., these are the values displayed by Blender in the Transform panel as of 2.73).
- Parent: a "contextual" CS; the parent coordinate system of each individual object/bone (coincides with Global if there is no parent).
- Local: a "contextual" CS; behaves as Active in edit modes and as Parent in non-edit modes.
- Individual: a "contextual" CS; the coordinate system of each individual object/bone (useful for transforming objects around their local axes).
- Active: the coordinate system of the active object (coincides with Global if there is no active object).
- Object: the coordinate system of the specified object/bone (if no object is specified, then active one is used).
- Camera: the "projection" coordinate system of the specified camera (or active camera, if not specified).
- View: the "projection" coordinate system of the active 3D view.
- Workplane: the workplane's coordinate system.
- Position-specific:
- Cursor: use 3D cursor position as the coordsystem's origin.
- Average: use average position of the selection as the coordsystem's origin.
- Center: use center of the selection as the coordsystem's origin.
- Min: use minimal coordinate of the selection as the coordsystem's origin.
- Max: use maximal coordinate of the selection as the coordsystem's origin.
- Pivot: use current manipulator position as the coordsystem's origin.
- Rotation-specific:
- Normal: use normal to calculate coordsystem's orientation.
- Gimbal: use gimbal axes to calculate coordsystem's orientation.
- Orientation: take coordsystem's orientation from the specified transform orientation (if not specified, then current manipulator orientation will be used).
- Scale-specific:
- Range: use XYZ range of selection's positions as the XYZ scale of the coordinate system.
- Deviation: use XYZ deviation of selection's positions as the XYZ scale of the coordinate system.
For manipulating the extra transformation matrix, the following options might be also useful:
- Quick reseting of the individual X/Y/Z/T vectors to their default values
- Calculating an X/Y/Z/T position from 3D manipulator, cursor or active object/bone
- Calculating an X/Y/Z direction from 3D manipulator or active object/bone
Ideally, if Blender supported full-fledged coordinate systems, the 3D Manipulator would be just a special-purpose CS, and the Transform Orientations would be obsolete.
With regards to the display of coordinates in the Transform panel: by default, they should be displayed in the current coordinate system, but choosing an independent coordinate system can also be useful.
Custom Workplane
Examples of workplanes can be seen in Modo and Fusion 360. They are useful for drawing (co)planar sketches, aligning/projecting objects and other operations that require custom "ground plane".
Fusion 360 supports arbitrary number of finite-size workplanes, while Modo uses a global infinite workplane. In Blender, the "snapping" functionality of workplanes can be, in principle, emulated using ordinary meshes, but dedicated workplanes can offer some extra features and conveniences:
- unlimited size
- ability to rotate in 90-degree increments to "align" to current view direction
- cartesian and polar grids (for snapping or simply as visual guides)
- workplane-specific alignment/construction options (a good example can be seen here: [4])
Bounding-box transform
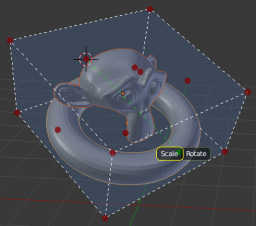
As the name implies, this feature is useful for rotating/scaling the selection around one of its bounding-box corners or midpoints. So far, the most convenient behaviour we have found is this:
When bounding-box transform is invoked, a bounding box in the coordinate system of 3D manipulator is calculated and displayed. The user can pick one of the corners, edges or face centers of the box as the point (s)he is going to drag; the opposite point of the box will then be the origin of the transformation operation. In the case of rotation the picked point or edge defines the locked axes of rotation. After the origin and the axis are defined, the choice of whether to scale or rotate is presented as a pie menu, with the previous choice being the default.
Advanced snapping
In our experience, snapping that is seen in certain operators (move, rotate, scale, knife, etc.) would be more useful if it supported the following modes:
- snapping to all types of objects (not just meshes); optional treatment of objects' origins and bounding-box corners/midpoints as snappable vertices
- simultaneous snapping to vertices, edges, faces and depth buffer (whichever is closer), with each of them togglable independently
- a mode in which snapping to edges/faces always snaps to their midpoints
- when aligning to normal, having an option to use nearest edge as a tangential (thus completely controlling the resulting orientation)
- the ability to choose what axis will be aligned to the normal/tangential
- an option to ignore geometry without visible polygons (e.g. objects with Wire or Bounds draw type)
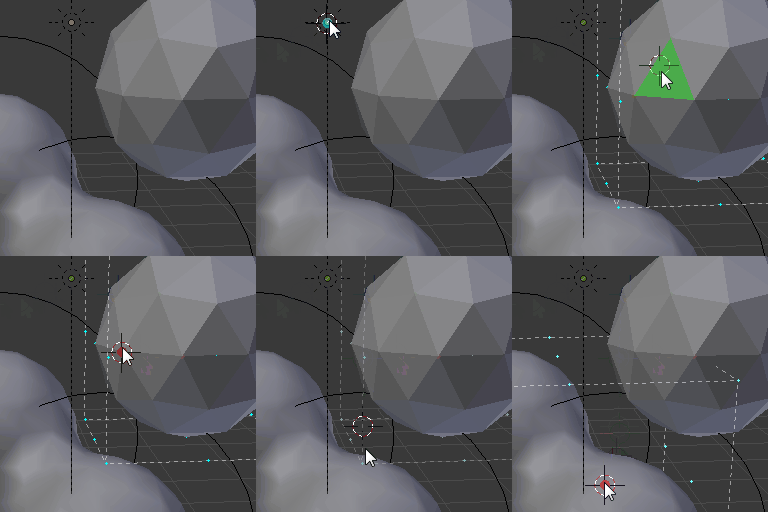
For entities like cursor or workplane, in many cases it would be convenient for them to stay attached to the objects they were snapped to, until the user attaches them to another object or detaches manually.
Reference points
Reference points' primary purpose is to serve as position and direction guidelines. dairin0d had an idea of a command-line snapping/aligning tool in which reference points would be used, but currently the idea is not sufficiently developed to evaluate its eventual usefulness (or uselessnes).
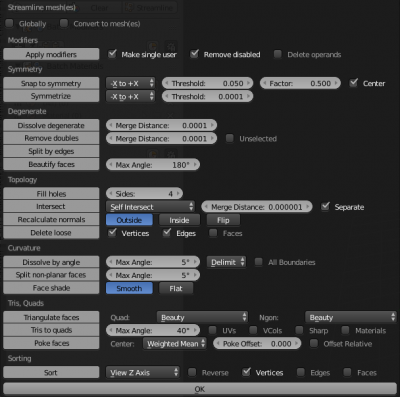
Streamline meshes
According to moth3r, this kind of all-in-one mesh processing operator is extremely useful in certain situations (e.g. preparing objects for export). It's probably not something Blender should have by default, but we decided to mention the idea anyway.
In any case, we hope this wall of text will prove to be at least in some way useful to Blender devs. Thanks for the reading! :-)
